Firstly let me acknowledge a few points worth nothing:
- Disk space monitoring should be performed by enterprise quality network monitoring software. (And yes these are often very expensive)
- The availability of adequate amounts of disk space is the responsibility of the people in charge of the IT infrastructure. (Not the DBAs)
- The process doing the monitoring should not be running on the machine it is monitoring. (If the monitored machine experiences a problem the monitor may not be able to notify anyone)
With all that being said you might be in the situation where you still need to know when SQL Server is running out of local disk space and the solution below provides you with a free means to achieve this. This is a dynamic solution which will be able to determine the disk space available of all the local drives visible to SQL Server.
Prerequisites:
- You will need to have an exchange server set up with SQL Server already capable of sending emails.
- I have set up a database called Admin to hold the below tables and SP. It is good practice to store this sort of thing in a purposely created database instead of using something like Master. You can use another database if you would prefer just change the references to Admin in the first and second script with a find and replace.
Setup:
There are 4 components to this process.
Tables:
DiskSpaceAlertThreshold, this table holds a red and a yellow value. These values relate to the percentage space available on the local drives. A good rule of thumb would be to ensure there is over 20% of space available. So disk space availability for the yellow alert is set to 20% and the red alert is set to 10%. (Yes I’ve borrowed the alert names from Star Trek)
StaffEmailList, this table contains the email address of the staff you want to be notified when disk space is running low. For this example Clark Kent of The Daily Planet is very interested in SQL server disk space. You can of course add additional staff email addresses to the table. To exclude a staff member from receiving an email, after they have been added to the table, set the active flag to zero.
Store Procedure:
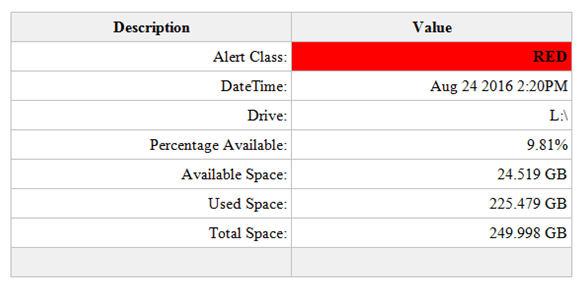
LowDiskSpaceAlert, this store procedure contains all the logic to determine what percentage of disk space is available. It also creates the HTML table used in the email to display the alert results and calls for the email to be sent.
N.B. You will need to change the profile named in the stored procedure to match an email account profile available within your SQL Server. Simply change the value of @profileName before executing the script.
SET @profileName = 'SQL Report'
An example of the HTML table sent as part of the email:
Job:
LowDiskSpaceAlert, this job simply runs the LowDiskSpaceAlert stored procedure every 10 minutes. You can change the schedule as you wish.
Create Tables and SP:
USE [Admin]
GO

/****** Object:  Table [dbo].[DiskSpaceAlertThreshold]    Script Date: 09/23/2016 18:46:29 ******/
SET ANSI_NULLS ON
GO

SET QUOTED_IDENTIFIER ON
GO

SET ANSI_PADDING ON
GO

CREATE TABLE [dbo].[DiskSpaceAlertThreshold] (
	[DiskSpaceAlertThresholdId] [int] IDENTITY(1, 1) NOT NULL
	,[AlertClass] [varchar](25) NULL
	,[ThresholdValue] [int] NULL
	,PRIMARY KEY CLUSTERED ([DiskSpaceAlertThresholdId] ASC) WITH (
		PAD_INDEX = OFF
		,STATISTICS_NORECOMPUTE = OFF
		,IGNORE_DUP_KEY = OFF
		,ALLOW_ROW_LOCKS = ON
		,ALLOW_PAGE_LOCKS = ON
		) ON [PRIMARY]
	) ON [PRIMARY]
GO

SET ANSI_PADDING OFF
GO

SET IDENTITY_INSERT [dbo].[DiskSpaceAlertThreshold] ON

INSERT [dbo].[DiskSpaceAlertThreshold] (
	[DiskSpaceAlertThresholdId]
	,[AlertClass]
	,[ThresholdValue]
	)
VALUES (
	1
	,N'Red'
	,10
	)

INSERT [dbo].[DiskSpaceAlertThreshold] (
	[DiskSpaceAlertThresholdId]
	,[AlertClass]
	,[ThresholdValue]
	)
VALUES (
	2
	,N'Yellow'
	,20
	)

SET IDENTITY_INSERT [dbo].[DiskSpaceAlertThreshold] OFF
/****** Object:  Table [dbo].[StaffEmailList]    Script Date: 09/23/2016 18:46:29 ******/
SET ANSI_NULLS ON
GO

SET QUOTED_IDENTIFIER ON
GO

SET ANSI_PADDING ON
GO

CREATE TABLE [dbo].[StaffEmailList] (
	[StaffEmailListId] [int] IDENTITY(1, 1) NOT NULL
	,[FirstName] [varchar](255) NULL
	,[LastName] [varchar](255) NULL
	,[EmailAddress] [varchar](255) NULL
	,[Active] [bit] NULL
	,PRIMARY KEY CLUSTERED ([StaffEmailListId] ASC) WITH (
		PAD_INDEX = OFF
		,STATISTICS_NORECOMPUTE = OFF
		,IGNORE_DUP_KEY = OFF
		,ALLOW_ROW_LOCKS = ON
		,ALLOW_PAGE_LOCKS = ON
		) ON [PRIMARY]
	) ON [PRIMARY]
GO

SET ANSI_PADDING OFF
GO

SET IDENTITY_INSERT [dbo].[StaffEmailList] ON

INSERT [dbo].[StaffEmailList] (
	[StaffEmailListId]
	,[FirstName]
	,[LastName]
	,[EmailAddress]
	,[Active]
	)
VALUES (
	1
	,N'Clark'
	,N'Kent'
	,N'cKent@thedailyplanet.com'
	,1
	)

SET IDENTITY_INSERT [dbo].[StaffEmailList] OFF
/****** Object:  StoredProcedure [dbo].[LowDiskSpaceAlert]    Script Date: 09/23/2016 18:46:33 ******/
SET ANSI_NULLS ON
GO

SET QUOTED_IDENTIFIER ON
GO

CREATE PROCEDURE [dbo].[LowDiskSpaceAlert]
AS
SET NOCOUNT ON

IF OBJECT_ID('tempdb..#DiskSpaceStats') IS NOT NULL
	DROP TABLE #DiskSpaceStats

IF OBJECT_ID('tempdb..#DriveAlert') IS NOT NULL
	DROP TABLE #DriveAlert

DECLARE @profileName AS VARCHAR(128)
DECLARE @thresholdRed AS INT
DECLARE @thresholdYellow AS INT
DECLARE @drive AS VARCHAR(5)
DECLARE @sql AS VARCHAR(MAX)
DECLARE @i AS INT
DECLARE @j AS INT

/*Change the name for your SQL Server email profile*/
SET @profileName = 'SQL Report'

CREATE TABLE #DriveAlert (
	AlertEntry VARCHAR(25)
	,AlertValue VARCHAR(25)
	)

SET @thresholdRed = (
		SELECT ThresholdValue
		FROM [Admin].[dbo].[DiskSpaceAlertThreshold]
		WHERE AlertClass = 'Red'
		)
SET @thresholdYellow = (
		SELECT ThresholdValue
		FROM [Admin].[dbo].[DiskSpaceAlertThreshold]
		WHERE AlertClass = 'Yellow'
		)

SELECT ROW_NUMBER() OVER (
		ORDER BY AvailableDriveSpacePercentage ASC
		) AS RowNo
	,ObservationDT
	,Drive
	,AvailableDriveSpacePercentage
	,AvailableDriveSpaceGB
	,UsedDriveSpaceGB
	,TotalDriveSpaceGB
INTO #DiskSpaceStats
FROM (
	SELECT DISTINCT GETDATE() AS ObservationDT
		,dovs.volume_mount_point AS Drive
		,CAST(((dovs.available_bytes / 1073741824.0) / (dovs.total_bytes / 1073741824.0)) * 100 AS NUMERIC(8, 2)) AS AvailableDriveSpacePercentage
		,CAST((dovs.available_bytes / 1073741824.0) AS NUMERIC(8, 3)) AvailableDriveSpaceGB
		,CAST(((dovs.total_bytes - dovs.available_bytes) / 1073741824.0) AS NUMERIC(8, 3)) AS UsedDriveSpaceGB
		,CAST((dovs.total_bytes / 1073741824.0) AS NUMERIC(8, 3)) TotalDriveSpaceGB
	FROM sys.master_files AS mf
	CROSS APPLY sys.dm_os_volume_stats(mf.database_id, mf.FILE_ID) AS dovs
	) AS r

SET @i = 1
SET @j = (
		SELECT MAX(RowNo)
		FROM #DiskSpaceStats
		)

WHILE @i <= @j
BEGIN
	SET @drive = (
			SELECT Drive
			FROM #DiskSpaceStats
			WHERE RowNo = @i
			)
	SET @sql = 'DECLARE @alert AS VARCHAR(6)
IF ' + CONVERT(VARCHAR(3), @thresholdYellow) + ' > (
		SELECT AvailableDriveSpacePercentage
		FROM #DiskSpaceStats
		WHERE Drive = ''' + @drive + '''
		)
BEGIN
SET @alert = ''YELLOW''
END
IF ' + CONVERT(VARCHAR(3), @thresholdRed) + ' > (
		SELECT AvailableDriveSpacePercentage
		FROM #DiskSpaceStats
		WHERE Drive = ''' + @drive + '''
		)
BEGIN
SET @alert = ''RED''
END
IF @alert IS NOT NULL
BEGIN
	SELECT AlertEntry
	,AlertValue
	FROM (
	SELECT ''Alert Class: '' AS AlertEntry
	,@alert AS AlertValue
	UNION ALL
	SELECT ''DateTime: '' AS AlertEntry
	,CONVERT(VARCHAR(30), ObservationDT)  AS AlertValue
	FROM #DiskSpaceStats
	WHERE Drive = ''' + @drive + '''
	UNION ALL
	SELECT ''Drive: '' AS AlertEntry
	,Drive AS AlertValue
	FROM #DiskSpaceStats
	WHERE Drive = ''' + @drive +
		'''
	UNION ALL
	SELECT ''Percentage Available: '' AS AlertEntry
	,CONVERT(VARCHAR(10), AvailableDriveSpacePercentage) + ''%'' AS AlertValue
	FROM #DiskSpaceStats
	WHERE Drive = ''' + @drive + '''
	UNION ALL
	SELECT ''Available Space: '' AS AlertEntry
	,CONVERT(VARCHAR(10), AvailableDriveSpaceGB) + '' GB'' AS AlertValue
	FROM #DiskSpaceStats
	WHERE Drive = ''' + @drive + '''
	UNION ALL
	SELECT ''Used Space: '' AS AlertEntry
	,CONVERT(VARCHAR(10), UsedDriveSpaceGB) + '' GB'' AS AlertValue
	FROM #DiskSpaceStats
	WHERE Drive = ''' + @drive + '''
	UNION ALL
	SELECT ''Total Space: '' AS AlertEntry
	,CONVERT(VARCHAR(10), TotalDriveSpaceGB) + '' GB'' AS AlertValue
	FROM #DiskSpaceStats
	WHERE Drive = ''' + @drive + '''
	UNION ALL
	SELECT '' '' AS AlertEntry
	,'' '' AS AlertValue
	) AS alert
END
'

	INSERT INTO #DriveAlert
	EXEC (@sql)

	SET @i = @i + 1
END

IF EXISTS (
		SELECT *
		FROM #DriveAlert
		)
BEGIN
	DECLARE @emailList AS VARCHAR(MAX)
	DECLARE @subjectMsg AS VARCHAR(255)
	DECLARE @tableHTML NVARCHAR(MAX)

	SET @emailList = (
			SELECT STUFF((
						SELECT '; ' + EmailAddress
						FROM [Admin].[dbo].[StaffEmailList]
						WHERE Active = 1
						FOR XML PATH('')
						), 1, 1, '') AS EmailAddress
			)
	SET @subjectMsg = (
			SELECT @@SERVERNAME
			) + ' Low Disk Space Alert'
	SET @tableHTML = N'<style>
	.tableFormat {
		width:80%;
		border:1px solid #C0C0C0;
		border-collapse:collapse;
		padding:5px;
	}
	.tableFormat th {
		border:1px solid #C0C0C0;
		padding:5px;
		background:#F0F0F0;
	}
	.tableFormat td {
		border:1px solid #C0C0C0;
		text-align:right;
		padding:5px;
	}
</style>' + N'<H1></H1>' + N'<table class="tableFormat" align="center">' + N'<tr><th>Description</th><th>Value</th></tr>' + CAST((
				SELECT td = AlertEntry
					,''
					,td = AlertValue
					,''
				FROM #DriveAlert
				FOR XML PATH('tr')
					,TYPE
				) AS NVARCHAR(MAX)) + N'</table>';

	DROP TABLE #DiskSpaceStats

	SET @tableHTML = REPLACE(@tableHTML, '<td> </td>', '<td bgcolor="#F0F0F0"> </td>')
	SET @tableHTML = REPLACE(@tableHTML, '<td>RED</td>', '<td bgcolor="red"><b>RED</b></td>')
	SET @tableHTML = REPLACE(@tableHTML, '<td>YELLOW</td>', '<td bgcolor="yellow"><b>YELLOW</b></td>')

	EXEC msdb.dbo.sp_send_dbmail @profile_name = @profileName
		,@recipients = @emailList
		,@body = @tableHTML
		,@subject = @subjectMsg
		,@importance = 'High'
		,@body_format = 'HTML';
END
GO
USE [msdb]
GO

/****** Object:  Job [LowDiskSpaceAlert]    Script Date: 09/23/2016 19:03:39 ******/
BEGIN TRANSACTION

DECLARE @ReturnCode INT

SELECT @ReturnCode = 0

/****** Object:  JobCategory [[Uncategorized (Local)]]]    Script Date: 09/23/2016 19:03:39 ******/
IF NOT EXISTS (
		SELECT NAME
		FROM msdb.dbo.syscategories
		WHERE NAME = N'[Uncategorized (Local)]'
			AND category_class = 1
		)
BEGIN
	EXEC @ReturnCode = msdb.dbo.sp_add_category @class = N'JOB'
		,@type = N'LOCAL'
		,@name = N'[Uncategorized (Local)]'

	IF (
			@@ERROR <> 0
			OR @ReturnCode <> 0
			)
		GOTO QuitWithRollback
END

DECLARE @jobId BINARY (16)

EXEC @ReturnCode = msdb.dbo.sp_add_job @job_name = N'LowDiskSpaceAlert'
	,@enabled = 1
	,@notify_level_eventlog = 0
	,@notify_level_email = 0
	,@notify_level_netsend = 0
	,@notify_level_page = 0
	,@delete_level = 0
	,@description = N'No description available.'
	,@category_name = N'[Uncategorized (Local)]'
	,@owner_login_name = N'PL\admin.ph'
	,@job_id = @jobId OUTPUT

IF (
		@@ERROR <> 0
		OR @ReturnCode <> 0
		)
	GOTO QuitWithRollback

/****** Object:  Step [RunLowDiskSpaceAlertSP]    Script Date: 09/23/2016 19:03:40 ******/
EXEC @ReturnCode = msdb.dbo.sp_add_jobstep @job_id = @jobId
	,@step_name = N'RunLowDiskSpaceAlertSP'
	,@step_id = 1
	,@cmdexec_success_code = 0
	,@on_success_action = 1
	,@on_success_step_id = 0
	,@on_fail_action = 2
	,@on_fail_step_id = 0
	,@retry_attempts = 0
	,@retry_interval = 0
	,@os_run_priority = 0
	,@subsystem = N'TSQL'
	,@command = N'[dbo].[LowDiskSpaceAlert]'
	,@database_name = N'Admin'
	,@flags = 0

IF (
		@@ERROR <> 0
		OR @ReturnCode <> 0
		)
	GOTO QuitWithRollback

EXEC @ReturnCode = msdb.dbo.sp_update_job @job_id = @jobId
	,@start_step_id = 1

IF (
		@@ERROR <> 0
		OR @ReturnCode <> 0
		)
	GOTO QuitWithRollback

EXEC @ReturnCode = msdb.dbo.sp_add_jobschedule @job_id = @jobId
	,@name = N'LowDiskSpaceAlertSchedule'
	,@enabled = 1
	,@freq_type = 4
	,@freq_interval = 1
	,@freq_subday_type = 4
	,@freq_subday_interval = 10
	,@freq_relative_interval = 0
	,@freq_recurrence_factor = 0
	,@active_start_date = 20160824
	,@active_end_date = 99991231
	,@active_start_time = 0
	,@active_end_time = 235959
	,@schedule_uid = N'a8831f35-e7a6-4880-bc2d-4d48aff82ff6'

IF (
		@@ERROR <> 0
		OR @ReturnCode <> 0
		)
	GOTO QuitWithRollback

EXEC @ReturnCode = msdb.dbo.sp_add_jobserver @job_id = @jobId
	,@server_name = N'(local)'

IF (
		@@ERROR <> 0
		OR @ReturnCode <> 0
		)
	GOTO QuitWithRollback

COMMIT TRANSACTION

GOTO EndSave

QuitWithRollback:

IF (@@TRANCOUNT > 0)
	ROLLBACK TRANSACTION

EndSave:
GO