Tag Archives: SQL Server

An icon depicting a calendar and clock

How to format SQL Server datetime as dd/mm/yyyy hh:mm:ss

If you are exporting the results of a SQL Server query to excel typically the recipient of the file wants the dates referenced in the format “dd/mm/yyyy hh:mm:ss” or “dd/mm/yyyy” not in the usual database format yyyy-mm-dd.

The below query formats the datetime as desired. Note that the letter m representing month is capitalised. If they are not the engine will interpret the lowercase letter m as minute so you will end up with days, minutes, years.

Also not that the letter h representing the hours is also capitalised. Capitalising the h makes the time output with the 24 hour format. Lowercase h will be 12 hour format. It is highly recommended not to use the lowercase h.

SELECT FORMAT(GETDATE(), 'dd/MM/yyyy HH:mm:ss', 'en-us')

If you only want the date and not time just remove the relevant text, i.e. just date dd/MM/yyyy or datetime without second dd/MM/yyyy HH:mm.

How to create a job that will test whether SQL Server database mail is working

The following script will create a job that will run every minute to test if database mail can be sent from a job scheduled to run by the Sql Server Agent.

Simply find and replace the email address below with the email address you want to target:

testoperator@mail.com

Then run the script.

The operator ‘Test Operator’ and job ‘MailTest’ will be created.

The job is disabled by default, enable it to begin testing.

When you are finished run the commented out section at the bottom of the script to remove the test operator and job.

If you have just setup database mail for the first time the SQL Server Agent will need to be restarted.

/*
FIND AND REPLACE

testoperator@mail.com

*/
USE msdb;
GO

EXEC dbo.sp_add_operator @name = N'Test Operator'
	,@enabled = 1
	,@email_address = N'testoperator@mail.com'
GO

USE [msdb]
GO

BEGIN TRANSACTION

DECLARE @ReturnCode INT

SELECT @ReturnCode = 0

/****** Object:  JobCategory [[Uncategorized (Local)]]    Script Date: 31/07/2019 11:35:43 ******/
IF NOT EXISTS (
		SELECT NAME
		FROM msdb.dbo.syscategories
		WHERE NAME = N'[Uncategorized (Local)]'
			AND category_class = 1
		)
BEGIN
	EXEC @ReturnCode = msdb.dbo.sp_add_category @class = N'JOB'
		,@type = N'LOCAL'
		,@name = N'[Uncategorized (Local)]'

	IF (
			@@ERROR <> 0
			OR @ReturnCode <> 0
			)
		GOTO QuitWithRollback
END

DECLARE @jobId BINARY (16)

EXEC @ReturnCode = msdb.dbo.sp_add_job @job_name = N'MailTest'
	,@enabled = 0
	,@notify_level_eventlog = 0
	,@notify_level_email = 3
	,@notify_level_netsend = 0
	,@notify_level_page = 0
	,@delete_level = 0
	,@description = N'No description available.'
	,@category_name = N'[Uncategorized (Local)]'
	,@owner_login_name = N'sa'
	,@notify_email_operator_name = N'Test Operator'
	,@job_id = @jobId OUTPUT

IF (
		@@ERROR <> 0
		OR @ReturnCode <> 0
		)
	GOTO QuitWithRollback

/****** Object:  Step [Step 1]    Script Date: 31/07/2019 11:35:44 ******/
EXEC @ReturnCode = msdb.dbo.sp_add_jobstep @job_id = @jobId
	,@step_name = N'Step 1'
	,@step_id = 1
	,@cmdexec_success_code = 0
	,@on_success_action = 1
	,@on_success_step_id = 0
	,@on_fail_action = 2
	,@on_fail_step_id = 0
	,@retry_attempts = 0
	,@retry_interval = 0
	,@os_run_priority = 0
	,@subsystem = N'TSQL'
	,@command = N'SELECT 1'
	,@database_name = N'master'
	,@flags = 0

IF (
		@@ERROR <> 0
		OR @ReturnCode <> 0
		)
	GOTO QuitWithRollback

EXEC @ReturnCode = msdb.dbo.sp_update_job @job_id = @jobId
	,@start_step_id = 1

IF (
		@@ERROR <> 0
		OR @ReturnCode <> 0
		)
	GOTO QuitWithRollback

EXEC @ReturnCode = msdb.dbo.sp_add_jobschedule @job_id = @jobId
	,@name = N'Job Schedule'
	,@enabled = 1
	,@freq_type = 4
	,@freq_interval = 1
	,@freq_subday_type = 4
	,@freq_subday_interval = 1
	,@freq_relative_interval = 0
	,@freq_recurrence_factor = 0
	,@active_start_date = 20190731
	,@active_end_date = 99991231
	,@active_start_time = 0
	,@active_end_time = 235959
	,@schedule_uid = N'f0741db6-488e-44da-8f5e-a3f0ed13835e'

IF (
		@@ERROR <> 0
		OR @ReturnCode <> 0
		)
	GOTO QuitWithRollback

EXEC @ReturnCode = msdb.dbo.sp_add_jobserver @job_id = @jobId
	,@server_name = N'(local)'

IF (
		@@ERROR <> 0
		OR @ReturnCode <> 0
		)
	GOTO QuitWithRollback

COMMIT TRANSACTION

GOTO EndSave

QuitWithRollback:

IF (@@TRANCOUNT > 0)
	ROLLBACK TRANSACTION

EndSave:
GO

/*
REMOVE OPERATOR AND JOB
*/
/*
USE msdb;
GO

EXEC sp_delete_operator @name = 'Test Operator';

EXEC sp_delete_job @job_name = N'MailTest';

GO
*/


How to monitor file stats using a batch script

The use case for this batch script is to monitor SQL Server files using Windows task manager scheduled to run the file every 5 minutes. The batch scripts gathers the stats of  every file in a referenced directory. The script can obviously be adapted however to something that suits your specific needs.

Note: Running this script against the C drive on a laptop took 15 minutes and produced a text file that was around 50 Mb. The script is best utilized in scenarios such as monitoring file sizes on drives used by applications that do not generate thousands of files, e.g. backup directories etc.

There is two scripts presented below. The first is the simpler of the two scripts, it just records the file stats of a single directory.

Directions for use:

Take either script below and save it as a batch file called FileStatsLogger.

Two variables need to be updated to use the script:

“LogPath=C:\Log\” Change C:\Log\ to another directory if you want the output file written somewhere else.

“ScanDir=C:\FolderToScan\” Change C:\FolderToScan\ to the directory you want to gather file stats from.

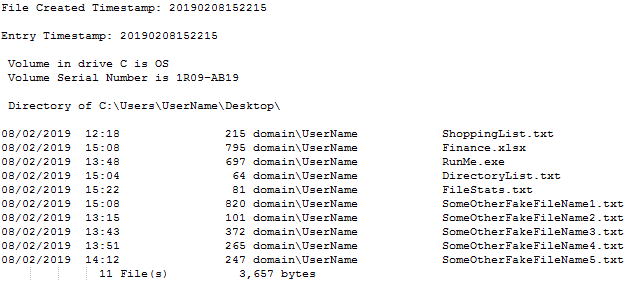
The file that will be created, FileStats, will record the following information:

  • A timestamp of when the batch script was run
  • A reference to each parent directory
  • Every file creation date and time
  • File size in Kbs
  • Every file owner
  • The name of the file
  • How many files are in the directory and their collective size

The output file will look like this when opened.

FileStats

Each time the script is run it will update the text file FileStats.

@ECHO OFF

REM SET TIMESTAMP VARIABLE
SET Timestamp=%date:~6,8%%date:~3,2%%date:~0,2%%time:~0,2%%time:~3,2%%time:~6,2%

REM SET FILE LOGGING VARIABLES
SET "LogPath=C:\Log\"
SET "LogFileName=FileStats.txt"
SET "Log=%LogPath%%LogFileName%"
SET "ScanDir=C:\FolderToScan\"

REM CREATE FILE IF DOES NOT EXIST
IF NOT EXIST "%Log%" ECHO File Created Timestamp: %Timestamp% > "%Log%"

REM TIMESTAMP ENTRY
ECHO/ >> "%Log%"
ECHO Entry Timestamp: %Timestamp% >> "%Log%"
ECHO/ >> "%Log%"

REM SCAN DIRECTORY
DIR /a %ScanDir% >> %Log%

To scan multiple directories create a text file called DirectoryList and populate the the file with the directories you want to scan. Each directory on a new line, for example:

L:\
D:\
T:\

It is assumed the directory list text file will be kept in the same directory as the batch file FileStatsLogger but you should add the full file path to were DirectoryList.txt is referenced in the script to avoid any problems.

Note: L, D & T are the naming convention for the Log, Data and tempdb drive names for SQL Server. These are just drive letters examples but you can be more specific like C:\Users\UserName\Desktop\ just be sure to include the backslash at the end of the reference.

This script will create a new log file for each day as the files can be large. The filename will following the format FileStats_YYYYMMDD.

As before you will have to:

“LogPath=C:\FileStats\” Change C:\Log\ to another directory if you want the output file written somewhere else.

“ScanDir=C:\FileStats\DirectoryList.txt” Change to the directory you will store DirectoryList.txt.

Though it is recommended you keep everything in a folder like this (potentially writing the FileStats log to a directory off of the host server):

FileStatsDirectory

@ECHO OFF

REM SET TIMESTAMP VARIABLES
for /f "tokens=2 delims==" %%G in ('wmic os get localdatetime /value') do set datetime=%%G
SET "dd=%datetime:~6,2%"
SET "mth=%datetime:~4,2%"
SET "yyyy=%datetime:~0,4%"
SET "hh=%time:~0,2%"
SET "mm=%time:~3,2%"
SET "ss=%time:~6,2%"

SET "FileNameDate=%yyyy%%mth%%dd%"
SET "Timestamp=%yyyy%%mth%%dd%%hh%%mm%%ss%"

REM SET FILE LOGGING VARIABLES
SET "LogPath=c:\FileStats\"
SET "LogFileName=FileStats_%FileNameDate%.txt"
SET "Log=%LogPath%%LogFileName%"


REM CREATE FILE IF DOES NOT EXIST
IF NOT EXIST "%Log%" ECHO File Created Timestamp: %Timestamp% > "%Log%"

REM TIMESTAMP ENTRY
ECHO/ >> "%Log%"
ECHO Entry Timestamp: %Timestamp% >> "%Log%"
ECHO/ >> "%Log%"

REM READ DIRECTORY LIST AND SCAN EACH DIRECTORY REFERENCED 
FOR /f "tokens=*" %%x IN (c:\FileStats\DirectoryList.txt) DO DIR /a /s /q "%%x" >> %Log%

Finally you can create a Windows task scheduler task to run the script at an interval that suits your needs.

The description of the task could be something along the lines of:

This task runs the batch script “FileStatsLogger” every 5 minutes which
logs the stats for each file of each directory referenced in the file
Directory List. The stats are recorded in the FileStats txt file.
All resources related to this tasks are contained in the FileStats directory.

How to perform incremental database file shrinking on SQL Server

First off you don’t ever shrink a database file unless you known it won’t need the space back again. (There’s some caveats to that statement but it mostly holds true) If that’s the space the file has consumed generally that’s the space the file needs. Shrinking just means the file will grow again and SQL Server will take a performance hit while it does that. You’re better off just adding the additional disk space.

If you need to perform a shrink and you’re worried about how long it will take and the performance impact it will have you can perform shrinks in small chunks. This is good practice particularly in a production transactional (OLTP) system as small increments  can make continuous, incremental progress, instead of trying to shrink by a large amount in one command. This makes it easier to shrink a database that must be shrunk by a large amount, and allows the shrink process to interrupted without losing all progress.

The script below can be used to shrink a database file in small increments until it reaches a target free space size based on the current free space percentage.

Simply provide as variables the database name, whether the file to be shrunk is the rows or log file, how much space to be left in terms of a percentage and how many shrinks you wish to perform. If you only want to truncate the file set the flag to 1 and you can ignore providing values for the number of shrinks or the percentage of space to keep.

(TruncateOnly means releasing all free space at the end of the file to the operating system without performing any page movement inside the file)

The script will determine given the number of shrinks and the target size what the shrink increment should be. It will then loop and execute the DBCC SHRINKFILE command to shrink the database file by the calculated increment until it reaches the target free space.

Progress updates are written to the global temp table ##DbStats so you can query this table during the shrink to see how far along the process is. The query to perform this check is commented out at the bottom of the script.

SET NOCOUNT ON;

DECLARE @DbName SYSNAME;
DECLARE @DbFileName SYSNAME;
DECLARE @RowsOrLog VARCHAR(4);
DECLARE @SpaceToLeavePercentage VARCHAR(2);
DECLARE @Sql VARCHAR(MAX);
DECLARE @ShrinkSql VARCHAR(MAX);
DECLARE @NumberOfShrinks INT;
DECLARE @FreeMbRounded INT;
DECLARE @TargetFreeMbRounded INT;
DECLARE @ShrinkIncrementInMb INT;
DECLARE @ShrinkToInMb INT;
DECLARE @TruncateOnly BIT;

/*SET USER INPUT VARIABLES*/
SET @DbName = '_DatabaseName_';
SET @RowsOrLog = 'Rows';
SET @SpaceToLeavePercentage = '10';
SET @NumberOfShrinks = 1;

--SET @TruncateOnly = 1;
IF OBJECT_ID('tempdb..##DbStats') IS NOT NULL
BEGIN
	DROP TABLE ##DbStats
END;

IF OBJECT_ID('tempdb..#Check') IS NOT NULL
BEGIN
	DROP TABLE #Check
END;

CREATE TABLE ##DbStats (
	Id_DbStats INT NOT NULL IDENTITY(1, 1) PRIMARY KEY
	,LogicalName SYSNAME
	,FreeMbRounded INT
	,TargetFreeMbRounded INT
	,DiffMb INT
	,ShrinkIncrementInMb INT
	,NumberOfShrinksLeft INT
	);

CREATE TABLE #Check (
	Id_DbStats INT NOT NULL IDENTITY(1, 1) PRIMARY KEY
	,LogicalName SYSNAME
	,FreeMbRounded INT
	,TargetFreeMbRounded INT
	,DiffMb INT
	,ShrinkIncrementInMb INT
	,NumberOfShrinksLeft INT
	);

IF @SpaceToLeavePercentage IS NULL
BEGIN
	SET @SpaceToLeavePercentage = '10'
END

SET @Sql = '
USE ' + QUOTENAME(@DbName) + ';
SELECT LogicalName
,FreeMbRounded
,TargetFreeMbRounded
,FLOOR(FreeMbRounded) - FLOOR(TargetFreeMbRounded) AS DiffMb
FROM (
SELECT NAME AS LogicalName
	,CAST(ROUND(CONVERT(DECIMAL(12, 1), (size - FILEPROPERTY(NAME, ''SpaceUsed'')) / 128.0), 0) AS INT) AS FreeMbRounded
	,CAST(ROUND(CONVERT(DECIMAL(12, 1),((((size - FILEPROPERTY(NAME, ''SpaceUsed'')) / 128.0) / 100.0) * ' + @SpaceToLeavePercentage + ')), 0) AS INT) AS TargetFreeMbRounded
FROM ' + QUOTENAME(@DbName) + '.sys.database_files 
WHERE type_desc = ''' + @RowsOrLog + '''
) AS a
';

INSERT INTO ##DbStats (
	LogicalName
	,FreeMbRounded
	,TargetFreeMbRounded
	,DiffMb
	)
EXEC (@Sql);

SET @TargetFreeMbRounded = (
		SELECT TargetFreeMbRounded
		FROM ##DbStats
		)
SET @DbFileName = (
		SELECT LogicalName
		FROM ##DbStats
		);

IF @TruncateOnly = 1
BEGIN
	SET @ShrinkSql = '
USE ' + QUOTENAME(@DbName) + ';

DBCC SHRINKFILE (
		N' + '''' + @DbFileName + '''' + '
		, 0
		, TRUNCATEONLY
		) WITH NO_INFOMSGS;
';

	EXEC (@ShrinkSql);
END
ELSE
BEGIN
	SET @ShrinkIncrementInMb = (
			(
				SELECT (FLOOR(MAX(FreeMbRounded)) - @TargetFreeMbRounded)
				FROM ##DbStats
				) / @NumberOfShrinks
			);

	UPDATE ##DbStats
	SET ShrinkIncrementInMb = @ShrinkIncrementInMb
		,NumberOfShrinksLeft = @NumberOfShrinks
	WHERE NumberOfShrinksLeft IS NULL;

	SELECT TOP 1 *
	FROM ##DbStats
	ORDER BY Id_DbStats DESC;

	IF @ShrinkIncrementInMb > 0
	BEGIN
		WHILE @NumberOfShrinks > 0
		BEGIN
			SET @FreeMbRounded = (
					SELECT FreeMbRounded
					FROM ##DbStats
					WHERE Id_DbStats = (
							SELECT MAX(Id_DbStats)
							FROM ##DbStats
							)
					);

			IF @TargetFreeMbRounded > (@FreeMbRounded - @ShrinkIncrementInMb)
			BEGIN
				SET @ShrinkToInMb = @TargetFreeMbRounded;
			END
			ELSE
			BEGIN
				SET @ShrinkToInMb = (@FreeMbRounded - @ShrinkIncrementInMb);
			END

			SET @ShrinkSql = '
USE ' + QUOTENAME(@DbName) + ';

DBCC SHRINKFILE (
		N' + '''' + @DbFileName + '''' + '
		,' + CONVERT(VARCHAR(12), @ShrinkToInMb) + '
		) WITH NO_INFOMSGS;
';

			EXEC (@ShrinkSql);

			SET @NumberOfShrinks = @NumberOfShrinks - 1;
			SET @Sql = '
USE ' + QUOTENAME(@DbName) + ';
SELECT LogicalName
,FreeMbRounded
,' + CONVERT(VARCHAR(255), @TargetFreeMbRounded) + '
,FLOOR(FreeMbRounded) - ' + CONVERT(VARCHAR(255), @TargetFreeMbRounded) + ' AS DiffMb
,' + CONVERT(VARCHAR(255), @ShrinkIncrementInMb) + '
,' + CONVERT(VARCHAR(255), @NumberOfShrinks) + '
FROM (
SELECT NAME AS LogicalName
	,CAST(ROUND(CONVERT(DECIMAL(12, 1), (size - FILEPROPERTY(NAME, ''SpaceUsed'')) / 128.0), 0) AS INT) AS FreeMbRounded
	,CAST(ROUND(CONVERT(DECIMAL(12, 1),((((size - FILEPROPERTY(NAME, ''SpaceUsed'')) / 128.0) / 100.0) * ' + @SpaceToLeavePercentage + ')), 0) AS INT) AS TargetFreeMbRounded
FROM ' + QUOTENAME(@DbName) + '.sys.database_files 
WHERE type_desc = ''' + @RowsOrLog + '''
) AS a
';

			INSERT INTO ##DbStats (
				LogicalName
				,FreeMbRounded
				,TargetFreeMbRounded
				,DiffMb
				,ShrinkIncrementInMb
				,NumberOfShrinksLeft
				)
			EXEC (@Sql);

			SELECT TOP 1 *
			FROM ##DbStats
			ORDER BY Id_DbStats DESC;
		END
	END
	ELSE
	BEGIN
		SELECT *
		FROM ##DbStats;
	END

	DROP TABLE ##DbStats
END;
		--DROP TABLE ##DbStats
		/*CHECK TO RUN IN ANOTHER SSMS WINDOW*/
		/*
SELECT TOP 1 Id_DbStats
	,LogicalName
	,FreeMbRounded
	,TargetFreeMbRounded
	,DiffMb
	,ShrinkIncrementInMb
	,NumberOfShrinksLeft
FROM ##DbStats WITH (NOLOCK)
ORDER BY Id_DbStats DESC;
/*
/*CHECK PROGRESS*/
/*
SELECT percent_complete AS PercentageComplete
	,start_time AS StartTime
	,STATUS AS CurrentStatus
	,command AS Command
	,estimated_completion_time AS EstimatedCompletionTime
	,cpu_time AS CpuTime
	,total_elapsed_time AS TotalElapsedTime
FROM sys.dm_exec_requests
WHERE Command = 'DbccFilesCompact'
*/
*/
/*
DROP TABLE ##DbStats
*/
*/


If you found this post helpful please like, comment and share.

How to tell if Virtual Machine backups are running full database backups on a SQL Server instance

Some Virtual Machine backup solutions use the SQL Server VSS writer service to make SQL Server database backups as part of the VM backup.

You may not have had visibility on this process so to confirm if this is happening in your environment open up SQL Server Management Studio (SSMS) then in Object Explorer right click on the instance name, click on new query and run the script below. 

This query looks for entries in the physical_device_name field of msdb.dbo.backupmediafamily that are not directory paths.

SELECT @@SERVERNAME AS ServerName
	,bs.backup_set_id AS BackupSetId
	,bs.database_name AS DbName
	,bs.backup_start_date AS BackupStartDate
	,bs.backup_finish_date AS BackupFinishDate
	,CAST(CAST(bs.backup_size / 1000000 AS INT) AS VARCHAR(14)) + ' ' + 'MB' AS [Size]
	,bs.[type] AS BackupType
	,CASE bs.[type]
		WHEN 'D'
			THEN 'Full Backup'
		WHEN 'I'
			THEN 'Differential Backup'
		WHEN 'L'
			THEN 'TLog Backup'
		WHEN 'F'
			THEN 'File or filegroup'
		WHEN 'G'
			THEN 'Differential file'
		WHEN 'P'
			THEN 'Partial'
		WHEN 'Q'
			THEN 'Differential Partial'
		END AS BackupTypeDescription
	,bmf.physical_device_name AS BackupFilePath
	,CAST(bs.first_lsn AS VARCHAR(50)) AS FirstLogSeqNo
	,CAST(bs.last_lsn AS VARCHAR(50)) AS LastLogSeqNo
FROM msdb.dbo.backupset AS bs WITH (NOLOCK)
INNER JOIN msdb.dbo.backupmediafamily AS bmf WITH (NOLOCK) ON bs.media_set_id = bmf.media_set_id
WHERE bs.[type] = 'D'
	AND bmf.physical_device_name NOT LIKE '%\%'
ORDER BY bs.database_name ASC
	,bs.backup_set_id ASC;


For the field BackupFilePath if you see GUID looking entries like {AQ8F5957-2804-4X05-9EE5-109EB87EBCAB}5 the VM backup is probably running full database backups on the SQL Server.

It might be time to review your recovery strategy as the VM backups could be covering the same ground as the SQL Server backups creating a lot of expensive redundancy due to unnecessary replication of work.

How to schedule a job to restore the last backup made of a SQL Server database

This post provides you with a script that will generate a restore script for a database using the latest full backup file that exists in a directory. (No need to state the filename explicitly)

You need to provide the following at the start of the script:

  • The target database i.e. the database you will restore to
  • The directory where the backup file is saved

If you are using the excellent Ola Hallengren maintenance solution (see link) the directory path will look something like below. If you’re not using Ola’s solution, you should be.

\\ServerWhereBackupsAreSaved\DriveName\InstanceName\TargetDatabase\Full\

This restore script is designed to work with Ola’s solution as it segregates the backup directory structure such that each database has an allocated folder and each full backup file is named with the date and time of the file creation.

The restore script determines which backup file is the latest backup file based on the max name. So for the script to work it is assumed you have an appropriate backup strategy (i.e. using Ola’s solution) were backup types are segregated into different folders, backup names have a date reference and the backup location is dedicated to backups and nothing else, i.e. no trash files in the location.

Some use cases for this solution might be:

  • Restoring a nightly backup to another instance for reporting purposes
  • Restoring backups to a development environment
  • Restoring backups to another server to test the backups

You can use the logic in a stored procedure or as the T-SQL in a job step and schedule accordingly.

/*
You need to reference the following:
* The target database i.e. the database you will restore to.
* The directory where the backup file is saved.
If you are using the Ola Hallengren backup scripts the directory path will look 
something like below.
\\ServerWhereBackupsAreSaved\DriveName\InstanceName\TargetDatabase\Full\

Find & Replace the follow text for the target database and directory:

TARGET_DATABASE
DIR_PATH
*/
/*
Declare Variables
*/
DECLARE @DatabaseToRestore AS VARCHAR(MAX);
DECLARE @DirToSearch AS VARCHAR(MAX);
DECLARE @ShellCommand AS VARCHAR(MAX);
DECLARE @BackupFile AS VARCHAR(MAX);
DECLARE @Sql AS VARCHAR(MAX);

/*
Set User Variables
*/
SET @DatabaseToRestore = 'TARGET_DATABASE';
SET @DirToSearch = 'DIR_PATH';
SET @ShellCommand = 'dir ' + @DirToSearch;

/*
Create Temp Table To Hold xp_cmdshell Output
*/
IF OBJECT_ID('tempdb..#DirList') IS NOT NULL
	DROP TABLE #DirList;

CREATE TABLE #DirList (
	Id INT identity(1, 1)
	,line NVARCHAR(1000)
	);

/*
Enable Advanced Options To Enable xp_cmdshell Temporarily
*/
EXEC master.dbo.sp_configure 'show advanced options'
	,1;

RECONFIGURE
WITH OVERRIDE;

EXEC master.dbo.sp_configure 'xp_cmdshell'
	,1;

RECONFIGURE
WITH OVERRIDE;

/*
Run The Shell Command To Capture And Write Dir Info To Temp Table
*/
SET @Sql = '
INSERT INTO #DirList (line)
EXEC xp_cmdshell ' + '''' + @ShellCommand + '''' + ';';

EXEC (@Sql);

EXEC master.dbo.sp_configure 'xp_cmdshell'
	,0;

/*
Disable Advanced Options And xp_cmdshell Again
*/
RECONFIGURE
WITH OVERRIDE;

EXEC master.dbo.sp_configure 'show advanced options'
	,0;

RECONFIGURE
WITH OVERRIDE;

/*
Get The Last Backup File Name And Save To A Variable
*/
WITH CTE
AS (
	SELECT SUBSTRING(line, 37, 100) [FileName]
	FROM #DirList
	WHERE Id > (
			SELECT MIN(Id)
			FROM #DirList
			WHERE line LIKE '%<DIR>%..%'
			)
		AND Id < (
			SELECT MAX(Id) - 2
			FROM #DirList
			)
	)
SELECT @BackupFile = [FileName]
FROM CTE
WHERE [FileName] = (
		SELECT MAX(FileName)
		FROM CTE
		);

/*
Create The Restore Script
*/
SET @BackupFile = @DirToSearch + @BackupFile
SET @Sql = '
ALTER DATABASE ' + QUOTENAME(@DatabaseToRestore) + ' SET SINGLE_USER WITH ROLLBACK IMMEDIATE;
RESTORE DATABASE ' + QUOTENAME(@DatabaseToRestore) + ' FROM DISK = ' + '''' + @BackupFile + '''' + '
WITH NORECOVERY
,REPLACE;
RESTORE DATABASE ' + QUOTENAME(@DatabaseToRestore) + ' WITH RECOVERY;
'

/*
To Directly Execute The Script Uncomment The EXEC Statement And Delete The Select Statement
*/
/*
EXEC (@Sql)
*/
SELECT @Sql


A picture with garbled characters and the word password in the middle

How to generate a random password with T-SQL

The following script will generate a random 10 character password that meets the complexity requirement for Microsoft Windows. To generate a password just run the script in a new SQL Server Management Studio window. The logic can also be easily turned into a function.

The option of symbol characters is limited to what’s shown below as dealing with quotes and obscure characters in a password is often more trouble than it is worth. The password generated however should still be very secure as it will be 10 characters long with a guaranteed number, lowercase letter, uppercase letter and a symbol.

!
#
$
%
&
(
)
*
+

/*Declare Variables*/
DECLARE @i INT;
DECLARE @Pw VARCHAR(MAX);
DECLARE @Numbers TABLE (Characters CHAR(1));
DECLARE @LowerCase TABLE (Characters CHAR(1));
DECLARE @UpperCase TABLE (Characters CHAR(1));
DECLARE @Symbols TABLE (Characters CHAR(1));
DECLARE @BaseCharacters TABLE (Characters CHAR(1));
DECLARE @GuaranteedCharacters TABLE (Characters CHAR(1));
DECLARE @PwCharacters TABLE (Characters CHAR(1));

/*Generate Numbers*/
SET @i = 0;

WHILE @i <= 9
BEGIN
	INSERT INTO @Numbers
	SELECT @i

	SET @i = @i + 1
END;

/*Generate Lowercase Letters*/
SET @i = 97;

WHILE @i <= 122
BEGIN
	INSERT INTO @LowerCase
	SELECT CHAR(@i)

	SET @i = @i + 1
END;

/*Generate Uppercase Letters*/
SET @i = 65;

WHILE @i <= 90
BEGIN
	INSERT INTO @UpperCase
	SELECT CHAR(@i)

	SET @i = @i + 1
END;

/*Generate Symbols*/
SET @i = 33;

WHILE @i <= 43
BEGIN
	IF (
			@i = 34
			OR @i = 39
			)
	BEGIN
		SET @i = @i + 1
	END

	INSERT INTO @Symbols
	SELECT CHAR(@i)

	SET @i = @i + 1
END;

/*
Randomly Select A Number, Lowercase Letter,
Uppercase Letter And A Symbol So Four Character Types
Are Guaranteed To Be Present Somewhere In The Password
*/
INSERT INTO @GuaranteedCharacters (Characters)
SELECT TOP 1 Characters
FROM @Numbers
ORDER BY NEWID();

INSERT INTO @GuaranteedCharacters (Characters)
SELECT TOP 1 Characters
FROM @LowerCase
ORDER BY NEWID();

INSERT INTO @GuaranteedCharacters (Characters)
SELECT TOP 1 Characters
FROM @UpperCase
ORDER BY NEWID();

INSERT INTO @GuaranteedCharacters (Characters)
SELECT TOP 1 Characters
FROM @Symbols
ORDER BY NEWID();

/*
Randomly Select Another 6 Characters
*/
INSERT INTO @BaseCharacters
SELECT TOP 6 Characters
FROM (
	SELECT Characters
	FROM @Numbers
	
	UNION ALL
	
	SELECT Characters
	FROM @LowerCase
	
	UNION ALL
	
	SELECT Characters
	FROM @UpperCase
	
	UNION ALL
	
	SELECT Characters
	FROM @Symbols
	) AS Characters
ORDER BY NEWID()

/*Generate A 10 Character Password*/
INSERT INTO @PwCharacters (Characters)
SELECT Characters
FROM (
	SELECT Characters
	FROM @BaseCharacters
	
	UNION ALL
	
	SELECT Characters
	FROM @GuaranteedCharacters
	) AS Characters
ORDER BY NEWID()

/*Save The Password To A String*/
SELECT @Pw = COALESCE(@Pw + Characters, Characters)
FROM @PwCharacters

SELECT @Pw AS PW;


If you found this post helpful please like, comment and share.

An icon of a computer folder with a visible file and two arrows facing up and down

How to move/rename Database files in SQL Server

An example use case for the process below could be you need to move database files to a new drive. Another example might be your organisation intends to run a legacy database along side a new updated database with both sharing the same database name in the same instance with the files located in the same directory with the same names. Obviously this cannot be done and requires the database names to differ and the files to be renamed or not exist in the same directory.

For example AdventureWorks might become AdventureWorks_Legacy while a new and improved AdventureWorks database retains the original database name. The associated database file names would also need to be changed/moved to reflect this.

Someone might also want to do something like this for test purposes but obviously having test resources in a live environment would not be recommended if avoidable.

The first step to moving and renaming the files is to copy and modify the script below. Note the script below assumes you want to move and change the names of the files. To avoid any database conflicts you only need to do one or the other.

/* 
Find & Replace DbName with the name of the Database you are working with
*/
USE [DbName];

/*
Changing Physical names and paths
Replace 'C:\...\NewDbName.mdf' with full path of new Db file to be used
*/
ALTER DATABASE DbName MODIFY FILE (
	NAME = ' DbName '
	,FILENAME = 'C:\...\NewDbName.mdf'
	);

/*
Replace 'C:\...\NewDbName_log.ldf' with full path of new Db log file to be used
*/
ALTER DATABASE DbName MODIFY FILE (
	NAME = ' DbName _log'
	,FILENAME = 'C:\...\NewDbName_log.ldf'
	);

/*
Changing logical names
*/
ALTER DATABASE DbName MODIFY FILE (
	NAME = DbName
	,NEWNAME = NewDbName
	);

ALTER DATABASE DbName MODIFY FILE (
	NAME = DbName_log
	,NEWNAME = NewDbName_log
	);
Once the script has been set up as desired follow the steps below:
  1. Open Microsoft SQL Server Management Studio (SSMS).
  2. Connect to the server that houses the Db you are working with.
  3. Run the modified script
  4. Right click on the Db in SSMS and select Tasks > Take Offline
  5. If you are moving the database files log into the server that houses the database files and copy and move the MDF and LDF files to the location you specified in first two alter commands. If the script specifies new names rename the copied files to match the names given in the script exactly.
  6. Go back to SSMS and right click on the Db and select Tasks > Bring Online.
  7. If you have moved the files once the database is back online and confirmed working as expected the unused original files can be deleted.
  8. Now you can rename the Db to the new name if you wish using SSMS.
Grim Reaper icon

How to filter sp_who2 to create KILL statements

Until now the only way to kill wayward commands or queries in SQL Server was to run sp_who or sp_who2, look for the record with abnormal CpuTime or DiskIO readings (or look for the login of the guy who never knows what he’s doing), and take note of the corresponding Spid number by running your finger along the screen tracing it back to the ID so you don’t get confused and end up killing the wrong Spid from another record by mistake.

But now there’s a better way if you know the the likely culprit you want to kill in advance. The script below will allow you to filter the results of sp_who2 based on any of the returned columns. You’ll now be able to specify the database name or login name etc. and the query will return only the rows that match your constraints. Narrow the results down enough and you’ll be left with one record to kill. Then copy the results of the KillSpid column and paste to a new SSMS window. Now you should be left with one Kill command to run with no possibility of killing the wrong Spid.

IF OBJECT_ID('tempdb..#sp_who2') IS NOT NULL DROP TABLE #sp_who2
GO

CREATE TABLE #sp_who2 (
	Spid INT
	,Status VARCHAR(255)
	,LoginName VARCHAR(255)
	,HostName VARCHAR(255)
	,BlkBy VARCHAR(255)
	,DbName VARCHAR(255)
	,Command VARCHAR(255)
	,CpuTime INT
	,DiskIO INT
	,LastBatch VARCHAR(255)
	,ProgramName VARCHAR(255)
	,Spid2 INT
	,RequestId INT
	)

INSERT INTO #sp_who2
EXEC sp_who2

SELECT 'Kill ' + CONVERT(VARCHAR(MAX), SPID) AS KillSpid
	,Spid 
	,Status 
	,LoginName 
	,HostName 
	,BlkBy 
	,DbName 
	,Command 
	,CpuTime 
	,DiskIO 
	,LastBatch 
	,ProgramName 
	,Spid2
	,RequestId
FROM #sp_who2
-- Add any filtering of the results here :
WHERE DBName NOT IN ('master')
-- Add any sorting of the results here :
-- AND ProgramName = ''
-- AND DbName = ''
-- AND LoginName = ''
-- AND HostName = ''
-- AND Status = ''
ORDER BY Spid ASC
,DBName ASC;

DROP TABLE #sp_who2


How to get the date & time a job or schedule was modified in SQL Server

The script below has one parameter, @SD or start date. The logic of the script will return two tables showing the modified jobs and schedules from the start date onward.

By default the start date will be set to one year ago to the day which will return a full years worth of data up to the time the script is run. To enter a date manually change the line SET @SD = NULL; –‘20180101 00:00:00’; removing NULL; — and changing the date time text. 

USE msdb;
GO

DECLARE @SD AS DATETIME;

SET @SD = NULL; --'20180101 00:00:00';

IF @SD IS NULL
BEGIN
SET @SD = DATEADD(YEAR, - 1, GETDATE());
END;

SELECT @SD AS StartDate;

-- Jobs that have been modified
SELECT [Name] AS JobName
	,[Enabled]
	,[Date_created]
	,[Date_modified]
FROM sysjobs
WHERE [date_modified] > @SD
--AND enabled = 0
ORDER BY [date_modified] DESC;

-- Schedules that have been modified
SELECT [Name] AS ScheduleName
	,[Enabled]
	,[Date_created]
	,[Date_modified]
FROM sysschedules
WHERE [date_modified] > @SD
--AND enabled = 0
ORDER BY [date_modified] DESC;
GO