Tag Archives: howto

Picture showing SQL Server Agent Properties Window

How to setup how much Agent Job History is retained

I was asked to do a historic analysis of SQL Server jobs to determine their statistics, such as the number of runs, average run duration, successes/failures etc. As part of the daily checks I do on a server I’d only check the job runs for the past 24 hours. So I was surprised when I started the analysis and saw that averages for the same job across servers varied significantly.

When I looked at the msdb.dbo.sysjobhistory table of the server with the lowest averages I noted that there were only 999 rows and the history only went back a day or two.

So I had effectively no history on that server. When I looked at another the sysjobhistory table had almost 10 million entries, roughly 4 Gb of data! (The joys of taking over someone else’s environment)

This got me looking at the history settings for the SQL Agent. To open the SQL Server Agent Properties while in SQL Server Object Explorer right click on SQL Server Agent and then click on properties.

Picture showing SQL Server Agent Properties Window

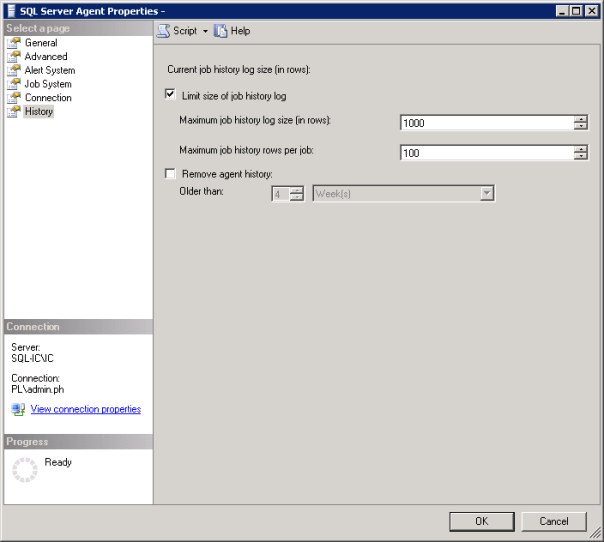
For the first server the history settings were set to the default of 1000 lines for the log as a whole and 100 lines for the individual jobs. If you have a job that runs 4 steps that will use 5 lines, one line for the job and one line for each of the steps that are run. When I looked at the history settings on the second, server as you would expect, no settings had been applied.

Some sensible thresholds needed to be applied across the environment. I’m not going to dictate to you what your retention policy should be regarding job run history but I will say it can be as much as business decision as a server maintenance one so ask around if people need a record that something has run.

You may be in the position that you can be specific enough to enter row values but most organisations will have jobs that run weekly or monthly. In that case you may be better off using the “Older than” option and setting a retention period rather than using rows.

Always with logging, if you have the space, you’re better off having too much than having too little and missing data you need.  The size of each row in the sysjobhistory table is at most 4.5KB so keeping 10k rows is only around 45 Mb. If you don’t have 45 Mb to spare on your server then job history retention is the least of your worries. The worst thing that is likely to happen in storing more rows than you need is that it takes a bit longer to bring up the job history viewer. But here’s a link to some queries to help with that.

The moral of the story is just because it’s in the MSDB doesn’t mean Microsoft are taking care of it. Check your settings and make sure you’re retaining an appropriate amount of history now.

Icon of a folder or file with a clock on it

How to get the date of creation and size of current temporary objects from tempdb

The query below will return the temporary objects that currently exist in the tempdb of an instance.

It’s a good query if you’re experiencing issues with the tempdb and want to see what objects are taking up space or if temp tables are surviving longer than you might expect them to.

Recently I found that because queries were running directly from Tableau and the connection was being held open temp tables were not being removed. All the temp tables existing at the same time was taking up several GBs of space needlessly.

-- Get current temporary objects date of creation and size 
SELECT DISTINCT obj.name AS ObjectName
	,obj.type_desc AS ObjectType
	,obj.object_id AS ObjectId
	,obj.principal_id AS PrincipalId
	,obj.schema_id AS SchemaId
	,obj.parent_object_id AS ParentId
	,stat.row_count AS RowCountStat
	,stat.used_page_count * 8 AS UsedSizeKB
	,stat.reserved_page_count * 8 AS RevervedSizeKB
	,obj.create_date AS CreatedDate
	,obj.modify_date AS ModifiedDate
FROM tempdb.sys.partitions AS part WITH (NOLOCK)
INNER JOIN tempdb.sys.dm_db_partition_stats AS stat WITH (NOLOCK) ON part.partition_id = stat.partition_id
	AND part.partition_number = stat.partition_number
INNER JOIN tempdb.sys.tables AS tbl WITH (NOLOCK) ON stat.object_id = tbl.object_id
LEFT JOIN tempdb.sys.objects AS obj WITH (NOLOCK) ON tbl.name = obj.name
ORDER BY CreatedDate ASC;

How to identify databases with Guest user enabled

As best practice it is recommended to disable guest user in every user database, i.e. not master, msdb and tempdb, to improve the security of SQL Server. Guest user permits access to a database for any logins that are not mapped to a specific database user. The guest user cannot be dropped but it can be disabled by revoking the CONNECT permission.

Use the script below to identify which databases have guest user enabled. 

USE master;
GO

DECLARE @database_name SYSNAME
	,@sqlcmd NVARCHAR(4000)

DECLARE databases_cursor CURSOR
FOR
SELECT NAME
FROM sys.databases
WHERE STATE IN (0)
	AND database_id > 4
ORDER BY NAME

CREATE TABLE #guest_users_enabled (
	database_name SYSNAME
	,user_name SYSNAME
	,permission_name NVARCHAR(128)
	,state_desc NVARCHAR(6)
	)

OPEN databases_cursor;

FETCH NEXT
FROM databases_cursor
INTO @database_name;

WHILE @@FETCH_STATUS = 0
BEGIN
	SET @sqlcmd = N'use ' + @database_name + ';

        insert into #guest_users_enabled

        SELECT ''' + @database_name + ''' as database_name, name,

        permission_name, state_desc

        FROM sys.database_principals dpr

        INNER JOIN sys.database_permissions dpe

        ON dpr.principal_id = dpe.grantee_principal_id

        WHERE name = ''guest'' AND permission_name = ''CONNECT'''

	EXEC sp_executesql @sqlcmd

	FETCH NEXT
	FROM databases_cursor
	INTO @database_name;
END

SELECT database_name
	,user_name
	,permission_name
	,state_desc
FROM #guest_users_enabled
ORDER BY database_name ASC

DROP TABLE #guest_users_enabled

CLOSE databases_cursor;

DEALLOCATE databases_cursor;
GO
Use the script below, changing the placeholder database with the database identified in the script above, to revoke permission for the guest user to connect to that database.
USE [database name];

GO

REVOKE CONNECT FROM GUEST;

GO
Five Database icons arranged in a star with the largest one in the center

How to identify all user objects in the SQL Server Master database

What is the SQL Server Master Database used for?

The master database is used by SQL Server to contain all of the system level information:

  • Logins
  • Linked servers
  • Endpoints
  • Configuration settings
  • Information about the other databases on this instance and the location of their files

If the master database is not present, SQL Server cannot start.

This is way you should always take regular backups of the master database.
as if SQL Server suffers a failure, those changes will be lost and you’ll be in a lot of trouble.

So the master database is needed for SQL Server to work. Logic and objects needed to enable your application should not be tangled up in there so you should always avoid creating objects in the master database. Use a user database instead.

In saying that everyone has made the mistake of not specifying the database they want to USE in a script and by default objects get written to the Master database. Or you might have inherited the responsibility for an application which did not conform to best practices and it uses objects created in Master.

To gain visibility of these objects just run the script below.

SELECT o.object_id AS ObjectId
	,o.NAME AS ObjectName
	,o.type_desc AS ObjectType
	,o.create_date AS CreateDate
	,o.modify_date AS ModifyDate
	,SUM(st.row_count) AS RowCnt
	,CAST(SUM(st.used_page_count) / 128.0 AS DECIMAL(36, 1)) AS DataSize_MB
FROM master.sys.objects o
LEFT JOIN master.sys.dm_db_partition_stats st ON st.object_id = o.object_id
	AND st.index_id < 2
GROUP BY o.object_id
	,o.NAME
	,o.type_desc
	,o.create_date
	,o.modify_date
	,o.is_ms_shipped
HAVING o.is_ms_shipped = 0
	AND o.NAME <> 'sp_ssis_startup'
	AND o.type_desc NOT LIKE '%CONSTRAINT%'
ORDER BY CAST(SUM(st.used_page_count) / 128.0 AS DECIMAL(36, 1)) DESC
	,RowCnt DESC

How to set SQL Server file autogrowth settings to recommended sizes across all databases on an instance

As part of a Microsoft RAP analysis you might encounter some of the following:

  • Databases identified with auto-growth set to percentage growth
  • Databases identified with auto-growth set to 1MB growth
  • Database files have been identified that have the next Auto Growth increment of 1GB or above
  • Databases have been identified with one or more Transaction Log files where expected next Auto Growth increment is 1GB or above

Brent Ozar suggests that the data file and log file autogrowth setting should be 256MB and 128MB respectively, and he makes a good argument here.

Broadly I agree with his position but I also acknowledge, as he does, that every database is different and has its own considerations. (Keep that in mind while reviewing the following script)

I’ve created the script below, which programmatically creates the SQL commands, to apply these recommended values to the autogrowth settings of each database on an instance.

The script gets every database name, and associated data file and log file names and using dynamic SQL writes a script to update autogrowth settings for each database.

You can then adjust the setting values manually for each database before executing.

Or if you’re really brave/crazy execute the dynamic script automatically by changing PRINT @sql to EXEC(@sql).

USE Master;
GO

SET NOCOUNT ON

DECLARE @database AS NVARCHAR(256)
	,@dataFileName AS NVARCHAR(256)
	,@logFileName AS NVARCHAR(256)
	,@sql AS VARCHAR(MAX)
	,@loop AS INT
	,@end AS INT

IF OBJECT_ID('tempdb..#DatabaseList') IS NOT NULL
	DROP TABLE #DatabaseList

CREATE TABLE #DatabaseList (
	[#DatabaseListId] INT IDENTITY(1, 1) PRIMARY KEY
	,[DatabaseName] [sysname] NOT NULL
	,[DataFileName] [sysname] NOT NULL
	,[LogFileName] [sysname] NOT NULL
	)

INSERT INTO #DatabaseList
SELECT d.DatabaseName
	,d.FileName AS DataFileName
	,l.FileName AS LogFileName
FROM (
	SELECT d.NAME AS DatabaseName
		,mf.NAME AS FileName
	FROM sys.master_files mf(NOLOCK)
	JOIN sys.databases d(NOLOCK) ON mf.database_id = d.database_id
	WHERE type_desc = 'ROWS'
	) AS d
LEFT JOIN (
	SELECT d.NAME AS DatabaseName
		,mf.NAME AS FileName
	FROM sys.master_files mf(NOLOCK)
	JOIN sys.databases d(NOLOCK) ON mf.database_id = d.database_id
	WHERE mf.type_desc = 'LOG'
	) AS l ON l.DatabaseName = d.DatabaseName

SET @end = (
		SELECT MAX(#DatabaseListId)
		FROM #DatabaseList
		)
SET @loop = 1

WHILE @loop <= @end
BEGIN
	SELECT @database = DatabaseName
		,@dataFileName = DataFileName
		,@logFileName = LogFileName
	FROM #DatabaseList
	WHERE #DatabaseListId = @loop

	--PRINT @database
	SET @sql = 'USE [' + @database + '];
		GO
		ALTER DATABASE [' + @database + '] MODIFY FILE (NAME=''' + @dataFileName + ''',MAXSIZE = UNLIMITED, FILEGROWTH = 256MB);
		ALTER DATABASE [' + @database + '] MODIFY FILE (NAME=''' + @logFileName + ''',MAXSIZE = UNLIMITED, FILEGROWTH = 128MB);
		GO'

	PRINT @sql

	SET @loop = @loop + 1
END
		/*
Change PRINT @sql to:
EXEC (@sql)
To Update the file sizes automatically
*/


As part of this process I’d also run the script below before and after you’ve made the changes to have a record for change management purposes.

SELECT GETDATE() AS DateOfObservation
	,d.NAME AS database_name
	,mf.NAME AS file_name
	,mf.type_desc AS file_type
	,mf.growth AS current_percent_growth
FROM sys.master_files mf(NOLOCK)
JOIN sys.databases d(NOLOCK) ON mf.database_id = d.database_id

How to create a running total in SQL

Below is a simple example of how to create a running total in T-SQL using a self-join.

The total is created by summing the preceding values, the precedence of which is determined by, in this instance, the sale date field.

A date field, or another unique order field, is required for this technique to work otherwise all the values would be summed at once, based on grouping, and the summed value would be displayed for each relevant record.

CREATE TABLE #Product (
Product_ID INT
,Product VARCHAR(10)
)

CREATE TABLE #Sale (
    Product_ID INT
    ,SaleAmount MONEY
    ,SaleDate DATETIME
    )

INSERT INTO #Product
VALUES (
    1
    ,'Bike'
    )
    ,(
    2
    ,'Car'
    )
    ,(
    3
    ,'Truck'
    )


INSERT INTO #Sale
VALUES (
    1
    ,10
    ,'20150101 12:00:00.000'
    )
    ,(
    1
    ,10
    ,'20150102 13:00:00.000'
    )
    ,(
    2
    ,20
    ,'20150101 13:00:00.000'
    )
    ,(
    2
    ,30
    ,'20150101 14:00:00.000'
    )
    ,(
    3
    ,30
    ,'20150101 12:00:00.000'
    )

SELECT a.Product_ID
    ,p.Product
    ,a.SaleAmount
    ,SUM(b.SaleAmount) AS RunningTotal
    ,a.SaleDate
FROM #Sale AS a
INNER JOIN #Product AS p ON a.Product_ID = p.Product_ID   
LEFT JOIN #Sale AS b ON a.Product_ID = b.Product_ID
    AND b.SaleDate <= a.SaleDate
GROUP BY a.Product_ID
    ,p.Product
    ,a.SaleAmount
    ,a.SaleDate


DROP TABLE #Sale
DROP TABLE #Product
	

How do you tell if your Android device is rooted?

So here’s a quick and simple explanation of what a rooted device is.

By default the android OS blocks you and apps from doing the things that could potentially break (brick) the device or pose security concerns. But there are instances were an app legitimately needs access to some of the devices locked out functionality.

For example the sixaxis controller app lets you connect your device to a PS3/4 controller but requires root access to be able to manipulate the device’s bluetooth signal. This is a legitimate reason to require access to bluetooth but a more unscrupulous app might want access to transmit your phone’s data across a short range.

A rooted android device just means you have administrative privileges on the device, so you get to choose what you or an app can use/do, but unlike windows it’s not as simple as just changing a setting.

So how do you tell if an android device is rooted?

It’s simple, as with all things android you just use an app!

Install Root Checker from the play store and you’re good to go.

For a tutorial on how to root your device click here.

How to create Clustered and Nonclustered Indexes on a Temp Table

One of the best features of temp tables is that an index can be applied to them.

To clarify temp tables start with #, exist within the tempdb and are accessible within child batches (nested triggers, procedure, exec calls) of the query.

The execution plan can also determine the relevant statistics regarding their operation and suggest means of optimisation and will often suggest applying an index to the table.
Below is a simple example of applying both clustered and nonclustered indexes to the temporary table #Apostle created from a CTE (Common Table Expression).


IF OBJECT_ID('tempdb..#Apostle') IS NOT NULL
	DROP TABLE #Apostle;

WITH CTE
AS (
	SELECT 1 AS ID
		,'Simon Peter' AS NAME
	
	UNION
	
	SELECT 2
		,'James'
	
	UNION
	
	SELECT 3
		,'John'
	
	UNION
	
	SELECT 4
		,'Andrew'
	
	UNION
	
	SELECT 5
		,'Philip'
	
	UNION
	
	SELECT 6
		,'Thomas'
	
	UNION
	
	SELECT 7
		,'Bartholomew'
	
	UNION
	
	SELECT 8
		,'Matthew'
	
	UNION
	
	SELECT 9
		,'James'
	
	UNION
	
	SELECT 10
		,'Simon'
	
	UNION
	
	SELECT 11
		,'Thaddaeus'
	
	UNION
	
	SELECT 12
		,'Judas'
	)
SELECT *
INTO #Apostle
FROM CTE

-- CREATE INDEXES
CREATE CLUSTERED INDEX IDX_CLUSTERED_ID ON #Apostle (ID)

CREATE NONCLUSTERED INDEX IDX_NONCLUSTERED_ID ON #Apostle (ID)


Microsoft defines clustered and nonclustered indexes as the following:

Clustered

  • Clustered indexes sort and store the data rows in the table or view based on their key values. These are the columns included in the index definition. There can be only one clustered index per table, because the data rows themselves can be sorted in only one order.
  • The only time the data rows in a table are stored in sorted order is when the table contains a clustered index. When a table has a clustered index, the table is called a clustered table. If a table has no clustered index, its data rows are stored in an unordered structure called a heap.

Nonclustered

  • Nonclustered indexes have a structure separate from the data rows. A nonclustered index contains the nonclustered index key values and each key value entry has a pointer to the data row that contains the key value.
  • The pointer from an index row in a nonclustered index to a data row is called a row locator. The structure of the row locator depends on whether the data pages are stored in a heap or a clustered table. For a heap, a row locator is a pointer to the row. For a clustered table, the row locator is the clustered index key.
  • You can add nonkey columns to the leaf level of the nonclustered index to by-pass existing index key limits, 900 bytes and 16 key columns, and execute fully covered, indexed, queries.

Source

To learn more about indexes this is a good video on the topic.

How to write text to a file with SQL Server

The following is a tutorial on creating a stored procedure that will allow you to create a file in any directory and insert text into this newly created file.

In order for this to work you will need to authorise the running of system stored procedures with Object Linking and Embedding functionality (See OLE).

Authorisation is needed as the stored procedure we will create rely on the system SPs sp_OACreate and sp_OAMethod.

sp_OACreate: Creates an instance of an OLE object.

sp_OAMethod: Calls a method of an OLE object.

NOTE: By default, SQL Server blocks access to OLE Automation stored procedures by turning the components off as part of the security configuration for the server.

Run the script below to grant authorisation.

--AUTHORIZE SYSTEM STORED PROCEDURES
sp_configure 'show advanced options'
	,1;
GO

RECONFIGURE;
GO

sp_configure 'Ole Automation Procedures'
	,1;
GO

RECONFIGURE;
GO

--AUTHORIZED

 
Next we will create the stored procedure WriteToFile. Substitute the DatabaseName with the database you will be using.

--CREATE STORED PROCEDURE
/*
CHANGE:
DATABASE NAME: DatabaseName 
 */
USE "DatabaseName";
GO

SET ANSI_NULLS ON
GO

SET QUOTED_IDENTIFIER ON
GO

IF OBJECT_ID('[dbo].[WriteToFile]', 'P') IS NOT NULL
	DROP PROCEDURE [WriteToFile];
GO

CREATE PROCEDURE [dbo].[WriteToFile] @File VARCHAR(255)
	,@Text VARCHAR(MAX)
	WITH EXECUTE AS CALLER
AS
BEGIN
	DECLARE @OLE INT
	DECLARE @FileID INT

	EXECUTE sp_OACreate 'Scripting.FileSystemObject'
		,@OLE OUT

	EXECUTE sp_OAMethod @OLE
		,'OpenTextFile'
		,@FileID OUT
		,@File
		,8
		,1

	EXECUTE sp_OAMethod @FileID
		,'WriteLine'
		,NULL
		,@Text

	EXECUTE sp_OADestroy @FileID

	EXECUTE sp_OADestroy @OLE
END;

 
Below is an example using the WriteToFile stored procedure.

--WRITE TO FILE EXAMPLE
/*
CHANGE:
DATABASE NAME: DatabaseName 
 */
USE "DatabaseName";
GO

DECLARE @Path VARCHAR(255)
DECLARE @Txt VARCHAR(MAX)

--NOTE: THE LOG FILE WILL BE CREATED IF IT DOES NOT ALREADY EXIST
SET @PATH = 'C:\temp\WriteToFileExampleLog.txt'
SET @Txt = 'Hello World'

EXEC [DatabaseName].[dbo].[WriteToFile] @Path
	,@Txt;


Using the same stored procedure here’s an example writing a table to the file using concatenation and a loop. This process works by taking the table row by row and writing the concatenated value to the file. There are easier ways to achieve this however, i.e. utilising the export functionality built into SSMS and saving this as a package to be run as a job.

--STORED PROCEDURE CREATED
--WRITE TABLE TO FILE EXAMPLE
DECLARE @Path VARCHAR(255)
DECLARE @Txt VARCHAR(MAX)
DECLARE @loopId AS INT
DECLARE @maxId AS INT
DECLARE @TempCustomer TABLE (
	ID_column INT IDENTITY PRIMARY KEY
	,FirstName NVARCHAR(100)
	);

--NOTE: THE LOG FILE WILL BE CREATED IF IT DOES NOT ALREADY EXIST
SET @PATH = 'C:\temp\WriteToFileExampleLog.txt'

INSERT INTO @tempCustomer (FirstName)
VALUES ('Paul')
	,('Jim')
	,('John')

SET @loopId = 1
SET @maxId = (
		SELECT MAX(ID_column)
		FROM @TempCustomer
		)

WHILE @loopId <= @maxId
BEGIN
	SELECT @Txt = CONVERT(VARCHAR(10), ID_column) + ', ' + FirstName
	FROM @TempCustomer
	WHERE ID_column = @loopId

	PRINT @Txt

	EXEC [TEST_DB].[dbo].[WriteToFile] @Path
		,@Txt;

	SET @loopId = @loopId + 1
END


How to export a table as an XML file using a SQL script

Below is a script that will allow you, as the title suggests, to export a table as an XML file.

By use of the find and replace function in your preferred text editor, or by way of the text editor in SSMS, input your values for the required fields, i.e. replace TableName with the name of the table you will be working off.

SERVER NAME: ServerName

DATABASE NAME: DatabaseName

SCHEMA NAME: SchemaName

TABLE NAME: TableName

SAVE LOCATION ADDRESS: AddressName

FILE NAME: FileName (Excluding .xml extension)

Then run the script below and the table will be exported as an XML file to the location and file name of your choosing.

/*
FIND AND REPLACE:

SERVER NAME: ServerName
DATABASE NAME: DatabaseName 
SCHEMA NAME: SchemaName
TABLE NAME: TableName
SAVE LOCATION ADDRESS: AddressName
FILE NAME: FileName
 */
-- Run on ServerName
USE DatabaseName;
GO

DECLARE @saveLocation AS VARCHAR(510)
DECLARE @nameOfFile AS VARCHAR(255)
DECLARE @instanceName AS VARCHAR(255)
DECLARE @cmd NVARCHAR(1020)

SET @saveLocation = 'AddressName'
SET @nameOfFile = 'FileName'
SET @saveLocation = @saveLocation + '\' + @nameOfFile + '.xml'
SET @instanceName = (
		SELECT @@servername
		)

-- Please note that the fully qualified table name is needed
SELECT @cmd = '
    bcp "SELECT * FROM [DatabaseName].[SchemaName].[TableName] row for xml auto, root(''rows''), elements" ' + 'queryout "' + @saveLocation + '" -S ' + @instanceName + ' -T -w -r -t';

EXEC xp_cmdshell @cmd;
GO


This script is enabled by two utilities xp_cmdshell and BCP.

For an explanation of each please view the associated links.