Category Archives: sql

How to create a running total in SQL

Below is a simple example of how to create a running total in T-SQL using a self-join.

The total is created by summing the preceding values, the precedence of which is determined by, in this instance, the sale date field.

A date field, or another unique order field, is required for this technique to work otherwise all the values would be summed at once, based on grouping, and the summed value would be displayed for each relevant record.

CREATE TABLE #Product (
Product_ID INT
,Product VARCHAR(10)
)

CREATE TABLE #Sale (
    Product_ID INT
    ,SaleAmount MONEY
    ,SaleDate DATETIME
    )

INSERT INTO #Product
VALUES (
    1
    ,'Bike'
    )
    ,(
    2
    ,'Car'
    )
    ,(
    3
    ,'Truck'
    )


INSERT INTO #Sale
VALUES (
    1
    ,10
    ,'20150101 12:00:00.000'
    )
    ,(
    1
    ,10
    ,'20150102 13:00:00.000'
    )
    ,(
    2
    ,20
    ,'20150101 13:00:00.000'
    )
    ,(
    2
    ,30
    ,'20150101 14:00:00.000'
    )
    ,(
    3
    ,30
    ,'20150101 12:00:00.000'
    )

SELECT a.Product_ID
    ,p.Product
    ,a.SaleAmount
    ,SUM(b.SaleAmount) AS RunningTotal
    ,a.SaleDate
FROM #Sale AS a
INNER JOIN #Product AS p ON a.Product_ID = p.Product_ID   
LEFT JOIN #Sale AS b ON a.Product_ID = b.Product_ID
    AND b.SaleDate <= a.SaleDate
GROUP BY a.Product_ID
    ,p.Product
    ,a.SaleAmount
    ,a.SaleDate


DROP TABLE #Sale
DROP TABLE #Product
	
An icon symbolising data moving to different tables via ssis

How to use Temp tables in an SSIS package

If you have been using a query which utilizes temp tables but now you want that query to run as an SSIS package it’s going to need a bit of reworking.

Just adding the query as an Execute SQL Task in Visual Studio won’t work unfortunately if you are using, for example, SELECT * INTO to create the temp tables.

The First step to reworking the query will be to dedicate an Execute SQL Task to creating the temp tables your query uses, defining columns and data types etc. and then populating those tables with INSERT INTO rather than SELECT INTO.

For the following we will assume only one output temp table is required for the process which will be as follows:

  • A temp table to store data will be created.
  • A query will be used to populate this table.
  • This populated temp table will then become the source from which data will be pulled.

STEP 1.

In SSMS connect to what will be the source server and enter the statement to create the required temp table as a global temp table i.e. prefixing the table name with ##. Creating the table as a global temp table at this stage avoids errors when configuring the OLE DB Source in Visual Studio as it allows the table to be visible to the SSIS package.

STEP 2.

In Visual Studios drag a new Execute SQL Task into the control flow and name it, Create Temp Table.

Image showing Execute SQL Task Create Temp Table

Double click on the task to bring up the Execute SQL Task Editor window.

Image showing the Execute SQL Task Editor Window

Step through the process for creating a connection in the connection option and enter the following for the SQL statement option replacing yourTempTable with the name of your temp table.

IF OBJECT_ID('tempdb..##yourTempTable') IS NOT NULL
   DROP TABLE ##yourTempTable


Below this statement enter the same statement to create the global temp table as you used in SSMS.

STEP 3.

Next in the Create Temp Tables Properties, the window to the bottom right, for the section Execution under the option DelayValidation set the value to True. In STEP 1 the temp table is created and visible to Visual Studio, but when the SSIS package is run in the future the table won’t be there to be validated prior to the package running. Without setting this property to true the package would seek to confirm the existence of the temp table and would error when it determined the temp table does not exist stopping the package from running.

Image of Create Temp Table Task Properties showing DelayingValidation option set to True

STEP 4.

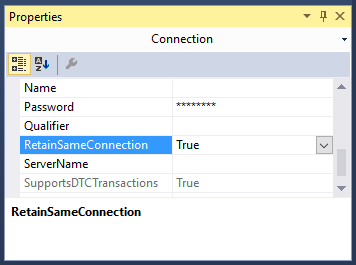
Next at the bottom of the design view window in Visual Studio the current source connection should be displayed. Left click on the source connection and the properties window should change focus to connection properties. Set the RetainSameConnection option to True, this allows the global temp table to remain visible to SSIS package during the package’s execution by maintaining the session.

Image showing the Connection Properties window with the RetainSameConnection option set to true

STEP 5.

Drag a Data Flow Task onto the Control Flow workspace and rename it Query and drag the precedence constraint between the Create Temp Table and Query.

Image showing OLE DB Source creation process

Double left click on the Query Task.

From Other Sources drag an OLE DB Source into the Data Flow workspace.

Double left click on the OLE DB Source and set the OLE DB Connection Manager to your source server and Data Access Mode to SQL Command.

Image of the OLE DB Source Editor Window

Enter your SQL Command in the box provided e.g.

SELECT * FROM ##yourTempTable


Hit OK on the OLE DB Source.

STEP 6.

Set up the destination as you would with any other typical SSIS package.

From Other Destinations drag an OLE DB Destination into the Data Flow workspace.

Then drag the precedence constraint between OLE DB Source to the OLE DB Destination.

Double left click on the OLE DB Destination and choose your destination and set “Table or View – fast load” from the data access mode dropdown. For the “Name of table or view option” enter your intended destination.

Hit OK on the OLE DB Destination.

Finally I would suggest adding another task that will drop the temp tables at the end of the package. For example, DROP TABLE ##yourTempTable.

Conclusion.

At this point you should now be able to run the package successfully and make your own adaptions to this process to fit your future needs.

How to export a table as an XML file using a SQL script

Below is a script that will allow you, as the title suggests, to export a table as an XML file.

By use of the find and replace function in your preferred text editor, or by way of the text editor in SSMS, input your values for the required fields, i.e. replace TableName with the name of the table you will be working off.

SERVER NAME: ServerName

DATABASE NAME: DatabaseName

SCHEMA NAME: SchemaName

TABLE NAME: TableName

SAVE LOCATION ADDRESS: AddressName

FILE NAME: FileName (Excluding .xml extension)

Then run the script below and the table will be exported as an XML file to the location and file name of your choosing.

/*
FIND AND REPLACE:

SERVER NAME: ServerName
DATABASE NAME: DatabaseName 
SCHEMA NAME: SchemaName
TABLE NAME: TableName
SAVE LOCATION ADDRESS: AddressName
FILE NAME: FileName
 */
-- Run on ServerName
USE DatabaseName;
GO

DECLARE @saveLocation AS VARCHAR(510)
DECLARE @nameOfFile AS VARCHAR(255)
DECLARE @instanceName AS VARCHAR(255)
DECLARE @cmd NVARCHAR(1020)

SET @saveLocation = 'AddressName'
SET @nameOfFile = 'FileName'
SET @saveLocation = @saveLocation + '\' + @nameOfFile + '.xml'
SET @instanceName = (
		SELECT @@servername
		)

-- Please note that the fully qualified table name is needed
SELECT @cmd = '
    bcp "SELECT * FROM [DatabaseName].[SchemaName].[TableName] row for xml auto, root(''rows''), elements" ' + 'queryout "' + @saveLocation + '" -S ' + @instanceName + ' -T -w -r -t';

EXEC xp_cmdshell @cmd;
GO


This script is enabled by two utilities xp_cmdshell and BCP.

For an explanation of each please view the associated links.

How to enable and disable xp_cmdshell

xp_cmdshell is an extended stored procedure provided by Microsoft and stored in the master database. This procedure allows you to issue operating system commands directly to the Windows command shell via T-SQL code.

By default, the xp_cmdshell option is disabled on new installations. Along with other unwanted behavior malicious users can elevate their privileges with the use of xp_cmdshell. For this reason it is generally recommend to leave xp_cmdshell disabled. It can be enabled by using the Policy-Based Management or by running the sp_configure system stored procedure as shown in the following code example:

Use Master
GO

EXEC master.dbo.sp_configure 'show advanced options', 1
RECONFIGURE WITH OVERRIDE
GO

EXEC master.dbo.sp_configure 'xp_cmdshell', 1
RECONFIGURE WITH OVERRIDE
GO


To disable xp_cmdshell use the following code example. Note: The following example also sets show advanced options server configuration option to 0. It is best practice to leave this option in the default state of 0 to stop the enabling of features.

Use Master
GO

EXEC master.dbo.sp_configure 'xp_cmdshell', 0
RECONFIGURE WITH OVERRIDE
GO

EXEC master.dbo.sp_configure 'show advanced options', 0
RECONFIGURE WITH OVERRIDE
GO

How to populate a temp table with the days in a month

As described in the title this is a dynamic sql script that will populate a temp table with the day dates of the current month as outputted below:

calendarTableTo create a temporary calendar table for a greater period of time than just the current month:

Set @startDate to any historical date and @numberOfLoops to any number you like (365 being a year from the @startdate).

To make the table persistent:

Remove the # signs from the #calendarTable temp table referenced and rename the table accordingly.

You could also remove any columns you do not need.

IF OBJECT_ID('tempdb..#calendarTable') IS NOT NULL
	DROP TABLE #calendarTable;
	GO

CREATE TABLE #calendarTable (
	"DayID" INT
	,"DayOfMonth" INT
	,"DayOfQuarter" INT
	,"DayOfYear" INT
	,"MonthOfDate" INT
	,"YearOfDate" INT
	,"DayDate" DATE
	,PRIMARY KEY (DayID)
	)

DECLARE @startDate AS DATE
DECLARE @baseDate DATE
	,@offSet INT
	,@numberOfLoops INT

/*
To create a temporary calendar table:
Set @startDate to any historical date 
and @numberOfLoops to any number you like 
(365 being a year from the @startdate)

To make the table persistent remove the # signs 
from the #calendarTable temp table referenced 
*/
SET @startDate = GETUTCDATE() /*'20150101'*/
SET @baseDate = DATEADD(MONTH, DATEDIFF(MONTH, 0, @startDate), 0)
SET @offSet = 0
SET @numberOfLoops = DATEDIFF(DAY, @baseDate, DATEADD(MONTH, 1, @baseDate)) /*365*/

WHILE (@offSet < @numberOfLoops)
BEGIN
	INSERT INTO #calendarTable (
		"DayID"
		,"DayOfMonth"
		,"DayOfQuarter"
		,"DayOfYear"
		,"MonthOfDate"
		,"YearOfDate"
		,"DayDate"
		)
	SELECT (@offSet + 1)
		,DATEPART(DAY, DATEADD(DAY, @offSet, @baseDate))
		,DATEDIFF(D, DATEADD(QQ, DATEDIFF(QQ, 0, DATEADD(DAY, @offSet, @baseDate)), 0), DATEADD(DAY, @offSet, @baseDate)) + 1
		,DATEPART(DAYOFYEAR, DATEADD(DAY, @offSet, @baseDate))
		,DATEPART(MONTH, DATEADD(DAY, @offSet, @baseDate))
		,DATEPART(YEAR, DATEADD(DAY, @offSet, @baseDate))
		,DATEADD(DAY, @offSet, @baseDate)

	SET @offSet = @offSet + 1
END

SELECT *
FROM #calendarTable

Combine and then split tsql insert statement files into batches of one thousand.

Recently I was given the task of executing hundreds of prepared sql files some containing multi-row insert statements numbering in the tens of thousands.

So I encountered two problems with this:

  • MSSQL Multi-row insert statements  actually have some limits i.e. a maximum of 1000 rows can be inserted.
  • I didn’t know which files had more or less than a thousand insert statements.

Luckily all the new rows were going into the same table and I knew that each file had the same flat/unformatted tsql structure.

This meant I could write a batch script to combine the files and then split the tsql insert statements into batches of 1000.

The batch script below is a little long winded so here are the main sections.

  • Combine Files
  • Remove unwanted lines of text  i.e. blank lines or insert statement sections.
  • Ensure every parentheses is followed by a comma
  • Inject the “insert into table” statement and GO every 1000 lines.
  • Remove double quotes

This was a somewhat specific case but hopefully you’ll be able to pick the batch script below apart for yourself and get some use out of it. But if there’s one little snippet of code I’d like to draw your attention to it is this little gem.

TYPE *.sql > CombinedScript.sql


Type that into a text file and save it as combine.bat, place the file in the folder with all your sql scripts and the OS will combine them all for you as CombinedScript.sql.

Here’s the rest of the script followed by some sample data showing the shape and structure of the original sql files.

(I’d like to thank the hilite.me website for creating this awesome online utility for creating HTML highlighted code that can just be dropped into a blog, as shown below. No more gist for me!)

@ECHO OFF

::VARIABLES
SET FileToUse="CombinedScript.sql"
SET FileToDelete="Query.sql"
SET FirstLine="Insert into [LoadProfiles] (Profile,Type,ProfileDate,ProfileValue,Active,Created,CreatedBy) Values"
SET BatchSplit="GO "
SET TextLineToAdd=%BatchSplit%%FirstLine%
::SET "TextLineToAdd=%TextLineToAdd:"=%"
::Combine SQL FILES

ECHO Combining Files . . . 
ECHO Please Wait
ECHO.
TYPE *.sql > %FileToUse%
ECHO Files Combined
ECHO.

ECHO Removing unwanted lines of text . . . 
ECHO Please Wait
ECHO.
::REF 1
::REMOVE THE LINES WITH INSERT AND VALUES FROM FILE
findstr /v "Insert Values" %FileToUse% > Temp.sql
::REF 2
::REMOVE BLANK ROWS FROM Temp.sql
findstr /v /r /c:"^$" /c:"^\ *$" Temp.sql >> CleanedFile.sql
::DELETE Temp.sql
IF EXIST Temp.sql del /F Temp.sql
ECHO Lines Removed
ECHO.


::REF 3
::REPLACE ) WITH ), TO ENSURE EVERY PARENTHESES IS FOLLOWED BY A COMMA
ECHO Adding Comma to each Parentheses missing a Comma . . .
ECHO Please Wait
ECHO.
    setlocal enableextensions disabledelayedexpansion

    set "search=)"
    set "replace=),"

    set "textFile=CleanedFile.sql"

    for /f "delims=" %%i in ('type "%textFile%" ^& break ^> "%textFile%" ') do (
        set "line=%%i"
        setlocal enabledelayedexpansion
        set "line=!line:%search%=%replace%!"
        >>PreparedFile.sql echo(!line!
        endlocal
    )
::DELETE CleanedFile.sql
IF EXIST CleanedFile.sql del /F CleanedFile.sql
::REF 3
::REPLACE ),, WITH ), TO ENSURE EVERY PARENTHESES IS FOLLOWED BY ONLY ONE COMMA
	    setlocal enableextensions disabledelayedexpansion

    set "search=),,"
    set "replace=),"

    set "textFile=PreparedFile.sql"

    for /f "delims=" %%i in ('type "%textFile%" ^& break ^> "%textFile%" ') do (
        set "line=%%i"
        setlocal enabledelayedexpansion
        set "line=!line:%search%=%replace%!"
        >>CleanedFile.sql echo(!line!
        endlocal
    )
ECHO Commas Added
ECHO.

ECHO Creating Query file . . .
ECHO Please Wait
ECHO.
::DELETE PreparedFile.sql
IF EXIST PreparedFile.sql del /F PreparedFile.sql
 
::Try to delete the file only if it exists
IF EXIST %FileToDelete% del /F %FileToDelete%
 
::REM If the file wasn't deleted for some reason, stop and error
IF EXIST %FileToDelete% exit 1

TYPE NUL > %FileToDelete% 

::REF 4
SETLOCAL
SET count=0
SET injectevery=1000
FOR /f "delims=" %%Z IN ('type CleanedFile.sql^|findstr /n "^"') DO (
SET /a count+=1
SET line=%%Z
SETLOCAL ENABLEDELAYEDEXPANSION
ECHO(!line:*:=! >> Query.sql
IF !count!==%injectevery% ECHO.%TextLineToAdd% >> Query.sql
ENDLOCAL
SET /a count=count %% %injectevery% 
) 

::REF 3
::REPLACE " WITH NOTHING 
ECHO Adding Comma to each Parentheses missing a Comma . . .
ECHO Please Wait
ECHO.
    setlocal enableextensions disabledelayedexpansion

    set "search=""
    set "replace= "

    set "textFile=Query.sql"

    for /f "delims=" %%i in ('type "%textFile%" ^& break ^> "%textFile%" ') do (
        set "line=%%i"
        setlocal enabledelayedexpansion
        set "line=!line:%search%=%replace%!"
        >>Script.sql echo(!line!
        endlocal
    )
::DELETE CleanedFile.sql
IF EXIST CleanedFile.sql del /F CleanedFile.sql

PAUSE

::REF 1: http://stackoverflow.com/questions/418916/delete-certain-lines-in-a-txt-file-via-a-batch-file
::CREDIT GOES TO: http://stackoverflow.com/users/14138/rick

::REF 2: http://www.computing.net/answers/programming/delete-blank-line-from-a-txt-file-using-batch/25575.html
::CREDIT GOES TO: http://www.computing.net/userinfo/150780

::REF 3: http://stackoverflow.com/questions/23075953/batch-script-to-find-and-replace-a-string-in-text-file-without-creating-an-extra
::CREDIT GOES TO: http://stackoverflow.com/users/2861476/mc-nd

::REF 4: FOR INSERT NEW TEXT LINE: http://stackoverflow.com/questions/15859128/looking-for-batch-file-to-insert-new-lines-into-text-file
::CREDIT GOES TO: http://stackoverflow.com/users/2128947/magoo

/*CHANGE DATABASE_NAME*/

USE [DATABASE_NAME]
GO

/****** Object:  Table [dbo].[LoadProfiles]    Script Date: 06/12/2015 15:34:43 ******/
SET ANSI_NULLS ON
GO

SET QUOTED_IDENTIFIER ON
GO

SET ANSI_PADDING ON
GO

CREATE TABLE [dbo].[LoadProfiles](
	[ProfileID] [int] IDENTITY(1,1) NOT NULL,
	[Profile] [int] NULL,
	[Type] [varchar](8) NULL,
	[ProfileDate] [date] NULL,
	[ProfileValue] [decimal](12, 10) NULL,
	[Active] [bit] NULL,
	[Created] [datetime] NULL,
	[CreatedBy] [int] NULL,
PRIMARY KEY CLUSTERED 
(
	[LoadProfileID] ASC
)WITH (PAD_INDEX  = OFF, STATISTICS_NORECOMPUTE  = OFF, IGNORE_DUP_KEY = OFF, ALLOW_ROW_LOCKS  = ON, ALLOW_PAGE_LOCKS  = ON) ON [PRIMARY]
) ON [PRIMARY]

GO

SET ANSI_PADDING OFF
GO

 
Insert into [dbo].[LoadProfiles] (Profile,Type,ProfileDate,ProfileValue,Active,Created,CreatedBy)
 Values
(1,'24H','2012/01/01',0.003348,1,getutcdate(),333),
(1,'24H','2012/01/02',0.003392,1,getutcdate(),333),
(1,'24H','2012/01/03',0.003278,1,getutcdate(),333),
(1,'24H','2012/01/04',0.003252,1,getutcdate(),333),
(1,'24H','2012/01/05',0.003203,1,getutcdate(),333)

How to map the table structure of all Databases in a SQL Server Instance

Below is a T-SQL script that will return the following fields for each table from each database located in a SQL Server Instance:

  • ServerName
  • DatabaseName
  • SchemaName
  • TableName
  • ColumnName
  • KeyType

The output is provided in a table format with these additional formatted lines of text which can be used as queries or as part of queries.

  • A Select table query
  • A Select column query
  • Each column bracketed
  • Each table and column bracketed

This query is especially useful from a reporting perspective for a DBA or SQL developer unfamiliar with the structure of the database they are querying. The table returned by the query can be exported to excel. Using excels filter option applied to the columns of the table makes finding and selecting specific tables and columns very easy.

This process can be repeated for every database server used by the business to generate a single mapped servers master excel file allowing the user to find any table or column available to the organization quickly.

Applying some colour coding like below adds to the ease of use.

Image of excel file with mapped database server structure

How to use:

Simply open SQL Server management studio and from object explorer right click on the server name and select new query. This will open a window set to the master database of the server. Copy and paste the SQL below into this SQL Server window and execute. When the query is finished you will have created the table above.

/*
SCRIPT UPDATED
20180316
*/

USE [master]
GO

/*DROP TEMP TABLES IF THEY EXIST*/
IF OBJECT_ID('tempdb..#DatabaseList') IS NOT NULL
	DROP TABLE #DatabaseList;

IF OBJECT_ID('tempdb..#TableStructure') IS NOT NULL
	DROP TABLE #TableStructure;

IF OBJECT_ID('tempdb..#ErrorTable') IS NOT NULL
	DROP TABLE #ErrorTable;

IF OBJECT_ID('tempdb..#MappedServer') IS NOT NULL
	DROP TABLE #MappedServer;

DECLARE @ServerName AS SYSNAME

SET @ServerName = @@SERVERNAME

CREATE TABLE #DatabaseList (
	Id INT NOT NULL IDENTITY(1, 1) PRIMARY KEY
	,ServerName SYSNAME
	,DbName SYSNAME
	);

CREATE TABLE [#TableStructure] (
	[DbName] SYSNAME
	,[SchemaName] SYSNAME
	,[TableName] SYSNAME
	,[ColumnName] SYSNAME
	,[KeyType] CHAR(7)
	) ON [PRIMARY];

/*THE ERROR TABLE WILL STORE THE DYNAMIC SQL THAT DID NOT WORK*/
CREATE TABLE [#ErrorTable] ([SqlCommand] VARCHAR(MAX)) ON [PRIMARY];

/*
A LIST OF DISTINCT DATABASE NAMES IS CREATED
THESE TWO COLUMNS ARE STORED IN THE #DatabaseList TEMP TABLE
THIS TABLE IS USED IN A FOR LOOP TO GET EACH DATABASE NAME
*/
INSERT INTO #DatabaseList (
	ServerName
	,DbName
	)
SELECT @ServerName
	,NAME AS DbName
FROM master.dbo.sysdatabases WITH (NOLOCK)
WHERE NAME <> 'tempdb'
ORDER BY NAME ASC

/*VARIABLES ARE DECLARED FOR USE IN THE FOLLOWING FOR LOOP*/
DECLARE @sqlCommand AS VARCHAR(MAX)
DECLARE @DbName AS SYSNAME
DECLARE @i AS INT
DECLARE @z AS INT

SET @i = 1
SET @z = (
		SELECT COUNT(*) + 1
		FROM #DatabaseList
		)

/*WHILE 1 IS LESS THAN THE NUMBER OF DATABASE NAMES IN #DatabaseList*/
WHILE @i < @z
BEGIN
	/*GET NEW DATABASE NAME*/
	SET @DbName = (
			SELECT [DbName]
			FROM #DatabaseList
			WHERE Id = @i
			)
	/*CREATE DYNAMIC SQL TO GET EACH TABLE NAME AND COLUMN NAME FROM EACH DATABASE*/
	SET @sqlCommand = 'USE [' + @DbName + '];' + '

INSERT INTO [#TableStructure]
SELECT DISTINCT' + '''' + @DbName + '''' + ' AS DbName
	,SCHEMA_NAME(SCHEMA_ID) AS SchemaName
	,T.NAME AS TableName	
	,C.NAME AS ColumnName
	,CASE 
		WHEN OBJECTPROPERTY(OBJECT_ID(iskcu.CONSTRAINT_NAME), ''IsPrimaryKey'') = 1 
			THEN ''Primary'' 
		WHEN OBJECTPROPERTY(OBJECT_ID(iskcu.CONSTRAINT_NAME), ''IsForeignKey'') = 1 
			THEN ''Foreign''
		ELSE NULL 
		END AS ''KeyType''
FROM SYS.TABLES AS t WITH (NOLOCK)
INNER JOIN SYS.COLUMNS C ON T.OBJECT_ID = C.OBJECT_ID
LEFT JOIN INFORMATION_SCHEMA.KEY_COLUMN_USAGE AS iskcu WITH (NOLOCK) 
ON SCHEMA_NAME(SCHEMA_ID) = iskcu.TABLE_SCHEMA 
	AND T.NAME = iskcu.TABLE_NAME
	AND C.NAME = iskcu.COLUMN_NAME
ORDER BY SchemaName ASC
	,TableName ASC
	,ColumnName ASC;
';

	/*ERROR HANDLING*/
	BEGIN TRY
		EXEC (@sqlCommand)
	END TRY

	BEGIN CATCH
		INSERT INTO #ErrorTable
		SELECT (@sqlCommand)
	END CATCH

	SET @i = @i + 1
END

/*
JOIN THE TEMP TABLES TOGETHER TO CREATE A MAPPED STRUCTURE OF THE SERVER
ADDITIONAL FIELDS ARE ADDED TO MAKE SELECTING TABLES AND FIELDS EASIER
*/
SELECT DISTINCT @@SERVERNAME AS ServerName
	,DL.DbName
	,TS.SchemaName
	,TS.TableName
	,TS.ColumnName
	,TS.[KeyType]
	,',' + QUOTENAME(TS.ColumnName) AS BracketedColumn
	,',' + QUOTENAME(TS.TableName) + '.' + QUOTENAME(TS.ColumnName) AS BracketedTableAndColumn
	,'SELECT * FROM ' + QUOTENAME(DL.DbName) + '.' + QUOTENAME(TS.SchemaName) + '.' + QUOTENAME(TS.TableName) + '--WHERE --GROUP BY --HAVING --ORDER BY' AS [SelectTable]
	,'SELECT ' + QUOTENAME(TS.TableName) + '.' + QUOTENAME(TS.ColumnName) + ' FROM ' + QUOTENAME(DL.DbName) + '.' + QUOTENAME(TS.SchemaName) + '.' + QUOTENAME(TS.TableName) + '--WHERE --GROUP BY --HAVING --ORDER BY' AS [SelectColumn]
INTO #MappedServer
FROM [#DatabaseList] AS DL
INNER JOIN [#TableStructure] AS TS ON DL.DbName = TS.DbName
ORDER BY DL.DbName ASC
	,TS.SchemaName ASC
	,TS.TableName ASC
	,TS.ColumnName ASC

/*
HOUSE KEEPING
*/
IF OBJECT_ID('tempdb..#DatabaseList') IS NOT NULL
	DROP TABLE #DatabaseList;

IF OBJECT_ID('tempdb..#TableStructure') IS NOT NULL
	DROP TABLE #TableStructure;

SELECT *
FROM #ErrorTable;

IF OBJECT_ID('tempdb..#ErrorTable') IS NOT NULL
	DROP TABLE #ErrorTable;

/*
THE DATA RETURNED CAN NOW BE EXPORTED TO EXCEL
USING A FILTERED SEARCH WILL NOW MAKE FINDING FIELDS A VERY EASY PROCESS
*/
SELECT ServerName
	,DbName
	,SchemaName
	,TableName
	,ColumnName
	,KeyType
	,BracketedColumn
	,BracketedTableAndColumn
	,SelectColumn
	,SelectTable
FROM #MappedServer
ORDER BY DbName ASC
	,SchemaName ASC
	,TableName ASC
	,ColumnName ASC;


How to find columns from all Tables of a Database

If your job is to create reports using SQL chances are you have or will encounter this situation:

You’ve been asked to prepare a report, but the person who has asked for the report simply has a list of fields they want and they have no idea where those fields come from. They may have received previous reports in the past, so they know the fields exist, but they cannot provide any of the SQL queries used to create these reports as an example.

You, the developer, may not be familiar with that particular area of the business or associated data sources. Possibly because you typically prepared financial reports and this request has come from the operations or marketing departments.

So the first step is to locate these columns within the database.

The following query will return the Table Name, Schema Name and Column Name from the database.

In the example below all instances where the column name equals CustomerID, OrderID, OrderDate will be returned. Also Column names that contain the word Status or Promotion will also be return. Simply change or add additional columns names as needed. 

USE [YourDatabaseName];
GO

SELECT T.NAME AS TableName
	,SCHEMA_NAME(SCHEMA_ID) AS SchemaName
	,C.NAME AS ColumnName
FROM SYS.TABLES AS t
INNER JOIN SYS.COLUMNS C ON T.OBJECT_ID = C.OBJECT_ID
WHERE C.NAME = 'CustomerID'
	OR C.NAME = 'OrderID'
	OR C.NAME = 'OrderDate'
	OR C.NAME LIKE '%Status%'
	OR C.NAME LIKE '%Promotion%'
ORDER BY SchemaName
	,TableName;


That should help get you started in preparing the report.

How to get the hour from a datetime string (T-SQL)

Often data is entered into the database as a string (varchar), when a more appropriate data type should have been applied.

Here’s a snippet of T-SQL for dealing with datetime data, stored as varchar, when what you really need is the hour. 

DECLARE @DateTime AS VARCHAR(25)

-- GET THE CURRENT DATETIME AND CONVERT INTO A STRING
SET @DateTime = (
		SELECT CONVERT(VARCHAR(25), GETDATE(), 120)
		)

--PRINT @DateTime
-- GET HOUR FROM DATETIME AS A STRING
SELECT DATEPART(HOUR, CONVERT(DATETIME, CONVERT(VARCHAR(13), @DateTime, 120) + ':00')) AS ConvertedHour


Why would data be stored as a varchar instead of using the appropriate data type in the first place?

The most common reason might be that XML files have been loaded without any data type conversions being applied, i.e. dates have been entered as strings along with everything else.

Why would you need this code?

Should you be confronted with data in this raw string form you would be unable to apply a clause regarding a specific hour. Ideally there should be some sort of staging table to convert the fields into the appropriate data types but if you simply wanted to apply some clauses to select specific data, which will be outputted to an excel file for example, that additional effort may be unnecessary.