Use Azure Active Directory (Azure AD) authentication for better security.
Implement firewall rules to control access to your database.
Assign minimal permissions to users based on their roles (principle of least privilege).
Encryption:
Enable Transparent Data Encryption (TDE) to protect data at rest.
Use Always Encrypted to secure sensitive data in transit.
Consider client-side encryption for additional protection.
Auditing and Monitoring:
Enable Azure SQL Auditing to track database activity.
Set up Azure Monitor to receive alerts and insights.
Regularly review logs and audit trails.
Network Security:
Isolate your database using Virtual Network Service Endpoints.
Restrict public access and use private endpoints.
Patch Management:
Keep your database engine up to date with the latest security patches.
Regularly review vulnerability assessments.
Backup and Recovery:
Implement automated backups and test recovery procedures (remember a backup is only theoretically there unless it has been tested and proven to work).
Store backups conforming to the 3-2-1 Backup Rule explained below (do not assume your backups are safe just because they are in the cloud).
The 3-2-1 Backup Rule: Ensuring Data Resilience
The 3-2-1 Rule is a robust strategy that emphasizes redundancy, resilience, and data availability. Here’s what it entails:
Three Copies of Your Data:
Maintain the original data and create at least two additional copies.
Two Different Types of Media for Storage:
Store your data on distinct forms of media (e.g., hard drives, tapes) to enhance redundancy.
At Least One Copy Off-Site:
Safeguard one backup copy in an off-site location, separate from your primary data and on-site backups.
By adhering to this rule, you mitigate single points of failure, protect against corruption, and ensure data safety even in unexpected events or disasters
Below is a script you can modify to create a Login for an Azure SQL Server instance along with Users from that Login within databases.
To use the script don’t execute it all at once.
Execute the script in stages:
Section 1 & 2 can be executed together.
Section 3 requires you to switch to the target database.
Section 4 relates to limiting data access to a particular role or schema.
/*Find & replacethe following with a login name and user name*//*ServerLoginDbUser*//*1: Create SQL Login on master database (connect with admin account to master database)*/CREATE LOGIN ServerLogin
WITH PASSWORD ='<strong_password>';
/*2: Create SQL User on the master database (this is necessary for login attempt to the <default> database, as with Azure SQL you cannot set the DEFAULT_DATABASE property of the login so it always will be [master] database.) */CREATEUSER DbUser
FROM LOGIN ServerLogin;
/***************************//*SWITCH TO TARGET DATABASE*//***************************//*3: Create SQL User on the user database (connect with admin account to user database)*/CREATEUSER DbUser
FROM LOGIN ServerLogin;
/*************************//*SECURITY CONSIDERATIONS*//*************************//*Set up role example*//*4. Grant permissions to the user by assigning them to a database role*/ALTERROLE db_datareader ADD MEMBER DbUser;
/*Limit access to schema*//*Or instead of step four you can use the below:*/GRANTSELECTONSCHEMA::schemaName
TO DbUser;
Many programs in operation today, terrible programs written by lazy developers, still represent four-digit years with only the final two digits, making the year 2000 indistinguishable from 1900.
If you’re consuming data from a source system using an incomplete date format, and you’re doing your job properly, you’ll want to correct for that.
Below is an ADF expression example that will correct date field values that relate to the year 2000 onward by prefixing 20 to the year, e.g. 21 becomes 2021.
Typically most pipeline development use cases can be handled directly within Data Factory through the Azure Web Portal. However where the line can get blurred sometimes between working in the cloud and working locally is with DevOps GIT.
If a GIT based deployment gets tangled there is an expectation you will be able to work through the desktop interface for GIT or worse fall back to using command line.
This is necessary because before a GIT pull request can complete, any conflicts with the target branch must be resolved and this usually involves issuing a few commands to put the matter right. The options for resolving conflicts through the web portal by default are limited to nonexistent which is at odds with the very high level, low code approach of developing pipelines in Data Factory.
Luckily if a merge conflict occurs there is an extension you can try.
A conflict might occur because the master branch is no longer in sync with the development branch for example i.e. the master branch was changed after a development branch was created from it. When a pull request is created this may throw a merge conflict error blocking the merge from proceeding. Without resorting to code the extension above will allow you to choose between the source and target branch and specify which has the correct file version.
The following example is for a computer running Windows 10 or Windows Server 2016.
This tutorial has 5 main steps:
Create the Root and Child certificates
Export the Root and Child certificates
Edit the Root certificate
Enter the Root certificate into the Azure Point-to-Site configuration
Connect via the Azure VPN client
Following these instructions should allow you to connect to Azure using the Azure VPN client.
Create the Root and Child Certificates
1. Open the following:
> Windows Start > (type) run (enter) > (type) certmgr.msc (enter) > Personal > Certificates
This is where your certificates will appear once created so keep the certmgr.msc window open.
2. Open a Windows PowerShell console with elevated privileges.
> Windows Start > (type) Windows Powershell (right click: Run as Administrator)
3. Copy and paste the following example into Powershell to create the self-signed root certificate and child certificate. The example creates a self-signed root certificate named “PS2RootCert” and “PS2ChildCert” that is automatically installed in “Certificates-Current User\Personal\Certificates” (i.e. step 1).
1. Once PS2RootCert has been created and is visible in certmgr right-click on it. Click All Tasks, and then click Export. This opens the Certificate Export Wizard.
2. In the Wizard, click Next > Select No, do not export the private key, and then click Next > On the Export File Format page, select Base-64 encoded X.509 (.CER)., and then click Next > For File to Export, Browse to the location to which you want to export the certificate. For File name, name the certificate file “PS2RootCert”. Then, click Next > Click Finish to export the certificate
You should then see: “The export was successful”
2. Now export the PS2ChildCert which has slightly different steps to follow than above. In certmgr right-click on PS2ChildCert. Click All Tasks, and then click Export. This opens the Certificate Export Wizard.
> In the Certificate Export Wizard, click Next to continue > Select Yes, export the private key, and then click Next > On the Export File Format page, leave the defaults selected. Make sure that Include all certificates in the certification path if possible is selected. This setting additionally exports the root certificate information that is required for successful client authentication. Without it, client authentication fails because the client doesn’t have the trusted root certificate. Then, click Next > On the Security page, you must protect the private key. If you select to use a password, make sure to record or remember the password that you set for this certificate. Then, click Next > On the File to Export, Browse to the location to which you want to export the certificate. For File name, name the certificate “PS2ChildCert” Then, click Next. > Click Finish to export the certificate.
You should then see: “The export was successful”
Edit the Root certificate
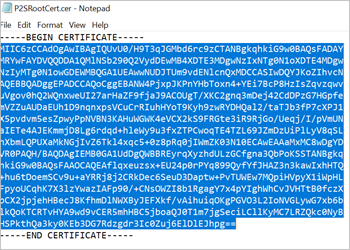
1. Open the PS2RootCert certificate with a text editor, such as Notepad++.
2. Copy only the following section (excluding the header and footer between the dashes and the dashes themselves, e.g. —)
3. Paste the copied text into a new Notepad++ window and edit the pasted text to make sure that the text is one continuous line without carriage returns or line feeds. You may need to modify your view in the text editor to ‘Show Symbol/Show all characters’ to see the carriage returns and line feeds. Once edited copy only the text as one continuous line.
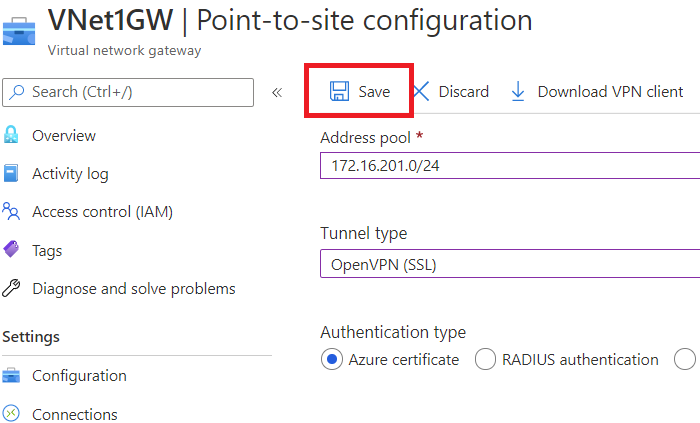
Enter the Root certificate into the Azure Point-to-Site configuration
1. Log into the Azure web portal.
2. Navigate to Virtual Network Gateways > Point-to-site configuration.
3. Paste the certificate data into the Public Certificate Data field. Name the certificate “PS2RootCert”, or if that name is already in use name the certificate “PS2RootCert_YourUserName”, and then select Save. You can add up to 20 trusted root certificates.
4. Select Save at the top of the page to save all of the configuration settings.
5. Once this is done download the VPN client. This will be the configuration information needed to set up an Azure VPN.
Connect via the Azure VPN client
1. Once the VPN client file has been downloaded unzip it. You should see 3 folders, one being AzureVPN. Inside AzureVPN is a configuration file called “azurevpnconfig”.
2. Launch the Azure VPN client. At the bottom of the screen to the left there should be a plus icon. Click it and it will give you the options of “Add” or “Import”. Click import.
3. Navigate to the AzureVPN folder and import the file azurevpnconfig. This should populate the VPN Client options with all the relevant information bar authentication type.
4. Under the Client Authentication heading, for Authentication Type choose Certificate and then for Certificate Information choose PS2ChildCert. (If these options are showing blank then change Certificate Information to “DigiCert Global Root CA”)
Click Save.
You should now have access to Azure via the Azure VPN.
If you found this post helpful please like/share/subscribe.