Time cannot be summed directly in T-SQL. In order to sum two times they first need to be assigned a date. When a time data type is cast as a datetime data type, as it does not have a date element, the value defaults to the date of 1900-01-01.
As T-SQL does have the functionality to sum datetime and as the date element will be the same only the time value will be summed. This functionality allows us to sum time.
Below is example T-SQL:
IF OBJECT_ID('tempdb..#TimeTable', 'U') ISNOTNULLBEGINDROPTABLE#TimeTable
ENDCREATETABLE#TimeTable(
id INT
,TimeRecord TIME(0)
);
INSERTINTO#TimeTable
VALUES (
1
,'00:00:10'
);
INSERTINTO#TimeTable
VALUES (
1
,'00:14:00'
);
INSERTINTO#TimeTable
VALUES (
2
,'00:00:10'
);
INSERTINTO#TimeTable
VALUES (
2
,'00:35:10'
);
SELECT id
,TimeRecord
FROM#TimeTable;
/*demo of time converted to datetime*/SELECTCAST(TimeRecord AS DATETIME) AS DateTimeRecord
FROM#TimeTable
SELECT id
,CAST(DATEADD(MILLISECOND, SUM(DATEDIFF(MILLISECOND, 0, CAST(TimeRecord AS DATETIME))), 0) AS TIME(0)) AS SummedTime
FROM#TimeTable
GROUPBY id;
This is a very common activity in the data world, i.e. there’s some data in a text string you need and the rest of the data in the string is just in your way. Some use cases might be you have a reference in a filename you need to extract, or you may need a snippet of data to create a composite key, or there’s an order number surrounded by other data that is not relevant to your needs etc.
The following is some simple T-SQL that will extract the data you want from a text string providing the data has specific delimiting characters on each side of it.
/*Delimiter variables, first and second position*/DECLARE@dfp ASCHAR(1);
DECLARE@dsp ASCHAR(1);
DECLARE@textVARCHAR(MAX);
SET@dfp =';';
SET@dsp ='@';
SET@text='I want you to ;Extract this@ substring for me please.';
SELECTSUBSTRING(@text, (CHARINDEX(@dfp, @text) +1), (CHARINDEX(@dsp, @text) -2) - CHARINDEX(@dfp, @text) + Len(@dsp))
You might have heard the term right to repair being thrown around in recent years and thought little of it. Maybe you’re an engineering graduate and fixing something yourself is not only a piece of cake for you but also your idea of a good time. Or maybe you are good with your hands but it would be ludicrous to spend your hard earned weekend fixing something yourself. Especially if you can hand it over to the well reviewed local repair shop that will do a perfect repair for a fair price.
Unfortunately without right to repair legislation manufactures have the power to take away your option to do either. Manufactures can refuse to provide documentation as to how to fix or service a product. Through monopolistic control of the supply chain manufacturers can make it so that consumers need to return their broken product directly to them if they want them repaired. Often repairs carried out by the manufacturer are done at exorbitant prices making the prospect of repairing the product uneconomical incentivizing customers to just purchase the newer product model. Through tight control of the supply chain manufacturers can even force the end of life of a product by no longer manufacturing replacement parts and/or suing a company that does. Manufacturers have even gone as far as making it difficult for wholesalers and repair shops to buy and sell used parts in bulk and suing repair shops for using unlicensed parts. This means that a product that could be easily repaired gets thrown in the trash all because a cheap, new or used, component part is unavailable.
You still might be thinking that all of this doesn’t concern you. You might be the type of person that buys a new phone every year, whether it needs replacing or not, or if something breaks you’ve got the money to buy a new one. Why is this such a big deal? What if I told you it could literally be the difference between life and death.
Below is a video that highlights how not having right to repair legislation in place affects everyone in society. The video is a conversation between Louis Rossmann and an hospital employee discussing all the difficulties an operating table manufacturer has put it place to make their operating table irreparable. Instead of the hospital having the option of repairing an operating table for the price of a $1,800 dollar hydraulic pump the hospital will be forced to buy either a used operating table for approx. $20 K plus or a new table at $40 K plus. That’s the potential difference in the salary of a nurse for a year.
Clearly this is not an isolated problem only affecting people at an individual level leaving repairable consumer products broken. By not affording individuals the right to repair their own devices this translates to restrictions on organizations doing the same. At an individual level it’s a shady business practice at best but scaled up to the organizational level it can be downright morally reprehensible.
Rossmann is active campaigner and advocate for right to repair legislation. The right to repair refers to government legislation that is intended to allow consumers the ability to repair and modify their own devices, where otherwise the manufacturer of such devices requires the consumer to use only their offered services.
If you would like to help Mr Rossmann in his fight to protect consumer right to repair in the state of New York please consider donating to his nonprofit called Repair Preservation Group Action Fund available through the link below.
If you still need convincing from a personal electronic devices perspective, here’s Linus from Linus Tech Tips speaking on the matter, spoiler he mentions Apple a lot.
The following example is for a computer running Windows 10 or Windows Server 2016.
This tutorial has 5 main steps:
Create the Root and Child certificates
Export the Root and Child certificates
Edit the Root certificate
Enter the Root certificate into the Azure Point-to-Site configuration
Connect via the Azure VPN client
Following these instructions should allow you to connect to Azure using the Azure VPN client.
Create the Root and Child Certificates
1. Open the following:
> Windows Start > (type) run (enter) > (type) certmgr.msc (enter) > Personal > Certificates
This is where your certificates will appear once created so keep the certmgr.msc window open.
2. Open a Windows PowerShell console with elevated privileges.
> Windows Start > (type) Windows Powershell (right click: Run as Administrator)
3. Copy and paste the following example into Powershell to create the self-signed root certificate and child certificate. The example creates a self-signed root certificate named “PS2RootCert” and “PS2ChildCert” that is automatically installed in “Certificates-Current User\Personal\Certificates” (i.e. step 1).
1. Once PS2RootCert has been created and is visible in certmgr right-click on it. Click All Tasks, and then click Export. This opens the Certificate Export Wizard.
2. In the Wizard, click Next > Select No, do not export the private key, and then click Next > On the Export File Format page, select Base-64 encoded X.509 (.CER)., and then click Next > For File to Export, Browse to the location to which you want to export the certificate. For File name, name the certificate file “PS2RootCert”. Then, click Next > Click Finish to export the certificate
You should then see: “The export was successful”
2. Now export the PS2ChildCert which has slightly different steps to follow than above. In certmgr right-click on PS2ChildCert. Click All Tasks, and then click Export. This opens the Certificate Export Wizard.
> In the Certificate Export Wizard, click Next to continue > Select Yes, export the private key, and then click Next > On the Export File Format page, leave the defaults selected. Make sure that Include all certificates in the certification path if possible is selected. This setting additionally exports the root certificate information that is required for successful client authentication. Without it, client authentication fails because the client doesn’t have the trusted root certificate. Then, click Next > On the Security page, you must protect the private key. If you select to use a password, make sure to record or remember the password that you set for this certificate. Then, click Next > On the File to Export, Browse to the location to which you want to export the certificate. For File name, name the certificate “PS2ChildCert” Then, click Next. > Click Finish to export the certificate.
You should then see: “The export was successful”
Edit the Root certificate
1. Open the PS2RootCert certificate with a text editor, such as Notepad++.
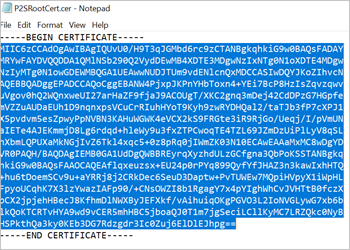
2. Copy only the following section (excluding the header and footer between the dashes and the dashes themselves, e.g. —)
3. Paste the copied text into a new Notepad++ window and edit the pasted text to make sure that the text is one continuous line without carriage returns or line feeds. You may need to modify your view in the text editor to ‘Show Symbol/Show all characters’ to see the carriage returns and line feeds. Once edited copy only the text as one continuous line.
Enter the Root certificate into the Azure Point-to-Site configuration
1. Log into the Azure web portal.
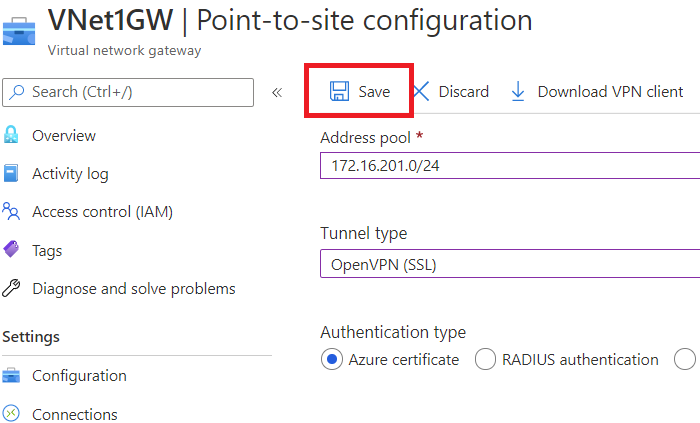
2. Navigate to Virtual Network Gateways > Point-to-site configuration.
3. Paste the certificate data into the Public Certificate Data field. Name the certificate “PS2RootCert”, or if that name is already in use name the certificate “PS2RootCert_YourUserName”, and then select Save. You can add up to 20 trusted root certificates.
4. Select Save at the top of the page to save all of the configuration settings.
5. Once this is done download the VPN client. This will be the configuration information needed to set up an Azure VPN.
Connect via the Azure VPN client
1. Once the VPN client file has been downloaded unzip it. You should see 3 folders, one being AzureVPN. Inside AzureVPN is a configuration file called “azurevpnconfig”.
2. Launch the Azure VPN client. At the bottom of the screen to the left there should be a plus icon. Click it and it will give you the options of “Add” or “Import”. Click import.
3. Navigate to the AzureVPN folder and import the file azurevpnconfig. This should populate the VPN Client options with all the relevant information bar authentication type.
4. Under the Client Authentication heading, for Authentication Type choose Certificate and then for Certificate Information choose PS2ChildCert. (If these options are showing blank then change Certificate Information to “DigiCert Global Root CA”)
Click Save.
You should now have access to Azure via the Azure VPN.
If you found this post helpful please like/share/subscribe.
There can be a number of reasons for this error but below steps through a potential scenario and fix for the error as referenced in the post title.
(TL;DR it’s probably down to permissions. Code example below.)
If you are running a Data Factory pipeline that calls a Store Procedure the process may fail throwing the error “The current transaction cannot be committed and cannot support operations that write to the log file. Roll back the transaction. Cannot find the object because it does not exist or you do not have permissions.”
The first part of that error is boilerplate stuff i.e. the query cannot do what it has to do so it is rolling back.
The second part of the error is what needs to be addressed. Either the object does not exist or the credentials the process is using does not have the required permission to do what the query has specified.
If you can confirm the object exits i.e. the table, then it can only be a matter of credential permissions.
The question becomes what are you trying to do with the object?
SELECT, DELETE, TRUNCATE all require that the credentials i.e. the user, has the permissions to carry out those statements.
If your query needs to TRUNCATE a table and the credentials used by Data Factory do not have permission to perform a TRUNCATE on a table then Azure will throw the aforementioned error.
In order to resolve that problem specifically, i.e. for a user to TRUNCATE a table, the user needs ALTER permissions. Below is an example of how to apply ALTER permissions on the object TestTable in the schema dbo to the user TestUser. Just update the schema, object and user to fit your needs.
GRANTALTERONOBJECT::dbo.TestTable TO TestUser;
GO
The above conforms to applying the principle of least privilege as the ability to alter objects only applies to that object specifically. In closing if the object exists look at what the query does to object and ensure the user has the required permissions to do it.
I recently got shipped a new bluetooth headset for work. The headset in question was the MPOW HC5 headset. They are very comfortable and have good audio quality but when they first arrived there was a problem. The audio had a persistent echo.
The echo was isolated to the headset as there was no echo when the audio was coming through the laptop speakers.
The echo was also isolated to Windows 10 as there was no echo when the headset was plugged into an Android device.
At first I thought the problem was caused by the Windows 10 audio enhancements settings. These settings include an option for echo. However in this instance this was not the cause of the problem.
To rule out Windows 10 audio enhancements as the cause of the problem do the following:
Control Panel > Hardware and Sound > Sound > Left click on Speakers (or another output device of your choosing) > Properties > Enhancements > Check “Disable all sound effects”.
In this particular case the echo problem for my headset was that playback was happening twice for the same device albeit slightly out of sync thus creating an echo. The problem was identifiable as when I traversed to the option path below I could see that the headset was registered with the OS twice under two slightly different names.
Options path:
Control Panel > Hardware and Sound > Sound > Playback
I tested playback for both device names, by right clicking the device and clicking test, and found that one of the devices had a audio glitch. When this instance of the device was disabled the headphones worked without any echo.
If you found this post helpful please like/share/subscribe.
If you are exporting the results of a SQL Server query to excel typically the recipient of the file wants the dates referenced in the format “dd/mm/yyyy hh:mm:ss” or “dd/mm/yyyy” not in the usual database format yyyy-mm-dd.
The below query formats the datetime as desired. Note that the letter m representing month is capitalised. If they are not the engine will interpret the lowercase letter m as minute so you will end up with days, minutes, years.
Also not that the letter h representing the hours is also capitalised. Capitalising the h makes the time output with the 24 hour format. Lowercase h will be 12 hour format. It is highly recommended not to use the lowercase h.
There are a lot of tutorials out there explaining how to remote into a Raspberry Pi. Unfortunately a lot of them ignore that this functionality comes baked into even the slimmed downed version of Raspbian. Worse still a lot of them just plain do not work! This article demonstrates how to actually remote into Raspian from Windows and you do not need to write a single line of code as everything can be done through the UI. That is of course assuming you are not a masochist and actually installed the UI.
(FYI these instructions are for connecting over the same network)
Virtual Network Computing
You will gain remote access and control of the Pi using technology called VNC. In computing, Virtual Network Computing is a graphical desktop-sharing system that uses the Remote Frame Buffer protocol to remotely control another computer.
To do this you will need to install a VNC viewer software on your Windows 10 PC. Microsoft’s own Remote Desktop Connection software can be a bit temperamental so it is recommended you use the free and very light software “VNC Viewer”. You will not need to install a VNC Server on the Pi as it is already preinstalled.
Setting up the Windows PC
VNC Viewer can be downloaded for free from RealVNC at the following link, or you can search for it in your web browser of choice if you would prefer. Once you have it installed you will need to set up the Pi to receive VNC connections.
Setting up the Pi
To enable the VNC connections follow these steps.
On the Pi go to the Application Menu, the Raspberry Icon to the top left of Home screen.
Preferences > Raspberry Pi Configuration > Interfaces > then enable the VNC option.
Next you will need to enable the VNC Server to display in the Application Menu which you can do by follow these steps.
From Preferences in the Application Menu go:
Preferences > Main Menu Editor > Other > then enable VNC Server.
Then click okay to apply the setting.
Now when you go to the Application Menu (Raspberry Icon on Home screen) you will be able to access the VNC Server application via the category “Other”.
Remoting into the Pi from Windows
After opening the application you should see under “Connectivity” the IP address that can be used for other computers on the same network to connect to the Raspberry Pi. (If an IP address is not displayed make sure your WiFi is on)
Jump over to your Windows 10 PC and open the VNC Viewer app.
Type the IP address displayed by the VNC Server into the Address bar.
When prompted enter the username and password you use to access the Raspberry Pi (possibly pi and raspberry). You should now have remote access to the Pi.
The best part is on reboot the VNC Server should start automatically.
If you found this post helpful please like/share/subscribe.