Tag Archives: howto

How to enable and disable xp_cmdshell

xp_cmdshell is an extended stored procedure provided by Microsoft and stored in the master database. This procedure allows you to issue operating system commands directly to the Windows command shell via T-SQL code.

By default, the xp_cmdshell option is disabled on new installations. Along with other unwanted behavior malicious users can elevate their privileges with the use of xp_cmdshell. For this reason it is generally recommend to leave xp_cmdshell disabled. It can be enabled by using the Policy-Based Management or by running the sp_configure system stored procedure as shown in the following code example:

Use Master
GO

EXEC master.dbo.sp_configure 'show advanced options', 1
RECONFIGURE WITH OVERRIDE
GO

EXEC master.dbo.sp_configure 'xp_cmdshell', 1
RECONFIGURE WITH OVERRIDE
GO


To disable xp_cmdshell use the following code example. Note: The following example also sets show advanced options server configuration option to 0. It is best practice to leave this option in the default state of 0 to stop the enabling of features.

Use Master
GO

EXEC master.dbo.sp_configure 'xp_cmdshell', 0
RECONFIGURE WITH OVERRIDE
GO

EXEC master.dbo.sp_configure 'show advanced options', 0
RECONFIGURE WITH OVERRIDE
GO

How to fix an SSRS Report that cannot find stored procedure fields or parameters while displaying the define query parameters window

When setting up your data sets in an SSRS report if you are using a complicated stored procedure, i.e. a SP which relies on dynamic SQL, temp tables or finishes with an IF statement, chances are the SSRS report will not be able to figure out what the SP returns. When this happens you will not be able to populate the data set with data.

This happens because the execution plan of the SSRS software isn’t smart enough and won’t be able to determine what fields the SP creates and therefore will not be able to create a means of storing the data on the report end.

Subsequently you’ll see the, often misleading, table below popup.


SSRS Pop up Define Query Parameters

The solution to stop this from happening is quite simple, but considering how expensive this software is it’s a solution that shouldn’t have to be employed.

The solution is to trick the SSRS software by simplifying the SP. Basically perform a select on the specific fields you need with no additional logic or create a table with the exact fields you need with corresponding data types and select from that.

Use this dumb SP to populate the dataset in the SSRS report.

In the “Choose a data source and create a query” window as below, click refresh fields.

SSRS window refresh fields
The software should now pick up the fields.
Change the SP back to the way it was before and do not refresh the fields again in the SSRS software and the fields should continue to populate as you need them.

How to pass a multi-value parameter to a stored procedure from a SSRS Report

When you allow for multiple field values to be selected in a SSRS report there needs to be additional logic added to the back end to deal with this.

This is best explained with an example scenario.

I have a table called Ireland with two columns, ID_Column and County. You can use the script below to create and populate this table. Run the query below to follow the working example.

CREATE DATABASE [TEST_DB];

USE [TEST_DB];
GO

/****** Object:  Table [dbo].[Ireland]    Script Date: 07/15/2015 10:49:49 ******/
SET ANSI_NULLS ON
GO

SET QUOTED_IDENTIFIER ON
GO

SET ANSI_PADDING ON
GO

CREATE TABLE [dbo].[Ireland] (
	[ID_Column] [int] IDENTITY(1, 1) NOT NULL
	,[County] [varchar](9) NULL
	,PRIMARY KEY CLUSTERED ([ID_Column] ASC) WITH (
		PAD_INDEX = OFF
		,STATISTICS_NORECOMPUTE = OFF
		,IGNORE_DUP_KEY = OFF
		,ALLOW_ROW_LOCKS = ON
		,ALLOW_PAGE_LOCKS = ON
		) ON [PRIMARY]
	) ON [PRIMARY]
GO

SET ANSI_PADDING OFF
GO

SET IDENTITY_INSERT [dbo].[Ireland] ON

INSERT [dbo].[Ireland] ([ID_Column], [County]) VALUES (1, N'Antrim')
INSERT [dbo].[Ireland] ([ID_Column], [County]) VALUES (2, N'Armagh')
INSERT [dbo].[Ireland] ([ID_Column], [County]) VALUES (3, N'Carlow')
INSERT [dbo].[Ireland] ([ID_Column], [County]) VALUES (4, N'Cavan')
INSERT [dbo].[Ireland] ([ID_Column], [County]) VALUES (5, N'Clare')
INSERT [dbo].[Ireland] ([ID_Column], [County]) VALUES (6, N'Cork')
INSERT [dbo].[Ireland] ([ID_Column], [County]) VALUES (7, N'Derry')
INSERT [dbo].[Ireland] ([ID_Column], [County]) VALUES (8, N'Donegal')
INSERT [dbo].[Ireland] ([ID_Column], [County]) VALUES (9, N'Down')
INSERT [dbo].[Ireland] ([ID_Column], [County]) VALUES (10, N'Dublin')
INSERT [dbo].[Ireland] ([ID_Column], [County]) VALUES (11, N'Fermanagh')
INSERT [dbo].[Ireland] ([ID_Column], [County]) VALUES (12, N'Galway')
INSERT [dbo].[Ireland] ([ID_Column], [County]) VALUES (13, N'Kerry')
INSERT [dbo].[Ireland] ([ID_Column], [County]) VALUES (14, N'Kildare')
INSERT [dbo].[Ireland] ([ID_Column], [County]) VALUES (15, N'Kilkenny')
INSERT [dbo].[Ireland] ([ID_Column], [County]) VALUES (16, N'Laois')
INSERT [dbo].[Ireland] ([ID_Column], [County]) VALUES (17, N'Leitrim')
INSERT [dbo].[Ireland] ([ID_Column], [County]) VALUES (18, N'Limerick')
INSERT [dbo].[Ireland] ([ID_Column], [County]) VALUES (19, N'Longford')
INSERT [dbo].[Ireland] ([ID_Column], [County]) VALUES (20, N'Louth')
INSERT [dbo].[Ireland] ([ID_Column], [County]) VALUES (21, N'Mayo')
INSERT [dbo].[Ireland] ([ID_Column], [County]) VALUES (22, N'Meath')
INSERT [dbo].[Ireland] ([ID_Column], [County]) VALUES (23, N'Monaghan')
INSERT [dbo].[Ireland] ([ID_Column], [County]) VALUES (24, N'Offaly')
INSERT [dbo].[Ireland] ([ID_Column], [County]) VALUES (25, N'Roscommon')
INSERT [dbo].[Ireland] ([ID_Column], [County]) VALUES (26, N'Sligo')
INSERT [dbo].[Ireland] ([ID_Column], [County]) VALUES (27, N'Tipperary')
INSERT [dbo].[Ireland] ([ID_Column], [County]) VALUES (28, N'Tyrone')
INSERT [dbo].[Ireland] ([ID_Column], [County]) VALUES (29, N'Waterford')
INSERT [dbo].[Ireland] ([ID_Column], [County]) VALUES (30, N'Westmeath')
INSERT [dbo].[Ireland] ([ID_Column], [County]) VALUES (31, N'Wexford')
INSERT [dbo].[Ireland] ([ID_Column], [County]) VALUES (32, N'Wicklow')
SET IDENTITY_INSERT [dbo].[Ireland] OFF


If I wanted to allow a user to select every county from the Ireland table in an SSRS report I would create a stored procedure that simply executes the following query.

SELECT * FROM Ireland


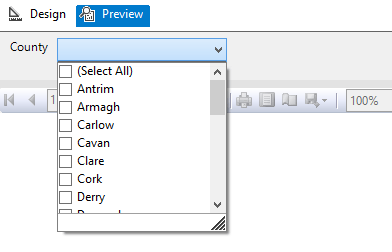
However an SSRS report which allows users to choose counties in Ireland like below means that a WHERE clause needs to be introduced and be able to respond to the field values selected.

Image showing an SSRS report parameter options

But the issue is that the SSRS report will pass the multi-valued parameter as a string with the values separated by a comma.

So instead of receiving the required: ‘Antrim’, ‘Armagh’, ‘Carlow’, ‘Cavan’ etc. for use in the WHERE clause.

SQL Server is passed: ‘Antrim, Armagh, Carlow, Cavan’ etc. which cannot be used.

So the first additional logic and code to be added to the back end to deal with the multi-value parameter is a User Defined Function (UDF) which splits the parameter. The following function and quotations are taken from the 4guysfromrolla website.

Function Scope:

“There are generally two parameters to a split function: the list to split and the character(s) to split on, the delimiter. In the following function we begin by declaring our input variables – @List, the list to split, and @SplitOn, the delimiter(s) to split on. The return value of this UDF is a table with two fields: Id, an identity column, and Value, an nvarchar(100) column.”

Function Logic:

“The main body of the function simply loops through the string finding the first occurrence of the delimiter on each pass. Once the delimiter has been found, the string is broken into two pieces. The first piece is inserted into the result table while the second piece replaces the original list. The loop continues until no more occurrences of the delimiter are found. Lastly, the remainder of the list is added to the result table. Return the table and you have a split function.”

Run the query below to follow the working example.

USE [TEST_DB];
GO

CREATE FUNCTION [dbo].[Split] (
	@List NVARCHAR(2000)
	,@SplitOn NVARCHAR(5)
	)
RETURNS @RtnValue TABLE (
	Id INT identity(1, 1)
	,Value NVARCHAR(100)
	)
AS
BEGIN
	WHILE (Charindex(@SplitOn, @List) > 0)
	BEGIN
		INSERT INTO @RtnValue (value)
		SELECT Value = ltrim(rtrim(Substring(@List, 1, Charindex(@SplitOn, @List) - 1)))

		SET @List = Substring(@List, Charindex(@SplitOn, @List) + len(@SplitOn), len(@List))
	END

	INSERT INTO @RtnValue (Value)
	SELECT Value = ltrim(rtrim(@List))

	RETURN
END


(For a line by line break down of the function please see the webpage.)

Now that the split function exits within the database it is now possible to use a Stored Procedure to SELECT from the Ireland table pulling back specific counties by way of a WHERE clause.

Run the query below to follow the working example.

USE Test_DB;
GO

IF OBJECT_ID('[GetCounties]') IS NULL
	EXEC ('CREATE PROCEDURE dbo.[GetCounties] AS SELECT 1')
GO

ALTER PROCEDURE [dbo].[GetCounties] @County VARCHAR(MAX)
AS
	/*

NAME OF SP: GetCounties
Author:		Bloggins86
Date:		15/07/2015
Purpose:	Test multi-parameter select

*/
	------------------------------------------------------
	------------------------------------------------------
	--INSERT STORED PROCEDURE LOGIC HERE
	SELECT *
	FROM Ireland
	WHERE County IN (SELECT Value FROM dbo.Split(@County, ','))

	------------------------------------------------------
	------------------------------------------------------


Now that the populated table, split function and county select SP exists run the query below passing a string with multiple counties to return Dublin, Meath and Cork from the Ireland Table.

EXEC dbo.[GetCounties] 'Dublin, Meath, Cork'


You should now have returned the table with Dublin, Meath and Cork as separate row entries.

And that’s it, thanks for reading.

Don’t drop that Stored Procedure, Alter it!

So when writing scripts to create tables you might often include some SQL like below to first assess whether or not the table exists before dropping it.

IF OBJECT_ID('Schema.TableName', 'U') IS NOT NULL
      DROP TABLE Schema.TableName
      GO


This might be because you are still testing data and want a table with a different structure to be created or to exist and be populated with different data while using the same table name. So it’s the right thing to do in that circumstance but you may be wrongly carrying that thinking forward into creating stored procedures and user defined functions.

By dropping an SP or UDF you are also breaking any securities or permissions associated with that SP or UDF meaning these permissions etc. will have to be created again.

But for SPs and UDFs you don’t actually need to drop the SP or UDF you just want to change it if it exists. In which case you use Alter rather than Create. However what if you are unaware as to whether the SP or UDF actually exists?

I propose creating dummy SP’s or UDF’s in their place which will simply be over written as demonstrated below.

-- ALTER STORED PROCEDURE
-- THIS DUMMY SP JUST SELECTS 1
IF OBJECT_ID('[Schema].[NameOfStoreProcedure]') IS NULL
	EXEC ('CREATE PROCEDURE [Schema].[NameOfStoreProcedure] AS SELECT 1')
GO

ALTER PROCEDURE [Schema].[NameOfStoreProcedure] @DateParameter DATE
	,@IntParameter INT
	,@CharParameter VARCHAR(30)
AS
BEGIN
	------------------------------------------------------
	------------------------------------------------------
	--INSERT STORED PROCEDURE LOGIC HERE
	--E.G.
	SELECT 1
	------------------------------------------------------
	------------------------------------------------------
	
END;
GO

-- ALTER FUNCTION
-- THIS DUMMY UDF SIMPLY SETS THE PARAMETER @INT TO 1
IF OBJECT_ID('[Schema].[NameOfFunction]') IS NULL
	EXEC ('
CREATE FUNCTION [Schema].[NameOfFunction] (@INT AS INT)
RETURNS INT
AS
BEGIN
	SELECT @INT = 1
	RETURN @INT
END
')
GO

ALTER FUNCTION [Schema].[NameOfFunction] (@INT AS INT)
RETURNS INT
AS
BEGIN
	SET @INT = @INT + 1
	RETURN @INT
END
GO

-- RUN FUNCTION TO SEE RESULT
SELECT [Schema].[NameOfFunction](10) AS ReturnedValue


How to find columns from all Tables of a Database

If your job is to create reports using SQL chances are you have or will encounter this situation:

You’ve been asked to prepare a report, but the person who has asked for the report simply has a list of fields they want and they have no idea where those fields come from. They may have received previous reports in the past, so they know the fields exist, but they cannot provide any of the SQL queries used to create these reports as an example.

You, the developer, may not be familiar with that particular area of the business or associated data sources. Possibly because you typically prepared financial reports and this request has come from the operations or marketing departments.

So the first step is to locate these columns within the database.

The following query will return the Table Name, Schema Name and Column Name from the database.

In the example below all instances where the column name equals CustomerID, OrderID, OrderDate will be returned. Also Column names that contain the word Status or Promotion will also be return. Simply change or add additional columns names as needed. 

USE [YourDatabaseName];
GO

SELECT T.NAME AS TableName
	,SCHEMA_NAME(SCHEMA_ID) AS SchemaName
	,C.NAME AS ColumnName
FROM SYS.TABLES AS t
INNER JOIN SYS.COLUMNS C ON T.OBJECT_ID = C.OBJECT_ID
WHERE C.NAME = 'CustomerID'
	OR C.NAME = 'OrderID'
	OR C.NAME = 'OrderDate'
	OR C.NAME LIKE '%Status%'
	OR C.NAME LIKE '%Promotion%'
ORDER BY SchemaName
	,TableName;


That should help get you started in preparing the report.

How to dynamically pull all text file names from a folder into a SQL Server table

So here’s a quick out of the box solution for . . . you guessed it, dynamically pulling all text files from a folder into a SQL Server table. On it’s own this script isn’t very powerful but it can be paired with SQL queries to make some powerful functionality.

To use simply change the @path variable to the directory path you’re targeting and as it states in the comments . . .

-- NOTE: MAKE SURE THE BACKSLASH IS INCLUDED AT THE END OF THE STRING
-- *.txt IS REFERENCED IN THIS EXAMPLE BUT *.xls COULD ALSO BE USED

Sayōnara


— THIS QUERY USES CMD TO CAPTURE ALL THE FILES IN A FOLDER
— AND WRITE THE FILE NAMES TO A TABLE
— THE QUERY REQUIRES THAT xp_cmdShell BE ENABLED TO WORK
— THE FOLLOWING ENABLES xp_cmdShell:
— TO ALLOW ADVANCED OPTIONS TO BE CHANGED
EXEC sp_configure 'show advanced options'
,1
GO
— TO UPDATE THE CURRENTLY CONFIGURED VALUE FOR ADVANCED OPTIONS
RECONFIGURE
GO
— TO ENABLE THE FEATURE
EXEC sp_configure 'xp_cmdshell'
,1
GO
— TO UPDATE THE CURRENTLY CONFIGURED VALUE FOR THIS FEATURE
RECONFIGURE
GO
— THE FOLLOWING CREATES A TABLE AND POPULATES IT WITH THE FILES LOCATED IN THE SPECIFIED DIRECTORY
IF OBJECT_ID('ALLFILENAMES', 'U') IS NOT NULL
DROP TABLE ALLFILENAMES
CREATE TABLE ALLFILENAMES (
WHICHPATH VARCHAR(255)
,WHICHFILE VARCHAR(255)
)
DECLARE @filename VARCHAR(255)
,@path VARCHAR(255)
,@cmd VARCHAR(1000)
— GET THE LIST OF FILES TO PROCESS
— NOTES: MAKE SURE THE BACKSLASH IS INCLUDED AT THE END OF THE STRING
— *.txt IS REFERENCED IN THIS EXAMPLE BUT *.xls COULD ALSO BE USED
SET @path = 'C:\Users\Data\'
SET @cmd = 'dir ' + @path + '*.txt /b'
INSERT INTO ALLFILENAMES (WHICHFILE)
EXEC Master..xp_cmdShell @cmd
UPDATE ALLFILENAMES
SET WHICHPATH = @path
WHERE WHICHPATH IS NULL
SELECT *
FROM ALLFILENAMES

How to increase the performance of your Android TV Stick

So basically all android TV sticks (ATS’s), boxes and any other android device you connect to your TV has been somewhat hacked together to deliver a product the Android OS wasn’t explicitly designed for. (Not that it doesn’t do a great job)

The Android OS was designed for mobile devices but what constitutes a mobile device?

Well one can differentiate a mobile device as a mobile device by two distinguishing characteristics, one it has a built-in display and two it’ll be battery powered.

Android mini computers have neither.

As mentioned above ATS’s use a TV for the display and often ATS’s don’t have the drivers needed to recognised touch screen inputs. No touch screen inputs can have its drawbacks but the focus in this article is on the influence of not having a battery.

Android devices are constantly doing a juggling act between making the device run as fast and be as responsive as possible and not burning through the battery.

This balancing is primarily directed by the CPU governor. The Linux kernel has a number of CPU frequency governors, which can be looked on as rules that set the CPU frequency based on the selected governor and usage patterns. The frequency or clock rate is typically used as an indicator of the processor’s speed, i.e. how quickly it processes tasks. It is measured in the SI unit hertz. The higher the speed the better the performance and the worse the power consumption.

The best thing about the governors is that they have pre-sets, when the “performance” governor is active, the CPU frequency will be set to its maximum value, the “powersave” governor sets the CPU to its lowest frequency, the “ondemand” governor sets the CPU frequency depending on the current usage, etc.

But here’s the important part, because an ATS has no battery and it’s being power by the mains, there’s no need to set the governor to go easy on power consumption. So the governor should be set to performance at all times but by default (the device thinking it’s mobile) it’s probably not.

So how do you change the governor?

Well like everything else with android you use an app of course!

Note: You cannot change your CPU governor unless your phone is rooted and you have a ROM or app that lets you make a change. Also, different kernels (the intermediary software between your phone’s hardware and the operating system) offer different sets of governors.

There are several to choose from:

  • CPU tuner
  • No-frills CPU control
  • SetCPU
  • See here for more

I use CPU tuner as pictured below.

cpuTuner

Simply install CPU Tuner and set profile to “Performance” and Governor to “Full Speed” and you should be getting a little extra juice from your device.

Slán

A picture of a cx919 android tv stick

How to root a CX919 Android 4.4.2 Quad core with a RK31 rockchip

(This Post was last updated 13/02/2015)

Ok so here’s a quick tutorial on how to root this particular type of Android TV Stick (ATS). Specifically this model: See Link. If you’ve ever flashed a custom rom onto an android device before, forget everything about that, it’s nothing like that, it’s much simpler.

NOTE: you will need a windows PC to root the device and before starting make sure you have a good usb micro b cable you know works! USB Micro-B PlugIf you’ve found your way to this page you may have already tried the manual approach which uses the TPSparkyRoot batch script and that hasn’t worked! I’ve been there, you won’t be able to get it working, you were right to continue google searching your way across the net for a method that works, and here it is. . .

But first the obligatory caveat:

I take no responsibility for the welfare of your device. If by following these instructions you should brick your device, that’s your problem buddy. This tutorial will likely work for other devices too though. So if you’ve tried every other tutorial on the net to get your damned device rooted to no avail you might want to follow along. But again I’m not responsible if your ATS explodes.

Back up your device prior to implementing the instructions and you “should” be fine.

And now the tutorial:

STEP 1: Download software

Start by installing the following software:

Moborobo

Kingo

(Use the direct download link to skip downloading the download.com software)

(The reason you need moborobo is that the software is smart enough to determine what driver the PC needs to be able to communicate with the ATS. Chances are, if you tried an alternative method to root the device, the previous methods you tried to root the device failed because you couldn’t find the right driver.)

STEP 2: Prepare the ATS for communication with the PC

In the ATS go to System settings > Storage and click the 3 vertically stacked dots at the top right of the screen.

Picture showing the icon to clickClick on the window “USB computer connection” and tick the Mass Storage box.

Next within the systems settings, go to the developer options. (If the developer options are not there it is because they have not been enabled. To enable developer options go to the system settings and click on About Device. Next scroll to “Build Number” and tap it 7 times. After tapping 7 times you will see an alert saying “You are now a developer”/”Developer mode has been enabled”.

After navigating to developer options scroll down and tick the usb degugging option.

STEP 3: Connect the PC to the ATS

With the ATS connected to your TV via HDMI and powered by the DC usb port, connect the usb micro b cable to the available port.

Make sure you do not use the DC port to connect to the PC otherwise nothing will happen.

A picture showing which usb port to useNext connect the ATS to your PC via the USB.

Within system settings on the ATS click on “USB ” and tick “Connect to PC”.

STEP 4: Install the correct driver on the PC

Open the Moborobo software on your PC and wait for it to load completely. Moborobo should now create a connection to the ATS and install some apps on it. Once you see your TV screen switch to the Moborobo app you know the PC successfully connected to the device.

(You don’t need these apps once this process is run. The whole point of using moborobo was simply to install the correct driver on your PC. If the device installs the correct drivers on the PC itself you may not need moborobo to connect to the ATS, in which case continue to the next step.)

STEP 5: Rooting the device

Open Kingo on your PC. It will load for a few seconds.

When a screen appears asking if you want to root it has successfully connected to the device.

Uncheck the install APUS boost+. This is an optimization app not necessary for rooting the device.

Click root.

(Kingo may mistakenly think the device is already rooted in which case click on root again)

Kingo on desktopAllow Kingo to run.

COMPLETION:

Once you see the screens below on your PC and ATS the root was successful.

successPCsuccessATSWithin system settings on the ATS click on “USB ” and tick “Connect to PC”.

TIDYING UP:

You can now uninstall the software on your PC.

And uninstall the following Apps on your device.

  • MoboMarket
  • Mr.Clean
  • Kingo Root

Kingo will install its own SuperUser App which will need to remain but this simply acts as a checker for other apps looking to access system resources which you can either give permission to or deny.

FINAL WORDS:

Hopefully that all worked out for you.

If you used this tutorial successfully please comment below and share.

UPDATE 13/02/2015: Kingo superuser can sometimes grow to take up massive amounts of the device’s storage space. In my case over 600mb!!! Uninstalling the app from the google play store will reduce the app in size without actually uninstalling the app. (The app cannot actually be removed within settings, only disabled) In my case the app shrank to just over 5mb, much better!

Quick Caveat: There have be some online accusations that Kingo superuser steals user data. I cannot confirm this, but I’d imagine if it was a serious concern google would have removed the app from the store by now.

Android with a rocket launcher

How to setup an Android TV Stick

In my last posting Buying advice for Android TV Sticks I wrote about some of the main things to consider when buying an ATS. Quick recap, go quad-core, get a model with an external antenna, SD cards will give you more storage, you’ll need some sort of keyboard/mouse and there are several other android devices you could use to make your TV smart with which you should consider before buying.

This posting offers advice regarding, viewing Flash media, setting up your web browser properly and getting the best out of the user interface.

Firstly you need Adobe Flash Player to live.

The flashFlash player is incredibly resource hungry even for laptops but the quad-core ATS models can just about handle it. But rather than continue to optimise and refine the Android flash player the nice guys over at Adobe just decided to discontinue support for it. And unfortunately HTML5 hasn’t taken over the net in the way that we’ve been told it would so we’re still very reliant on flash for streaming video.

So you’ll need to download the last version of flash from the adobe archive if you want to watch media, like TV shows or sport broadcasts, via your browser. The last version can be found by scrolling down to the heading “Flash Player for Android 4.0 archives”. Just click on the file when downloaded and the install will run.

There are a few web browsers to choose from for Android but probably the most familiar browser Chrome doesn’t support flash so I’d recommend Firefox which brings me to another important matter.

Browsersepic battle between firefox and chrome

I don’t want to get into a “which browser is best” war but I would say of all the browsers I’ve tried namely Chrome, Dolphin, Lightning, UC and Firefox, IN MY OPINION Firefox is the most versatile though not the fastest. (My second favourite is UC browser because I always found it performs really well on underpowered devices.)

Regardless of which you use there will be an option in the settings/preferences to switch to viewing sites as a Desktop by default, as opposed to viewing them as a mobile device. This is a very important option as Android browsers will by default request to view a website as a mobile device.

Why is that?

If a site is modern it will either be a dynamic site, meaning the webpage can be reshaped to fit the devices display, or it may have a different website to be displayed to mobile devices altogether, a mobile site. Considering you’ll probably be viewing the site on a big HD TV a website optimised for a 4 inch display leaves a lot of wasted space on the screen. So make the most of that screen by setting the browser to view sites as a Desktop.

LaunchersAndroid with a rocket launcherTypically a user would interact with Android devices by touching and dragging their greasy fingers across the display. The graphical user interface (or GUI, pronounced “gooey”) therefore has been designed to optimise navigation by this means of interaction.

But because an ATS has no screen of its own to touch a typical android GUI is not optimal for couch surfing. (I don’t mean couch surfing in the hobo/college student sleeping on your sofa sense.) For this reason most ATS’s will come with their own custom launcher.

What’s a launcher? An application launcher is a computer program that helps a user to locate and start other computer programs. So it’s like the desktop environment on a windows computer except Android allows the environment to be changed easily and the looks, feel and performance of a device can benefit from doing so.

I’ve tried a few but the only browser I’d recommend is TVLauncher. (Though I say that having never paid for a launcher or an app . . . ever . . . BUT if I wanted to pay for things I’d be part of the Apple cult.)

So what makes TVLauncher good? Well the HINT is in the name. It was designed to be a launcher for Androids connected to TV’s. An ATS is not a mobile phone so the home screen won’t be packed with the icons you’d typically place on your home screen because you use them all day. I’m going to guess your home screen has the following icons:

  • Dialler
  • Sms
  • Camera
  • Alarm
  • Volume
  • Maps
  • Watsapp
  • Viber
  • As well as toggle widgets for wifi, Bluetooth and GPS.

You don’t need quick access to a dozen different apps on an ATS so with TVLauncher’s home screen you get 6 large tiles to use. You can import your own images for apps if you wish, like speed dial for Firefox and Chrome. And trust me you won’t need more than 6 if you’re using the ATS as a cheap but ultra cool media centre.

My set up is as follows:

For Music: Apollo

For Video: MX player

For Video Streaming: Youtube

For Web Browsing: Firefox

For File Navigation: ES File Explorer

For More Awesome Apps: Google Play

OK OK some of you might like paying for things like Netflix and Spotify, clutter up your home screen see if I care. . .

So that’s all for this post. If anyone reading this thinks they know of a better launcher feel free to comment below.