How to spoof your android device and bypass Google’s unsupported restriction

Here’s a quick tutorial on how to spoof your android device.

Prerequisites to spoofing your device:

Install a file browser that can navigate to the system folders of the device, i.e. Root Browser. (Note: you’ll need root access to get to the necessary folder. You can view the following tutorial for an idea of what’s involved in rooting your device.)

Question: What do you mean by spoofing?

Answer: Spoofing means your device is tricking some app or service into thinking the device is a specific version, brand or model that it is not.

So for instance you’ve bought a Chinese OEM android device, say a CX-919 android TV stick, and you want an app or service to think that it is actually the latest Galaxy note.

Question: Why would you want to spoof your device?

Answer: Developers can limit what devices can play their apps on Google play. This can be because they want the app to run smoothly on the device so they limit the distribution to only devices which are powerful enough or have been tested. If your device is not a device that has been given permission to install the app you will get a message from google play stating this device is unsupported. This doesn’t necessarily mean your device can’t use the app, it’s just saying the man doesn’t want you to.

Other times developers, * cough Gameloft cough * actually put graphic restrictions within the game so only certain models from certain brands get access to the higher end graphics.

This is not due to the app testing your device and determining the performance capability of the device is too low and protecting from playing a game with awful lag because you set the graphics unrealistically high. It is because your device has a simple text file, called build.prop, which states what version, make and model your device is. Changing this file that identifies your device is usually sufficient to get past google play and internal app restrictions.

Steps to editing the build.prop file:

Step 1: Open root browser.

Step 2: Navigate to the system folder, enter it and scroll down to the build.prop file.

Step 3: Copy the file and paste to an external SD in case anything goes wrong (Or it’s not a bad idea to email yourself a copy if you do not have an external SD card mounted)

Step 4: Open the build.prop file with a text editor.

Once in build.prop you can edit the following things:

  • Edit Android Version by locating ro.build.version.release= and changing the current Build Version.
  • Edit your model # by locating ro.product.model= and changing your model #
  • Edit your product brand by locating ro.product.brand= and changing the value to the desired brand
  • Edit your manufacturer by locating ro.product.manufacturer= and changing the value to the desired manufacturer

Please Note that if you change the product brand, the name MUST be in ALL LOWERCASE LETTERS

In Most cases you can get away with just changing the model, brand and manufacturer to achieve your aims. With this being the case you might as well just change these identifiers to the latest Galaxy Note details. At the time of writing this is:

NOTE: GT-(i)9600 not L or 1

ro.product.model=GT-I9600

ro.product.brand=samsung

ro.product.manufacturer=samsung

Step 5: Once you are finished editing, Save the file

Step 6: Go into the Settings screen, select Applications, select Manage Applications, tap the All category, and select the Google Play app. Clear its cache and data.

Step 7: Reboot your device and once everything loads again, go to Settings> About Phone/Device and see the changes.

If this doesn’t get you past the unsupported restriction on google play it’s possible the game was developed specifically for Nvidia shield, just change the build.prop values accordingly.

SQL table of common file types and extensions used in business

Below is a list of the file types and their respective extensions commonly used in business. You can use the SQL script on this page to create a table for use in queries and stored procedures.

(The table below was created used No-Cruft Excel to HTML Table Converter)

FileType Extension
Microsoft Word 97 – 2003 Document doc
Microsoft Word 97 – 2003 Template dot
Word document docx
Word macro-enabled document docm
Word template dotx
Word macro-enabled template dotm
Word binary document introduced in Microsoft Office 2007 docb
Microsoft Excel 97-2003 Worksheet xls
Microsoft Excel 97-2003 Template xlt
Excel macro xlm
Excel workbook xlsx
Excel macro-enabled workbook xlsm
Excel template xltx
Excel macro-enabled template xltm
Excel binary worksheet xlsb
Excel add-in or macro xla
Excel add-in xlam
Excel XLL add-in xll
Excel workspace xlw
Legacy PowerPoint presentation ppt
Legacy PowerPoint template pot
Legacy PowerPoint slideshow pps
PowerPoint presentation pptx
PowerPoint macro-enabled presentation pptm
PowerPoint template potx
PowerPoint macro-enabled template potm
PowerPoint add-in ppam
PowerPoint slideshow ppsx
PowerPoint macro-enabled slideshow ppsm
PowerPoint slide sldx
PowerPoint macro-enabled slide sldm
The file extension for the Office Access 2007 file format ACCDB
The file extension for Office Access 2007 files that are in “execute only” mode ACCDE
The file extension for Access Database Templates. ACCDT
The file extension for the Office Access 2007 file format that enables you to open a database in runtime mode ACCDR
Microsoft Publisher file extension pub
Windows BitMap BMP
Data Interchange format DIF
Graphics Interchange Format GIF
Web page source text HTML
JPEG graphic JPG
JPEG graphic JPEG
Web page imagemap MAP
Acrobat -Portable document format PDF
Public Network graphic PNG
Adobe PhotoShop PSD
PaintShop Pro PSP
Rich Text Format RTF
Stuffit Compressed Archive SIT
UNIX TAR Compressed Archive TAR
TIFF graphic TIF
ASCII text (Mac text does not contain line feeds–use DOS Washer Utility to fix) TXT
Windows sound WAV
MS Works WKS
PC Zip Compressed Archive ZIP


USE [YourDatabase]
GO


SET ANSI_NULLS ON
GO
SET QUOTED_IDENTIFIER ON
GO
SET ANSI_PADDING ON
GO
CREATE TABLE [dbo].[IH_FileType](
	[IH_FileType_ID] [int] IDENTITY(1,1) NOT NULL,
	[FileType] [varchar](250) NULL,
	[Extension] [varchar](5) NULL,
	[OfficeFileType] [bit] NULL,
PRIMARY KEY CLUSTERED 
(
	[IH_FileType_ID] ASC
)WITH (PAD_INDEX  = OFF, STATISTICS_NORECOMPUTE  = OFF, IGNORE_DUP_KEY = OFF, ALLOW_ROW_LOCKS  = ON, ALLOW_PAGE_LOCKS  = ON) ON [PRIMARY]
) ON [PRIMARY]
GO
SET ANSI_PADDING OFF
GO
SET IDENTITY_INSERT [dbo].[IH_FileType] ON
INSERT [dbo].[IH_FileType] ([IH_FileType_ID], [FileType], [Extension], [OfficeFileType]) VALUES (1, N'Microsoft Word 97 - 2003 Document', N'doc', 1)
INSERT [dbo].[IH_FileType] ([IH_FileType_ID], [FileType], [Extension], [OfficeFileType]) VALUES (2, N'Microsoft Word 97 - 2003 Template', N'dot', 1)
INSERT [dbo].[IH_FileType] ([IH_FileType_ID], [FileType], [Extension], [OfficeFileType]) VALUES (3, N'Word document', N'docx', 1)
INSERT [dbo].[IH_FileType] ([IH_FileType_ID], [FileType], [Extension], [OfficeFileType]) VALUES (4, N'Word macro-enabled document', N'docm', 1)
INSERT [dbo].[IH_FileType] ([IH_FileType_ID], [FileType], [Extension], [OfficeFileType]) VALUES (5, N'Word template', N'dotx', 1)
INSERT [dbo].[IH_FileType] ([IH_FileType_ID], [FileType], [Extension], [OfficeFileType]) VALUES (6, N'Word macro-enabled template', N'dotm', 1)
INSERT [dbo].[IH_FileType] ([IH_FileType_ID], [FileType], [Extension], [OfficeFileType]) VALUES (7, N'Word binary document introduced in Microsoft Office 2007', N'docb', 1)
INSERT [dbo].[IH_FileType] ([IH_FileType_ID], [FileType], [Extension], [OfficeFileType]) VALUES (8, N'Microsoft Excel 97-2003 Worksheet', N'xls', 1)
INSERT [dbo].[IH_FileType] ([IH_FileType_ID], [FileType], [Extension], [OfficeFileType]) VALUES (9, N'Microsoft Excel 97-2003 Template', N'xlt', 1)
INSERT [dbo].[IH_FileType] ([IH_FileType_ID], [FileType], [Extension], [OfficeFileType]) VALUES (10, N'Excel macro', N'xlm', 1)
INSERT [dbo].[IH_FileType] ([IH_FileType_ID], [FileType], [Extension], [OfficeFileType]) VALUES (11, N'Excel workbook', N'xlsx', 1)
INSERT [dbo].[IH_FileType] ([IH_FileType_ID], [FileType], [Extension], [OfficeFileType]) VALUES (12, N'Excel macro-enabled workbook', N'xlsm', 1)
INSERT [dbo].[IH_FileType] ([IH_FileType_ID], [FileType], [Extension], [OfficeFileType]) VALUES (13, N'Excel template', N'xltx', 1)
INSERT [dbo].[IH_FileType] ([IH_FileType_ID], [FileType], [Extension], [OfficeFileType]) VALUES (14, N'Excel macro-enabled template', N'xltm', 1)
INSERT [dbo].[IH_FileType] ([IH_FileType_ID], [FileType], [Extension], [OfficeFileType]) VALUES (15, N'Excel binary worksheet', N'xlsb', 1)
INSERT [dbo].[IH_FileType] ([IH_FileType_ID], [FileType], [Extension], [OfficeFileType]) VALUES (16, N'Excel add-in or macro', N'xla', 1)
INSERT [dbo].[IH_FileType] ([IH_FileType_ID], [FileType], [Extension], [OfficeFileType]) VALUES (17, N'Excel add-in', N'xlam', 1)
INSERT [dbo].[IH_FileType] ([IH_FileType_ID], [FileType], [Extension], [OfficeFileType]) VALUES (18, N'Excel XLL add-in', N'xll', 1)
INSERT [dbo].[IH_FileType] ([IH_FileType_ID], [FileType], [Extension], [OfficeFileType]) VALUES (19, N'Excel workspace', N'xlw', 1)
INSERT [dbo].[IH_FileType] ([IH_FileType_ID], [FileType], [Extension], [OfficeFileType]) VALUES (20, N'Legacy PowerPoint presentation', N'ppt', 1)
INSERT [dbo].[IH_FileType] ([IH_FileType_ID], [FileType], [Extension], [OfficeFileType]) VALUES (21, N'Legacy PowerPoint template', N'pot', 1)
INSERT [dbo].[IH_FileType] ([IH_FileType_ID], [FileType], [Extension], [OfficeFileType]) VALUES (22, N'Legacy PowerPoint slideshow', N'pps', 1)
INSERT [dbo].[IH_FileType] ([IH_FileType_ID], [FileType], [Extension], [OfficeFileType]) VALUES (23, N'PowerPoint presentation', N'pptx', 1)
INSERT [dbo].[IH_FileType] ([IH_FileType_ID], [FileType], [Extension], [OfficeFileType]) VALUES (24, N'PowerPoint macro-enabled presentation', N'pptm', 1)
INSERT [dbo].[IH_FileType] ([IH_FileType_ID], [FileType], [Extension], [OfficeFileType]) VALUES (25, N'PowerPoint template', N'potx', 1)
INSERT [dbo].[IH_FileType] ([IH_FileType_ID], [FileType], [Extension], [OfficeFileType]) VALUES (26, N'PowerPoint macro-enabled template', N'potm', 1)
INSERT [dbo].[IH_FileType] ([IH_FileType_ID], [FileType], [Extension], [OfficeFileType]) VALUES (27, N'PowerPoint add-in', N'ppam', 1)
INSERT [dbo].[IH_FileType] ([IH_FileType_ID], [FileType], [Extension], [OfficeFileType]) VALUES (28, N'PowerPoint slideshow', N'ppsx', 1)
INSERT [dbo].[IH_FileType] ([IH_FileType_ID], [FileType], [Extension], [OfficeFileType]) VALUES (29, N'PowerPoint macro-enabled slideshow', N'ppsm', 1)
INSERT [dbo].[IH_FileType] ([IH_FileType_ID], [FileType], [Extension], [OfficeFileType]) VALUES (30, N'PowerPoint slide', N'sldx', 1)
INSERT [dbo].[IH_FileType] ([IH_FileType_ID], [FileType], [Extension], [OfficeFileType]) VALUES (31, N'PowerPoint macro-enabled slide', N'sldm', 1)
INSERT [dbo].[IH_FileType] ([IH_FileType_ID], [FileType], [Extension], [OfficeFileType]) VALUES (32, N'The file extension for the Office Access 2007 file format', N'accdb', 1)
INSERT [dbo].[IH_FileType] ([IH_FileType_ID], [FileType], [Extension], [OfficeFileType]) VALUES (33, N'The file extension for Office Access 2007 files that are in "execute only" mode', N'accde', 1)
INSERT [dbo].[IH_FileType] ([IH_FileType_ID], [FileType], [Extension], [OfficeFileType]) VALUES (34, N'The file extension for Access Database Templates.', N'accdt', 1)
INSERT [dbo].[IH_FileType] ([IH_FileType_ID], [FileType], [Extension], [OfficeFileType]) VALUES (35, N'The file extension for the Office Access 2007 file format that enables you to open a database in runtime mode', N'accdr', 1)
INSERT [dbo].[IH_FileType] ([IH_FileType_ID], [FileType], [Extension], [OfficeFileType]) VALUES (36, N'Microsoft Publisher file extension', N'pub', 1)
INSERT [dbo].[IH_FileType] ([IH_FileType_ID], [FileType], [Extension], [OfficeFileType]) VALUES (37, N'Windows BitMap', N'bmp', 0)
INSERT [dbo].[IH_FileType] ([IH_FileType_ID], [FileType], [Extension], [OfficeFileType]) VALUES (38, N'Data Interchange format', N'dif', 0)
INSERT [dbo].[IH_FileType] ([IH_FileType_ID], [FileType], [Extension], [OfficeFileType]) VALUES (39, N'Graphics Interchange Format', N'gif', 0)
INSERT [dbo].[IH_FileType] ([IH_FileType_ID], [FileType], [Extension], [OfficeFileType]) VALUES (40, N'Web page source text', N'html', 0)
INSERT [dbo].[IH_FileType] ([IH_FileType_ID], [FileType], [Extension], [OfficeFileType]) VALUES (41, N'JPEG graphic', N'jpg', 0)
INSERT [dbo].[IH_FileType] ([IH_FileType_ID], [FileType], [Extension], [OfficeFileType]) VALUES (42, N'JPEG graphic', N'jpeg', 0)
INSERT [dbo].[IH_FileType] ([IH_FileType_ID], [FileType], [Extension], [OfficeFileType]) VALUES (43, N'Web page imagemap', N'map', 0)
INSERT [dbo].[IH_FileType] ([IH_FileType_ID], [FileType], [Extension], [OfficeFileType]) VALUES (44, N'Acrobat -Portable document format', N'pdf', 0)
INSERT [dbo].[IH_FileType] ([IH_FileType_ID], [FileType], [Extension], [OfficeFileType]) VALUES (45, N'Public Network graphic', N'png', 0)
INSERT [dbo].[IH_FileType] ([IH_FileType_ID], [FileType], [Extension], [OfficeFileType]) VALUES (46, N'Adobe PhotoShop', N'psd', 0)
INSERT [dbo].[IH_FileType] ([IH_FileType_ID], [FileType], [Extension], [OfficeFileType]) VALUES (47, N'PaintShop Pro', N'psp', 0)
INSERT [dbo].[IH_FileType] ([IH_FileType_ID], [FileType], [Extension], [OfficeFileType]) VALUES (48, N'Rich Text Format', N'rtf', 0)
INSERT [dbo].[IH_FileType] ([IH_FileType_ID], [FileType], [Extension], [OfficeFileType]) VALUES (49, N'Stuffit Compressed Archive', N'sit', 0)
INSERT [dbo].[IH_FileType] ([IH_FileType_ID], [FileType], [Extension], [OfficeFileType]) VALUES (50, N'UNIX TAR Compressed Archive', N'tar', 0)
INSERT [dbo].[IH_FileType] ([IH_FileType_ID], [FileType], [Extension], [OfficeFileType]) VALUES (51, N'TIFF graphic', N'tif', 0)
INSERT [dbo].[IH_FileType] ([IH_FileType_ID], [FileType], [Extension], [OfficeFileType]) VALUES (52, N'ASCII text (Mac text does not contain line feeds--use DOS Washer Utility to fix)', N'txt', 0)
INSERT [dbo].[IH_FileType] ([IH_FileType_ID], [FileType], [Extension], [OfficeFileType]) VALUES (53, N'Windows sound', N'wav', 0)
INSERT [dbo].[IH_FileType] ([IH_FileType_ID], [FileType], [Extension], [OfficeFileType]) VALUES (54, N'MS Works', N'wks', 0)
INSERT [dbo].[IH_FileType] ([IH_FileType_ID], [FileType], [Extension], [OfficeFileType]) VALUES (55, N'PC Zip Compressed Archive', N'zip', 0)
SET IDENTITY_INSERT [dbo].[IH_FileType] OFF


SELECT *
FROM IH_FileType

Image of a small firefox facing off against a giant mechanical chrome monster

How to change the folder Android Firefox downloads to by default

NOTE: To set the download location to a folder on an external SD you will need to have a rooted device. See the following tutorial to get an idea of how to root your device.

STEPS:

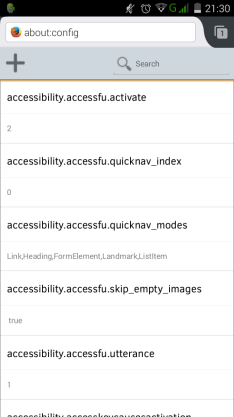
(1) Open firefox and type about:config into the address bar and tap Go. You will see a page displayed like below.

Image showing the about config page

You may want to bookmark this for easier future access.

(2) In the search bar, type down (for download) and wait for Firefox to filter the list.

(3) Scroll down to browser.download.folderList and tap it to display the editing controls. Change the value from 1 to 2 (from “default always” to “last used folder”).

(4) Tap the large “+” above the list to add a new setting.

(5) On the right side, you see “Boolean” tap that and change to “String”.

(6) Name the new setting as browser.download.dir

(7) Below the name of the setting enter the file path for the folder location you want to use. In my instance I had created the folder Download on the external SD. For example:

/mnt/external_sd/Download

(8) Once you have entered the file path tap return and then tap Create.

From this point on when you download something it should go to the folder you have specified.

How to create a running total in SQL

Below is a simple example of how to create a running total in T-SQL using a self-join.

The total is created by summing the preceding values, the precedence of which is determined by, in this instance, the sale date field.

A date field, or another unique order field, is required for this technique to work otherwise all the values would be summed at once, based on grouping, and the summed value would be displayed for each relevant record.

CREATE TABLE #Product (
Product_ID INT
,Product VARCHAR(10)
)

CREATE TABLE #Sale (
    Product_ID INT
    ,SaleAmount MONEY
    ,SaleDate DATETIME
    )

INSERT INTO #Product
VALUES (
    1
    ,'Bike'
    )
    ,(
    2
    ,'Car'
    )
    ,(
    3
    ,'Truck'
    )


INSERT INTO #Sale
VALUES (
    1
    ,10
    ,'20150101 12:00:00.000'
    )
    ,(
    1
    ,10
    ,'20150102 13:00:00.000'
    )
    ,(
    2
    ,20
    ,'20150101 13:00:00.000'
    )
    ,(
    2
    ,30
    ,'20150101 14:00:00.000'
    )
    ,(
    3
    ,30
    ,'20150101 12:00:00.000'
    )

SELECT a.Product_ID
    ,p.Product
    ,a.SaleAmount
    ,SUM(b.SaleAmount) AS RunningTotal
    ,a.SaleDate
FROM #Sale AS a
INNER JOIN #Product AS p ON a.Product_ID = p.Product_ID   
LEFT JOIN #Sale AS b ON a.Product_ID = b.Product_ID
    AND b.SaleDate <= a.SaleDate
GROUP BY a.Product_ID
    ,p.Product
    ,a.SaleAmount
    ,a.SaleDate


DROP TABLE #Sale
DROP TABLE #Product
	
Featured Image: A picture of a robot painting error over and over again

How to fix a Google Play Error -24


I had previously attempted to install an app but the device shut down mid installation. When I tried to install the app again at a later point in time the installation failed resulting in the Error -24 being shown on the play store.

So chances are you, as I did, are seeing an Error -24 message because remnants of a previous app installation remain.

Prerequisites to solving the problem:

To resolve this error install a file browser that will navigate to the system folders of the device, i.e. Root Browser. (Note: you’ll need root access to get to the necessary folder. You can view the following tutorial for an idea of what’s involved in rooting your device.)

Solution For An Error -24 :

STEP 1: In Root Browser tap the Data folder, then tap the Data folder again (One data folder is inside the other)

STEP 2: Find the remnant of the previous installation e.g. com.your.packagename and delete it. At this point you can try install the app again. If the installation fails repeat steps 1 & 2 and then move onto step 3.

Warning this next step is necessary but may have unwanted consequences as it involves wiping the cache of Google Play Services. The following paragraph is an over view of what google play services is and what it does. After reading the description you will be proceeding at your own risk.

Google Play services is used to update Google apps and apps from Google Play.
This component provides core functionality like authentication to your Google services, synchronized contacts, access to all the latest user privacy settings, and higher quality, lower-powered location based services.
Google Play services also enhances your app experience. It speeds up offline searches, provides more immersive maps, and improves gaming experiences.
Apps may not work if you uninstall Google Play services.

STEP 3: Go to Android Settings > Apps > swipe to All and scroll down to Google Play Services, tap on the app and then tap on clear cache button.

You should now be able to download and install that pesky app.

An icon symbolising data moving to different tables via ssis

How to use Temp tables in an SSIS package

If you have been using a query which utilizes temp tables but now you want that query to run as an SSIS package it’s going to need a bit of reworking.

Just adding the query as an Execute SQL Task in Visual Studio won’t work unfortunately if you are using, for example, SELECT * INTO to create the temp tables.

The First step to reworking the query will be to dedicate an Execute SQL Task to creating the temp tables your query uses, defining columns and data types etc. and then populating those tables with INSERT INTO rather than SELECT INTO.

For the following we will assume only one output temp table is required for the process which will be as follows:

  • A temp table to store data will be created.
  • A query will be used to populate this table.
  • This populated temp table will then become the source from which data will be pulled.

STEP 1.

In SSMS connect to what will be the source server and enter the statement to create the required temp table as a global temp table i.e. prefixing the table name with ##. Creating the table as a global temp table at this stage avoids errors when configuring the OLE DB Source in Visual Studio as it allows the table to be visible to the SSIS package.

STEP 2.

In Visual Studios drag a new Execute SQL Task into the control flow and name it, Create Temp Table.

Image showing Execute SQL Task Create Temp Table

Double click on the task to bring up the Execute SQL Task Editor window.

Image showing the Execute SQL Task Editor Window

Step through the process for creating a connection in the connection option and enter the following for the SQL statement option replacing yourTempTable with the name of your temp table.

IF OBJECT_ID('tempdb..##yourTempTable') IS NOT NULL
   DROP TABLE ##yourTempTable


Below this statement enter the same statement to create the global temp table as you used in SSMS.

STEP 3.

Next in the Create Temp Tables Properties, the window to the bottom right, for the section Execution under the option DelayValidation set the value to True. In STEP 1 the temp table is created and visible to Visual Studio, but when the SSIS package is run in the future the table won’t be there to be validated prior to the package running. Without setting this property to true the package would seek to confirm the existence of the temp table and would error when it determined the temp table does not exist stopping the package from running.

Image of Create Temp Table Task Properties showing DelayingValidation option set to True

STEP 4.

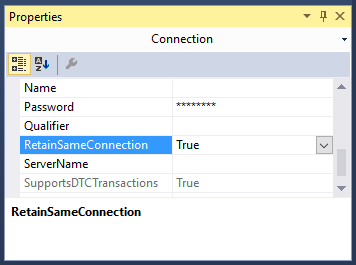
Next at the bottom of the design view window in Visual Studio the current source connection should be displayed. Left click on the source connection and the properties window should change focus to connection properties. Set the RetainSameConnection option to True, this allows the global temp table to remain visible to SSIS package during the package’s execution by maintaining the session.

Image showing the Connection Properties window with the RetainSameConnection option set to true

STEP 5.

Drag a Data Flow Task onto the Control Flow workspace and rename it Query and drag the precedence constraint between the Create Temp Table and Query.

Image showing OLE DB Source creation process

Double left click on the Query Task.

From Other Sources drag an OLE DB Source into the Data Flow workspace.

Double left click on the OLE DB Source and set the OLE DB Connection Manager to your source server and Data Access Mode to SQL Command.

Image of the OLE DB Source Editor Window

Enter your SQL Command in the box provided e.g.

SELECT * FROM ##yourTempTable


Hit OK on the OLE DB Source.

STEP 6.

Set up the destination as you would with any other typical SSIS package.

From Other Destinations drag an OLE DB Destination into the Data Flow workspace.

Then drag the precedence constraint between OLE DB Source to the OLE DB Destination.

Double left click on the OLE DB Destination and choose your destination and set “Table or View – fast load” from the data access mode dropdown. For the “Name of table or view option” enter your intended destination.

Hit OK on the OLE DB Destination.

Finally I would suggest adding another task that will drop the temp tables at the end of the package. For example, DROP TABLE ##yourTempTable.

Conclusion.

At this point you should now be able to run the package successfully and make your own adaptions to this process to fit your future needs.

How to play Quake 3 on your android TV stick using a PS3/4 controllerler.

The following is a tutorial on how to get this awesome FPS (which has aged beautifully and looks fantastic on a big Full HD Screen) onto your android TV stick (ATS), in my case a Tronsmart CX919, but this tutorial will also work for any android device.

Prerequisites:

Firstly in order to use a PS3/4 controller wirelessly your device will need to be rooted. If you do not have your device rooted please see this tutorial written for a CX919 device. (It will likely work for other devices too) Although you can use a keyboard and mouse if you’re old school or the touch controls on the screen if your device is mobile.

Secondly you will need the sixaxis controller app installed and setup on your device. If you do not have it installed please see this tutorial.

Steps to install Quake 3:

Running Quake 3 on an android device is achieved with the use of the Qiii4A app available on google play.

Step 1. Install this app.

QIII4A is a port of ioquake3 (which is a free software first person shooter engine based on Quake 3) to Android. So installing the app provides you with the engine for Quake 3 but not the game.

Therefore THIS APP DOES NOT CONTAIN OR DOWNLOAD ANY OF QUAKE 3 DATA FILES.

(IF YOU JUST WANT SOME FPS MULTIPLAYER ACTION: You have the option to install the game data for OpenArena also. OpenArena is a community-produced deathmatch FPS based on GPL idTech3 technology. There are many game types supported including Free For All, Capture The Flag, Domination, Overload, Harvester, and more.

Just press the button in the launcher app to download and install it.

Happy with just OpenArena?

Job done, you can stop reading now.

Enjoy!

You want more, keep reading.

Step 2. Get a copy of the Quake 3 baseq3 folder.

In order to install the Quake 3 game data you need the “baseq3” folder from the Quake 3 game which you can buy on steam http://store.steampowered.com/app/2200. In order to complete these steps it’s probably best to swap over to using a PC. You can download the game and pull the baseq3 folder from it.

(If you only have an android device at your disposal, you just need the baseq3 folder, oh I wonder where you could find that, wink wink nudge nudge.)

Step 3. Once you have the baseq3 folder.

Create a folder named qiii4a and paste baseq3 into it.

Step 4. Copy and paste the qiii4a folder to the folder specified in QIII4A launcher app

(example of correct path to “baseq3” folder: “/sdcard/qiii4a” directory in launcher). Note: you can also transfer the qiii4a folder to the external SD card of your android device and point the launch app to that location, example “/external_sd/qiii4a” However I would recommend that you have an external sd that is a class 10 micro sd card for the best performance.

Step 5. Launch the qiii4a app.

On  the controls screen check the following:

  • Smooth joystick
  • Hide onscreen buttons and enable mouse
  • Autodetect mouse
  • Mouse cursor position: Top left

On the graphics screen check the following:

  • 32 bit color
  • Screen resolution: Custom, then set the custom to whatever you have your ATS display set to. In my case it’s 1280 X 720
  • MSAA 16x

Step 6. Start the game and change the following settings

Use the right analogue stick to move the cross hair and R1 to select. (Or navigate with the keyboard)

Go to setup:

System > Graphics:

Basically you can just max out all the settings. Take a moment to appreciate how far technology has come that a little matchstick box sized computer that cost around 30 bucks can take all this classic has to throw at it.

Just be sure to set the video mode close to the custom display setting in the  Qiii4A app so aiming syncs up.

System > Controls:

You’ll have to play around with mouse speed until you find something you’re comfortable with. Chances are straight off the bat the controls won’t feel right.

Set smooth mouse on, free look on and map the right analogue stick button press as zoom view.

That’s pretty much it, you’re ready to go.

My advice is that you step through the single player game until you get your eye in and the controls set up comfortably. Once you’re settled you can move onto the multiplayer and play online. Stay away from excessive though, you’ll be eaten alive.

And now for my final thoughts.

In my opinion quake 3 is the best FPS experience on android. Even the latest Call of Duty games are based on the Quake engine in some shape or form so the value of the gameplay cannot be called into question.

In terms of visuals, no it’s not as pretty as Star Wars Battlefront but five minutes into a match and you’ll be too engrossed in taking revenge on the guy that just fragged you to really critique the less than epic visuals.

It’s a game all about blisteringly fast gameplay and android, with it’s still limited hardware, provides the perfect platform on which to appreciate an old classic again.

Android really needs a great FPS to make it a proper gaming platform, and what better FPS than the greatest FPS ever?


report cartoon

How to keep an SSRS Report on one page

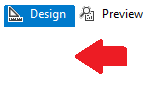
Using visual studio left click just under design to focus on the report.

Image showing where to click

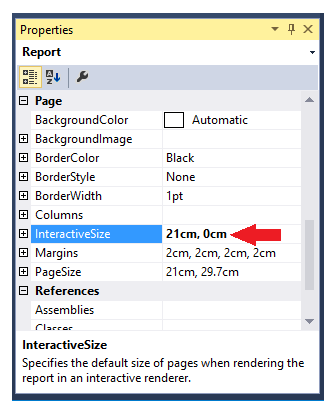
Now the report properties window should be visible in the bottom right of the screen.

Set the interactive height to 0 as shown below.

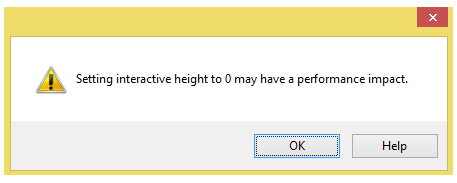
Properties windowYou will get the following warning sign below. Limiting the report to one page, by setting the interactive height to zero, means everything needs to be loaded all at once. This will create lag when a user loads the report and interacts with it.

warning message stating can cause performance issuesIf you are basically using SSRS as a means for end users to pull a data dump via excel, heed this warning. If you just have a few aggregated tables and you want them all on the same page you should be fine.

Image with the text 3000 years later in giant letters

How to provide a dynamic parameter drop-down of year options in SSRS

Say you’ve developed a report which returns data based on a inputted year parameter value, e.g. “give me all the sales in 2014”.

How do you provide the year options for the SSRS report?

Well there’s three ways that come to mind.

Select distinct from a date field, e.g. SELECT DISTINCT YEAR(SalesDate) FROM Sales

This would certainly provide you with all the available years but the database could have millions of sales. So it’s not too efficient.

You could manually populate years in the parameter settings in the SSRS report, kind of primitive but it would work.

But for me the robust and efficient way is the solution provided below.

The following SQL query dynamically populates an integer field in a temporary table with years. The query uses a base year variable, which can be set to as far back as when the required data fields and values existed in the database. A loop then provides the years up to and including the current year. This query can be used to generate a dataset for an SSRS report and then this dataset can then be used to provide parameter values for the report. The report will then always create a list of years between the base year and the current year. Meaning the years parameter will never need to be adjusted again.

(For a tutorial on how to turn a month name and year into dates for the first and last day of the month see this tutorial)

/*Create temp table populated with the years from a base year to the present year*/
IF OBJECT_ID('tempdb..#availableYear') IS NOT NULL
    DROP TABLE #availableYear

CREATE TABLE #availableYear ([Year] INT)

DECLARE @baseYear AS INT
DECLARE @i AS INT

/*Change the base year to the earliest year the database has the required data available*/
SET @baseYear = 2013
SET @i = 0

WHILE @i <= YEAR(GETDATE()) - @baseYear
BEGIN
    INSERT INTO #availableYear
    SELECT @baseYear + @i

    SET @i = @i + 1
END

SELECT * FROM #availableYear

Within the Stored Procedure that populates the report you can then do something like below to make sure the date range matches the year chosen.

DECLARE @yearChosen AS INT

SET @yearChosen = 2013

DECLARE @startDate date
DECLARE @endDate date

SET @startDate = CONVERT(CHAR(4), @yearChosen) + '0101'
SET @endDate = CONVERT(CHAR(4), @yearChosen) + '1231'

PRINT @startDate
PRINT @endDate    

--OR For example

YEAR(SaleDate) = @yearChosen

How to connect your android device to a Playstation 3 or 4 controller wirelessly

A list of directly compatible games is at the bottom of this post.

Prerequisites:

Firstly you will need your device rooted. Rooting the device just means you have administrative privileges on the device, but unlike windows it’s not as simple as just changing a setting. Please see this tutorial on checking if an android device is rooted and this tutorial if you need instruction on rooting your device.

Connecting your PS3/4 controller to your android device:

As with all things android you might have guessed you need an app to connect your device to your Playstation controller. In this case you need the sixaxis controller. Unfortunately the app isn’t free but it is cheap!

However before you go handing over your dosh the guys at dancing pixel studios (strange choice of names considering they don’t seem to make any games) were nice enough to create the sixaxis compatibility checker so you can try before you buy.

Step 1.

Install the compatibility checker from the play store here.

Step 2.

Once installed, open the app and click Start. If you get a connection failed your device is not supported.

Sorry dude.

If not, Yay!

Continue!

Step 3.

Connect your controller to your device with a mini usb cable.

Step 4.

Click pair. This will write your android’s Bluetooth address to the controller. (Don’t worry about the pad not working on the playstation anymore, they’re a terrible console anyway. JK, to reconnect your controller to your playstation just connect the controller via the usb cable and it will write the playstation address back onto the controller.)

Step 5.

Once paired click start on the app. The device is now listening for controllers. If the controller is not turned on press the power button in the center. Now when you press buttons on the controller you should see them appearing on screen.

Congratulations, your device is compatible you now have the honour of buying the app here.

Some setup advice:

When you first use the app you’ll be asked to tick the box recognising Sixaxis Controller as a Keyboard & Input Method. Do so. It asks because this is a security feature as such devices could be potential recording key strokes etc.

In general settings I always have the box Auto Start ticked, this means the app launches whenever the device is turned. For the idle timeout option I set the timeout for 300, which means if the controller is not interacted with for five minutes the app turns the controller off saving the battery. On the subject of battery you can use your device to charge the controller which is nice.

Not all games are compatible even more so if you’re using an Android box or stick:

Native compatible of a game means that it was programmed to accept inputs from controllers some great examples being BombSquad, Asphalt 8, Dead Trigger however, sadly, a lot of games do not support native compatibility.

This could be for a number of reasons, like the developer just never bothered to code compatibility into the app or the app might compete with a console version of the game and the developer doesn’t want to cannibalize the market. Man I wished Fifa had controller support. . .

However the sixaxis controller app comes with a great feature to map button presses. This is especially useful to the PUBG mobile fans out there.

How to do this though is another post in itself so I suggest you google around, there’s plenty of great tutorials out there and the gentle souls of the internet have even created touch profiles for games available to download saving you the trouble of doing the mapping yourself.

Sadly though mapping on many Android boxes and sticks don’t seem to work to well if at all. This is down to these devices often shipping without the necessary touch drivers because they don’t have screens. Which makes sense, why ship a device with touch drivers that doesn’t have a screen? For PUBG mobile players who want to use a controller of course!

The following is a list of games that you can play using the android sixaxis controller app.

Remapping of keys maybe necessary, the correct mapping is as follows.

  • Cross: A
  • Circle: B
  • Square: X
  • Triangle: Y

Games:

I’ll be adding to this list over time so if I’ve missed a game you’ve tested and know to work please comment below.

  1. Dead Trigger (free)
  2. Dead Trigger 2 (free)
  3. Evac
  4. Asphalt 8 (free)
  5. Dead Effect (free)
  6. Beach Buggy Blitz (free)
  7. Beach Buggy Racing (free)
  8. Dream League Soccer (free)
  9. BombSquad (free)
  10. Horizon Chase (free)
  11. PewPew (free)
  12. PewPew 2
  13. Skyriders (free)
  14. ShadowGun
  15. SoulCraft (free)
  16. Real Boxing (free)
  17. Skate Party 2 (free)
  18. GT Racing 2
  19. Manuganu 2 (free)
  20. Shooty Skies (free)
  21. Reckless Racing
  22. Rail Racing
  23. Jet Car Stunts 2
  24. Aces of the Luftwaffe (free)
  25. Tank Riders (free)
  26. Raging Thunder 2 (free)
  27. Annelids (free)
  28. Warlings: Armageddon (free)
  29. Table Top Racing (free)
  30. Sine Mora
  31. Pako – Car Chase Simulator (free)
  32. Sword Of Xolan (free)
  33. Nub’s Adventure (free)
  34. Super Dangerous Dungeons (free)
  35. Only One (free)
  36. Turbo Dismount (free)
  37. Particle Arcade Shooter
  38. Luminescence (free)
  39. Leo’s Fortune
  40. Does Not Commute
  41. Pac-Man (free)
  42. Redline Rush (free)
  43. Radiant (free)
  44. Zenonia
  45. Voxel Rush (free)
  46. Winter Fugitives *
  47. Hopeless *
  48. Tiny Thief *
  49. Smash Hit * (free)

Any other suggestions please feel free to add a comment below.