(This Post was last updated 13/02/2015)
Ok so here’s a quick tutorial on how to root this particular type of Android TV Stick (ATS). Specifically this model: See Link. If you’ve ever flashed a custom rom onto an android device before, forget everything about that, it’s nothing like that, it’s much simpler.
NOTE: you will need a windows PC to root the device and before starting make sure you have a good usb micro b cable you know works!  If you’ve found your way to this page you may have already tried the manual approach which uses the TPSparkyRoot batch script and that hasn’t worked! I’ve been there, you won’t be able to get it working, you were right to continue google searching your way across the net for a method that works, and here it is. . .
But first the obligatory caveat:
I take no responsibility for the welfare of your device. If by following these instructions you should brick your device, that’s your problem buddy. This tutorial will likely work for other devices too though. So if you’ve tried every other tutorial on the net to get your damned device rooted to no avail you might want to follow along. But again I’m not responsible if your ATS explodes.
Back up your device prior to implementing the instructions and you “should” be fine.
And now the tutorial:
STEP 1: Download software
Start by installing the following software:
Moborobo
Kingo
(Use the direct download link to skip downloading the download.com software)
(The reason you need moborobo is that the software is smart enough to determine what driver the PC needs to be able to communicate with the ATS. Chances are, if you tried an alternative method to root the device, the previous methods you tried to root the device failed because you couldn’t find the right driver.)
STEP 2: Prepare the ATS for communication with the PC
In the ATS go to System settings > Storage and click the 3 vertically stacked dots at the top right of the screen.
 Click on the window “USB computer connection” and tick the Mass Storage box.
Next within the systems settings, go to the developer options. (If the developer options are not there it is because they have not been enabled. To enable developer options go to the system settings and click on About Device. Next scroll to “Build Number” and tap it 7 times. After tapping 7 times you will see an alert saying “You are now a developer”/”Developer mode has been enabled”.
After navigating to developer options scroll down and tick the usb degugging option.
STEP 3: Connect the PC to the ATS
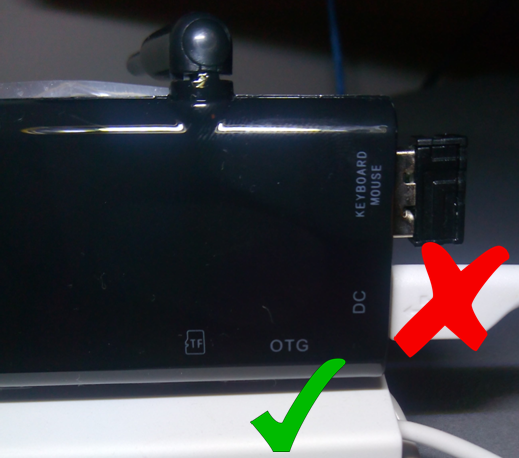
With the ATS connected to your TV via HDMI and powered by the DC usb port, connect the usb micro b cable to the available port.
Make sure you do not use the DC port to connect to the PC otherwise nothing will happen.
 Next connect the ATS to your PC via the USB.
Within system settings on the ATS click on “USB ” and tick “Connect to PC”.
STEP 4: Install the correct driver on the PC
Open the Moborobo software on your PC and wait for it to load completely. Moborobo should now create a connection to the ATS and install some apps on it. Once you see your TV screen switch to the Moborobo app you know the PC successfully connected to the device.
(You don’t need these apps once this process is run. The whole point of using moborobo was simply to install the correct driver on your PC. If the device installs the correct drivers on the PC itself you may not need moborobo to connect to the ATS, in which case continue to the next step.)
STEP 5: Rooting the device
Open Kingo on your PC. It will load for a few seconds.
When a screen appears asking if you want to root it has successfully connected to the device.
Uncheck the install APUS boost+. This is an optimization app not necessary for rooting the device.
Click root.
(Kingo may mistakenly think the device is already rooted in which case click on root again)
 Allow Kingo to run.
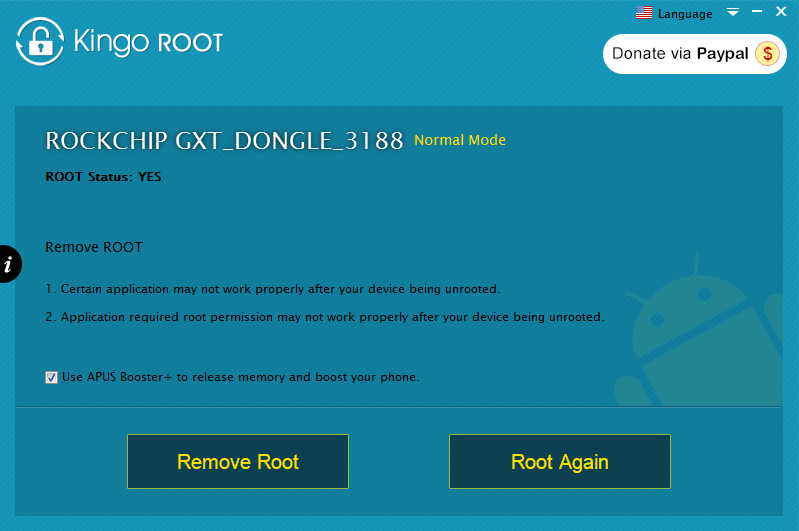
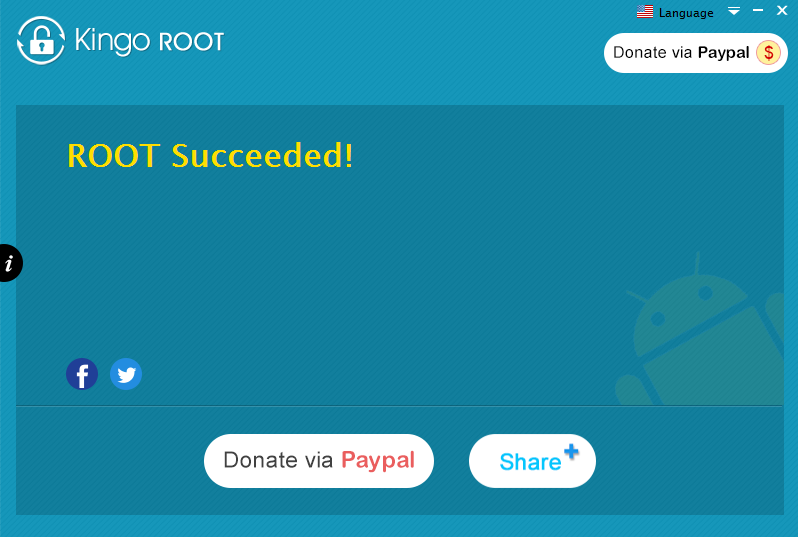
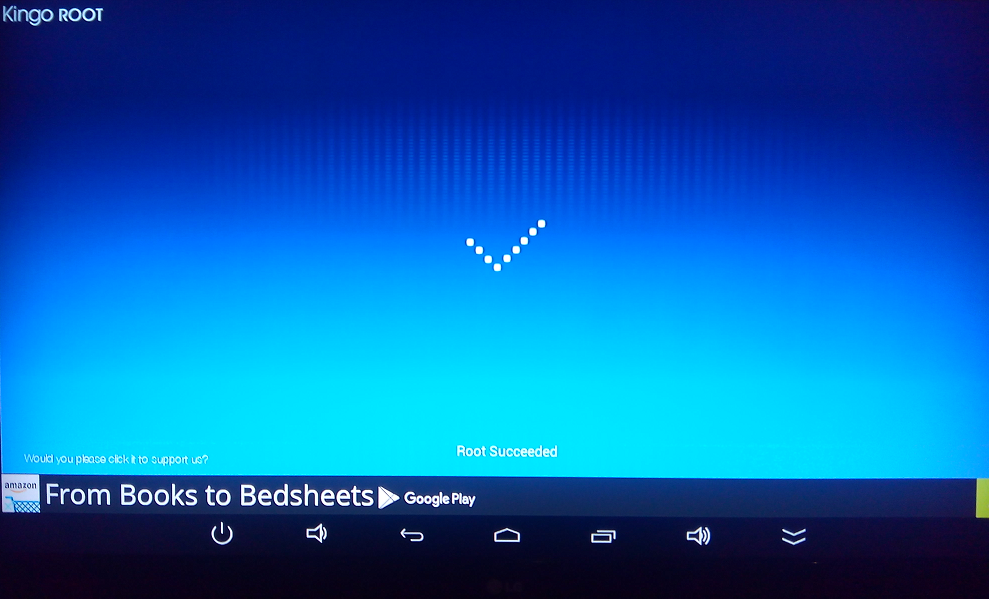
COMPLETION:
Once you see the screens below on your PC and ATS the root was successful.

 Within system settings on the ATS click on “USB ” and tick “Connect to PC”.
TIDYING UP:
You can now uninstall the software on your PC.
And uninstall the following Apps on your device.
- MoboMarket
- Mr.Clean
- Kingo Root
Kingo will install its own SuperUser App which will need to remain but this simply acts as a checker for other apps looking to access system resources which you can either give permission to or deny.
FINAL WORDS:
Hopefully that all worked out for you.
If you used this tutorial successfully please comment below and share.
UPDATE 13/02/2015: Kingo superuser can sometimes grow to take up massive amounts of the device’s storage space. In my case over 600mb!!! Uninstalling the app from the google play store will reduce the app in size without actually uninstalling the app. (The app cannot actually be removed within settings, only disabled) In my case the app shrank to just over 5mb, much better!
Quick Caveat: There have be some online accusations that Kingo superuser steals user data. I cannot confirm this, but I’d imagine if it was a serious concern google would have removed the app from the store by now.