You just pulled a file from Thingiverse and now when you try to slice it in Cura it says “your model is not manifold”. If you just want to make the error go away you can skip to the paragraph “The Fix” if you don’t want to be “filled in” on why it’s happening in the first place. Little bit of 3D printing humour there for ya.
So what does the error mean?
For a model to be manifold you can think of it as having logically enclosed space in a manner that can exist in real life with an outer geometry that can actually be 3D printed.
So what does non-manifold mean?
There’s a couple of reasons why a model is not manifold and here they are:
- Self-intersecting
- Separate Object
- Hole
- Inner Faces
- Overlapping Geometry
Self-intersecting: This is a bit of a weird analogy but imagine punching through yourself. You can’t do that in real life without making a big hole but in a virtual model of yourself you can have the objects of your fist and forearm pass through another body part of your choosing and that’s perfectly fine but in real life you can’t have two objects with mass occupy the same space at the same time so this cannot be printed.
Separate Object: Imagine a model of a figurine wearing sun glasses. If the sun glasses and the figurine were two separate objects and you shrank the figurine by rescaling it to 90% its original size the sun glasses might be left floating in midair. That’s fine for a virtual 3D model but in real life gravity might have something to say about that.
Hole: Pretty self explanatory, there’s a hole in the model and not like a window just a void that makes the model impossible to print successfully.
Inner Faces: Imagine trying to print a model within a model. The slicer reads the code and gets confused because there should only be one outer surface area not two.
Overlapping Geometry: Imagine you have created a 3D model of a house and you’ve accidentally copied the roof and then pasted it back on top of the model over the original roof. The model now has two roofs occupying the same space which cannot be printed.
The Fix:
Ideally you should open the file with some 3D modelling software and fix it manually but if you’re just pulling files from Thingiverse that’s a bit unrealistic. Luckily the following site allows you to upload files and it will try to fix them automatically.
https://3d-print.jomatik.de/en/index.php
If the process successfully fixes the file it will give you the option to download the file with a brief summary of what changes it made highlighting big changes in red.
Its a great solution especially for low risk models but the onus will always be on you to manually inspect the model to see if the problems have in fact been resolved. Also if you’re working on a super secret product design for a company probably best not to upload the model to be fixed online, but for files you’ve pulled from Thingiverse sure why not they’re already publicly available anyway.
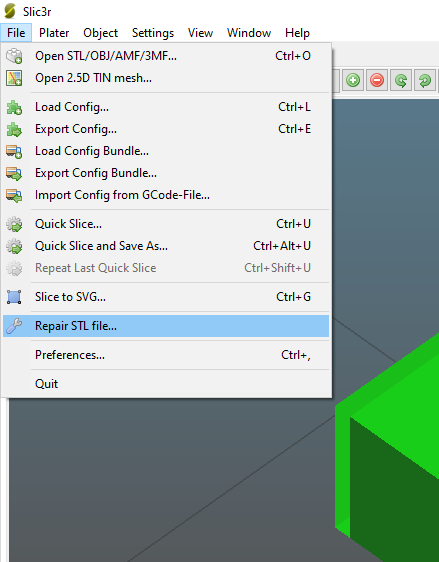
The New Fix:
The website above no longer provides the functionality to automatically make objects manifold unfortunately.
As an alternative solution, download and Install Slic3r.
Start Slic3r, go to file and then “Repair STL file . . .” and load in the file you want to fix.
You will then be able to open the file with Cura and hopefully it should be fixed (note: the solution is a bit hit and miss).
Alternatively download Meshmixer, open the problem file, go to edit and then make solid. This is not a guaranteed fix either but may fix some minor gaps and errors.