If you have been using a query which utilizes temp tables but now you want that query to run as an SSIS package it’s going to need a bit of reworking.
Just adding the query as an Execute SQL Task in Visual Studio won’t work unfortunately if you are using, for example, SELECT * INTO to create the temp tables.
The First step to reworking the query will be to dedicate an Execute SQL Task to creating the temp tables your query uses, defining columns and data types etc. and then populating those tables with INSERT INTO rather than SELECT INTO.
For the following we will assume only one output temp table is required for the process which will be as follows:
- A temp table to store data will be created.
- A query will be used to populate this table.
- This populated temp table will then become the source from which data will be pulled.
STEP 1.
In SSMS connect to what will be the source server and enter the statement to create the required temp table as a global temp table i.e. prefixing the table name with ##. Creating the table as a global temp table at this stage avoids errors when configuring the OLE DB Source in Visual Studio as it allows the table to be visible to the SSIS package.
STEP 2.
In Visual Studios drag a new Execute SQL Task into the control flow and name it, Create Temp Table.

Double click on the task to bring up the Execute SQL Task Editor window.

Step through the process for creating a connection in the connection option and enter the following for the SQL statement option replacing yourTempTable with the name of your temp table.
IF OBJECT_ID('tempdb..##yourTempTable') IS NOT NULL
   DROP TABLE ##yourTempTable
Below this statement enter the same statement to create the global temp table as you used in SSMS.
STEP 3.
Next in the Create Temp Tables Properties, the window to the bottom right, for the section Execution under the option DelayValidation set the value to True. In STEP 1 the temp table is created and visible to Visual Studio, but when the SSIS package is run in the future the table won’t be there to be validated prior to the package running. Without setting this property to true the package would seek to confirm the existence of the temp table and would error when it determined the temp table does not exist stopping the package from running.

STEP 4.
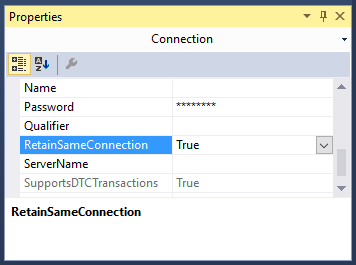
Next at the bottom of the design view window in Visual Studio the current source connection should be displayed. Left click on the source connection and the properties window should change focus to connection properties. Set the RetainSameConnection option to True, this allows the global temp table to remain visible to SSIS package during the package’s execution by maintaining the session.

STEP 5.
Drag a Data Flow Task onto the Control Flow workspace and rename it Query and drag the precedence constraint between the Create Temp Table and Query.

Double left click on the Query Task.
From Other Sources drag an OLE DB Source into the Data Flow workspace.
Double left click on the OLE DB Source and set the OLE DB Connection Manager to your source server and Data Access Mode to SQL Command.

Enter your SQL Command in the box provided e.g.
SELECT * FROM ##yourTempTable
Hit OK on the OLE DB Source.
STEP 6.
Set up the destination as you would with any other typical SSIS package.
From Other Destinations drag an OLE DB Destination into the Data Flow workspace.
Then drag the precedence constraint between OLE DB Source to the OLE DB Destination.
Double left click on the OLE DB Destination and choose your destination and set “Table or View – fast load” from the data access mode dropdown. For the “Name of table or view option” enter your intended destination.
Hit OK on the OLE DB Destination.
Finally I would suggest adding another task that will drop the temp tables at the end of the package. For example, DROP TABLE ##yourTempTable.
Conclusion.
At this point you should now be able to run the package successfully and make your own adaptions to this process to fit your future needs.

Awesome! Great stuff. Thanks
LikeLike
Awesome! worked Thanks
LikeLike
Glad to help.
Thanks for the comment.
LikeLike
Exactly what I needed – thanks!!
LikeLike